Azure – Networking – Part 3 – Subnet in Azure

Hello Friends,
Let’s continue with Azure Virtual Network in this articles. We have started a journey with Azure networking and this is the 3rd article on this series. If you have missed our last articles, please check it in following links.
Part 1 – Basics of Azure Networking
Part 2 – Azure Virtual Network (Vnet)
Next Article : Part 4 – Network Security Group (NSG) in Azure
In this article we will discuss about Subnet, one more important terminology of Azure networking.
As we know, virtual network (VNet), is a representation of a network in the cloud. In our organisation we are having our own networks and many resources are communicated with each other through this network. In Azure we have same concept of virtual networks only replacing physical machines and resources with virtual machine (VM) and services.
V-net is a logical division of Subnets. When create one V-net, we can define only one subnet and later we can add more subnet to the v-net if required. In a subnet we can have one or more VMs or cloud services. We can also create a V-Net that has multiple subnets by using Azure CLI or PowerShell. When creating a subnet, the address range must be defined and it’s range must be inside the address range of V-Net of the subnet.
for example: lets consider our VNet , which we have created in our last demo. In our last article, we have created one virtual network (KJ_VNet ). The address range of KJ_VNet was set to 10.1.0.0/16. We can add many subnet to KJ_Vnet but the virtual network address range need to be verify before adding new subnets. In this article , we are going to create two separate subnets and the address range must satisfy the IP mash set for the VNet.
we know we have V-Net with the address range of 10.1.0.0/16 .when adding new subnet to KJ_VNet the address range of each subnet must fall under the address range of V-Net. So lets create two subnet with the address range as in following example.
V-Net name and address range : KJ_VNet : 10.1.0.0/16
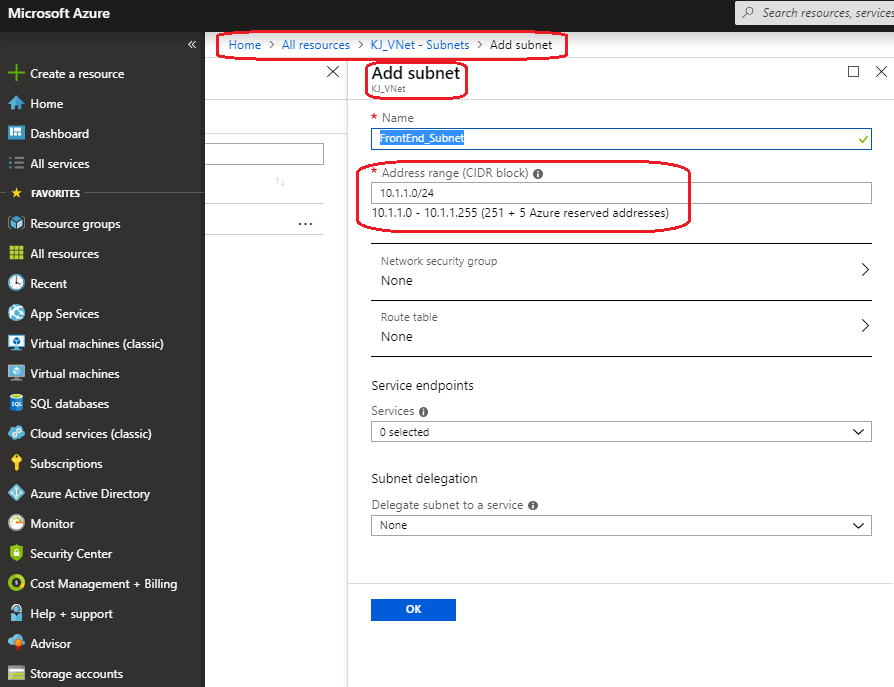
1st Subnet name and address range is : FrontEnd_Subnet : 10.1.1.0/24
2nd Subnet name and address range is : BackEnd_Subnet : 10.1.2.0/24
In the above two subnet each section of the subnet mask can contain a number from 0 to 256 . The number of IP can be vary as per the mask, as shown bellow. We can find more detail calculation on Subnet mask here.
Subnet Mask Cheat Sheet
| Mask | Addresses | Hosts | Netmask | Amount of a Class C |
|---|---|---|---|---|
| /30 | 4 | 2 | 255.255.255.252 | 1/64 |
| /29 | 8 | 6 | 255.255.255.248 | 1/32 |
| /28 | 16 | 14 | 255.255.255.240 | 1/16 |
| /27 | 32 | 30 | 255.255.255.224 | 1/8 |
| /26 | 64 | 62 | 255.255.255.192 | 1/4 |
| /25 | 128 | 126 | 255.255.255.128 | 1/2 |
| /24 | 256 | 254 | 255.255.255.0 | 1 |
| /23 | 512 | 510 | 255.255.254.0 | 2 |
| /22 | 1024 | 1022 | 255.255.252.0 | 4 |
| /21 | 2048 | 2046 | 255.255.248.0 | 8 |
| /20 | 4096 | 4094 | 255.255.240.0 | 16 |
| /19 | 8192 | 8190 | 255.255.224.0 | 32 |
| /18 | 16384 | 16382 | 255.255.192.0 | 64 |
| /17 | 32768 | 32766 | 255.255.128.0 | 128 |
| /16 | 65536 | 65534 | 255.255.0.0 | 256 |
I found the above chat table from the following articlehttps://www.aelius.com/njh/subnet_sheet.html
Why we need subnet :
As we already discussed that VNet is a logical collection of subnets. All subnets must divide the VNet Address range among them in a way, so that no subnet overlap the address range of other subnet.
In Azure Sub-netting is the strategy used to partition a single virtual network (VNet) into more than one smaller logical sub-networks (Subnets). An IP address includes a network segment and a host segment.The main purpose of sub-netting is to help relieve network congestion by handling network traffic and helping to maintain the security as well.
Create new Subnets in Azure Portal:
We will continue with our last article, where we have created a V-Net. In this article, we will describe , how to create multiple subnets and logically divide our existing virtual network (KJ_VNet) address range (10.1.0.0/16) between subnets.
So let’s now proceed to add two new Subnet to our existing Azure Virtual Network.
1. Connect to your Azure portal dashboard using your subscription account. If you don’t have any subscription, in that case you can get trial Azure subscription with one-month of validity. Then you can connect to the azure portal dashboard as in following figure.
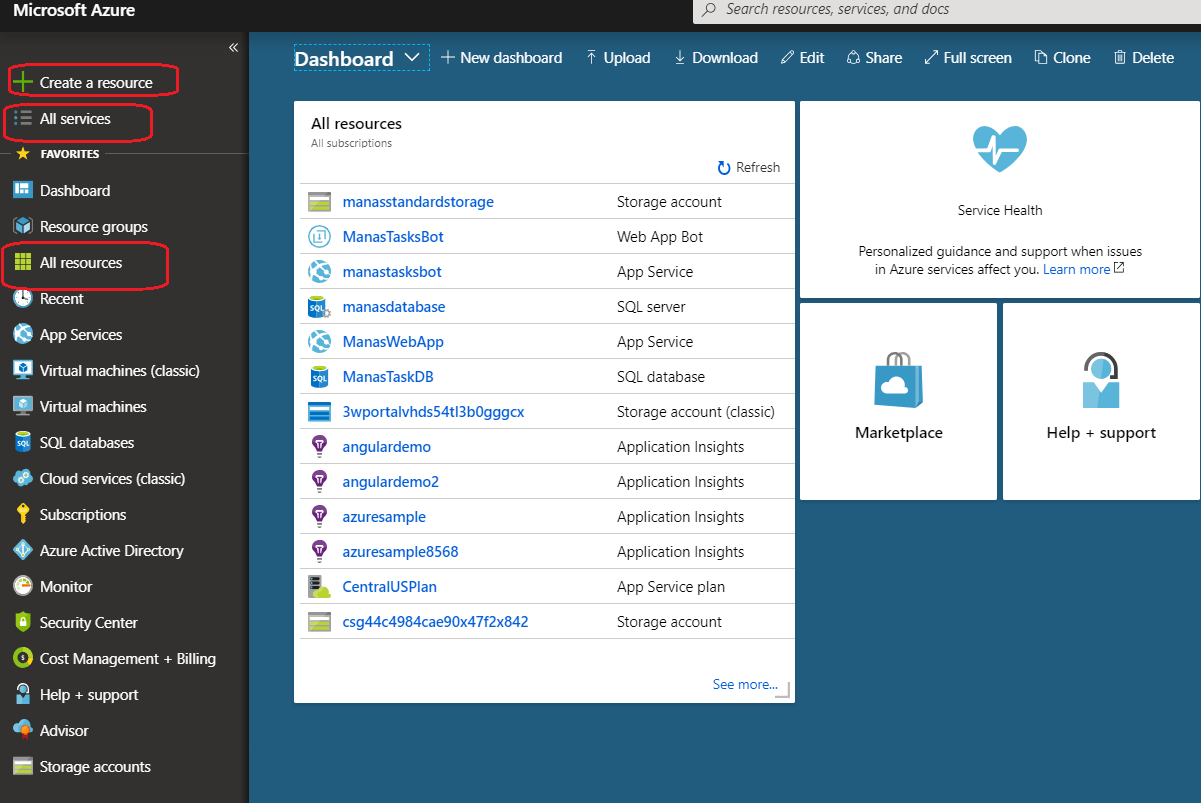
2. On the left side menu of the screen, select All resource > Select KJ_VNet as shown in the following figure.

3. As shown in the above figure , click on +Subnet button. This will took us to add a new Subnet to the existing Azure virtual network and allow to provide required information for our first FrontEnd_Subnet, as shown in the following figure. There is another button + Gateway Subnet , which create a gateway subnet. Here I am not going in detail about Gateway Subnet but a VNet in Azure infrastructure services that is connected to other networks must have a gateway subnet, which contains the systems that exchange packets with other networks.
4. Same way we can add our second Subnet for BackEnd_Subnet . Following figure shown both of the newly added Subnets. We can see in the following figure, each subnet has 251 available address, because , Azure reserve the first 4 addresses and the last address of every Subnet for its internal use.

In the above example , we see how to add subnet using Azure portal. we can also add subnet to the existing V-Net using Power shell and CLI.
Create new Subnets in Power Shell :
The Add-AzureRmVirtualNetworkSubnetConfig is used to add a subnet to the in-memory representation of the virtual network. The Set-AzureRmVirtualNetwork command updates the existing virtual network with the new subnet. In below power shell script, we are creating one V-Net (“10.2.0.0/16”). The script is adding a default subnet (FrontEndSubnet_PS ,10.2.1.0/24) when creating the V-Net and then adding a new subnet (BackEndSubnet_PS, 10.2.2.0/24) to the exiting V-Net.
New-AzureRmResourceGroup -Name TestResourceGroup -Location centralus
     $frontendSubnet = New-AzureRmVirtualNetworkSubnetConfig -Name FrontEndSubnet_PS -AddressPrefix "10.2.1.0/24"
     $virtualNetwork = New-AzureRmVirtualNetwork -Name MyVirtualNetwork -ResourceGroupName TestResourceGroup -Location centralus -AddressPrefix "10.2.0.0/16" -Subnet $frontendSubnet
     Add-AzureRmVirtualNetworkSubnetConfig -Name BackEndSubnet_PS -VirtualNetwork $virtualNetwork -AddressPrefix "10.2.2.0/24"
     $virtualNetwork | Set-AzureRmVirtualNetwork
Create new Subnets in CLI :
Following is the syntax of CLI to add a new subnet to the existing VNet.
az network vnet subnet create –address-prefixes –name –resource-group –vnet-name [–delegations] [–network-security-group] [–route-table] [–service-endpoint-policy] [–service-endpoints] [–subscription]
az network vnet subnet create -g MyResourceGroup --vnet-name MyVirtualNetwork -n MySubnet --address-prefix 10.2.3.0/24 As I am new to this and exploring Azure networking, please do comment or suggest, if I missed any thing important or my understanding is not correct. So that I could update my articles. My next article of this series is Part 4 – Network Security Group (NSG) in Azure
Thanks for reading 🙂
Keep reading, share your thoughts, experiences. Feel free to contact us to discuss more. If you have any suggestion / feedback / doubt, you are most welcome.
Stay tuned on Knowledge-Junction, will come up with more such articles.


7 Responses
[…] Subnet or Subnetwork is logical division of huge network IP range. We have huge IPv4 range from 0.0.0.0 to […]
[…] Part 3 – Subnet in Azure Network […]
[…] Part 3 – Subnet in Azure Network […]
[…] Part 3 – Subnet in Azure Network […]
[…] Part 3 – Subnet in Azure Network […]
[…] Azure — Subnet […]
[…] Chapter 3 – Subnet in Azure […]