Azure – Networking – Part 21 – Azure Route Table 2 – Configure User Define Route (UDR)

Hello Friends,
First of all, Thank you so much for your useful comments and questions on our last topic. In our last article Part 20 – Azure Route Table, we have discussed about the basic concept of Azure Route Table. Today in this article, we will continue with the same topic and will configure a User Define Route Table (UDR). So let’s start :).
Tool Installation Articles :
- Configure Azure Command Line Interface ( Azure CLI) On Windows
- Configure PowerShell For Microsoft Azure Az Module On Windows
Previous Azure Series :
- Learn Basics Of Azure Networking In 100 Hours
- Learn Basics Of Microsoft Azure Storage services
- Learn Basic Of Azure Active Directory And Azure Identity And Access Management
- Azure DevOps – Learn at one place
- Learn Basics Of Lift-And-Shift Migration To Azure
If you have missed our previous articles on azure networking, please check it in following links.
Part 1 – Basics of Azure Networking
- *
- *
- *
Part 12 – Azure VPN Network Gateway
Part 13 – Configure Azure Point-to-Site VPN
Part 14 – Configure Azure VNet-to-VNet Connection
Part 15 – Configure Azure Site-to-Site VPN Connection
Part 16 – Azure Virtual Network (VNet) peering
Part 17 – VNet Peering 2 – Hub-spoke VNet topology
Part 18 – Azure Traffic Manager 1
Part 19 – Azure Traffic Manager 2 -Create Traffic Manager Profile using (Cloud Shell)
Next Article : Part 22 – Azure Load Balancer – Overview
Flash-back :
As we know in our last article, Azure uses system routes to direct network traffic between virtual machines, on-premises networks, and the Internet. Here are the examples of system routes.
- Traffic between VMs in the same subnet.
- Between VMs in different subnets in the same virtual network.
- Data flow from VMs to the Internet.
- Communication between VMs using a VNet-to-VNet VPN.
- Site-to-Site and ExpressRoute communication through the VPN gateway.
But some time we want our traffics must traverse as per the requirement rather using default system route. In that case, we need to define custom/user define routes to override the default routes.
Use case:
We have our front end application (KJ-VM) under a Public subnet (KJ_FrontEnd_Subnet) and also we have our backend server (MSTechs-VM) under a private Subnet ( MSTech_Backend_Subnet). we are also maintaining a network virtual appliance (NVA) under a DMZ subnet ( NetAppli_Dmz_Subnet). For security reason, the requirement is all traffics from KJ-VM towards MSTechs-VM must go through the NVA ( Net-Vir-App-VM) DMZ subnet ( NetAppli_Dmz_Subnet) . To achieve the above requirement, we need to configure our User Define Route Table with KJ_FrontEnd_Subnet subnet, so that the next hop of all traffics leaving this subnet must be Net-Vir-App-VM . Then Net-Vir-App-VM will foreword the traffic to MSTechs-VM . Let’s configure the use case.
Configuration :
To configure our use cases I would use PowerShell. Open power-shell from Azure portal as shown in the following figure.

We need following list of resources for our use case.
- 1 Resource Group (RouteTableRG)
- 1 Virtual Network (KJ_Vnet)
- 3 Subnets (KJ_FrontEnd_Subnet, MSTech_Backend_Subnet, NetAppli_Dmz_Subnet)
- 1 Network Interface Card ( Network_Appliacne_NIC)
- 3 Virtual Machines ( Net-Vir-App-VM, KJ-VM, MSTechs-VM)
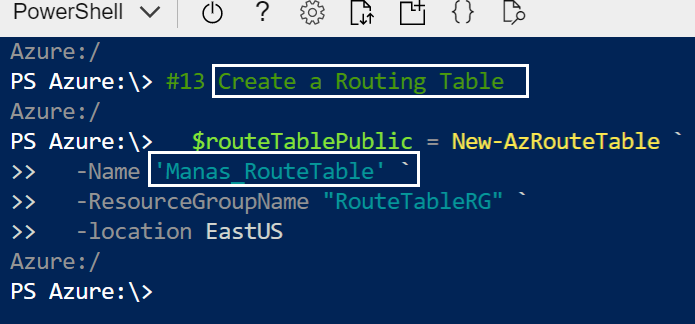
- 1 Route Table With User Define Routes (Manas_RouteTable)
Let start to create all of the above resources using following power-shell comand.
A. Connect to Azure and create a resource group as shown in the following figure.

B. Create a new Virtual Network (KJ_Vnet) as shown in the following figure.

C. Create three subnets ( KJ_FrontEnd_Subnet, MSTech_Backend_Subnet, NetAppli_Dmz_Subnet ) into KJ_VNet Virtual network.


D. Lets update KJ_VNet after adding Subnets and get VNet and DMZ subnet for further use as shown in the following figure.

E. Create a NIC card and enable Network forwarding and associate it with NetAppli_Dmz_Subnet as show in the following figure.

F. Create all 3 VMs (Net-Vir-App-VM, KJ-VM, MSTechs-VM) in each subnets.

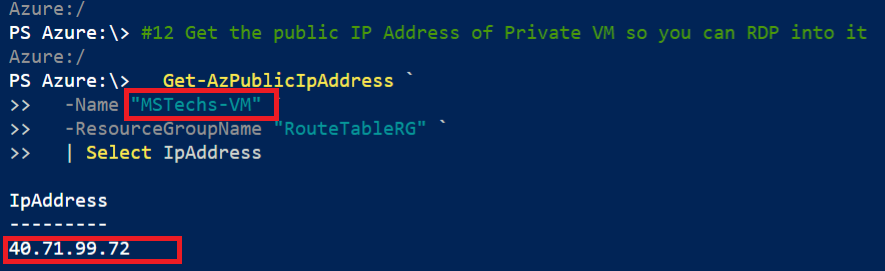
G. Get the public IP Address of Private/backend VM so we can RDP into it as shown in the following figure.

H. Create a routing table as shown in following figure.

I. Configure one User Define Route in the above “Manas_RouteTable” as shown in the following figure.

J. Associate Route Table with the Front End Subnet (KJ_FrontEnd_Subnet).

K. Connect to Private VM by using Public IP address of the VM. We have already get the Public IP of the MsTechs-VM as 40.71.99.72 .
L. Create Firewall rule to allow ICMP packets on both KJ-VM and MsTechs-VM VMs. tracert.exe command is used to test routing and it uses the Internet Control Message Protocol (ICMP), which is by default denied through the Windows Firewall. By using hte following command on both VM we can enable ICMP for both VMs. To enable ICMP on KJ-VM we can log in to KJ-VM from MSTechs-VM and run the following power shell command.
New-NetFirewallRule -DisplayName “Allow ICMPv4-In” -Protocol ICMPv4

M. Enable port forwarding on Network-Appliacne-VM. connect to Network-Appliacne-VM from MSTechs-VM and run following power shell command and restart the VM to finish the configuration.
Set-ItemProperty -Path HKLM:\SYSTEM\CurrentControlSet\Services\Tcpip\Parameters -Name IpEnableRouter -Value 1
To enable Port Forwarding on Network-Appliacne-VM .We also need to enable IP forwarding within Azure for the VM’s network interface card as shown in the following figure.

But we have already done it through power shell as in following figure.

N. Now we are done with all our configuration and time came to test the route table. For testing , we need to perform following two test cases.
Test 1: Run following command from KJ-VM . It will show that packets are transmitted via Net-Vir-App-VM hosted in NetAppli_Dmz_Subnet.
Tracert MSTecs-VM
Test 2: Test the traffic from MSTecs-VM to KJ-VM . We will use the following command from MSTecs-VM .
Tracert KJ-VM
You can find the attached power shell script here .
With this article, I am concluding this article. Soon I will now come up with a new topic.
Next Article : Part 22 – Azure Load Balancer – Overview
Thank you so much for your support and suggestions till now.
Keep reading, share your thoughts, experiences. Feel free to contact us to discuss more.
If you have any suggestion / feedback / doubt, you are most welcome. Stay tuned on Knowledge-Junction, will come up with more such articles.
Thanks for reading 🙂 .


6 Responses
[…] Part 21 – Azure Route Table 2 – Configure User Define Route (UDR) […]
[…] Part 21 – Azure Route Table 2 – Configure User Define Route (UDR) […]
[…] Part 21 – Azure Route Table 2 – Configure User Define Route (UDR) […]
[…] Part 21 – Azure Route Table 2 – Configure User Define Route (UDR) […]
[…] Chapter 21 – Azure Route Table 2 – Configure User Define Route (UDR) […]
[…] Part 21 – Azure Route Table 2 – Configure User Define Route (UDR) […]