M365 / Azure – Power Platform – Trigger Power Automate from .Net Core application / Azure web job using RestSharp

Hi All,
Greetings for the day 🙂 LIFE IS BEAUTIFUL 🙂 I hope we all are safe 🙂 STAY SAFE, STAY HEALTHY 🙂
Background / Use Case : In one of our application we have
- Azure Job (.Net core console application scheduled as web job in Azure App Service) which is fetching data from Azure SQL
- The data collected from Azure SQL we need to pass to Power Automate in JSON format
- So we need to trigger the Power Automate with parameters from our .Net console application / Azure web job
Take away from this article:
- In this article we will understand how to trigger Power Automate from .Net console application / Azure web job using RestSharp
Prerequisites:
- RestSharp NuGet package
- RestSharp.Newtosoft.Json package
- PowerAutomate URL to trigger Power Automate
Details:
- Create .NET Core console application
- We will use RestSharp APIs to trigger our PowerAutomate
- Make sure respective NuGet package is installed for RestSharp as shown in below Fig:


- We need PoerAutomate URL
Power Automate details:
- I am working on PowerAutomate which automates adding guest user to the given M365 Group
- I’ll write separate article for this but following is the snap for the same
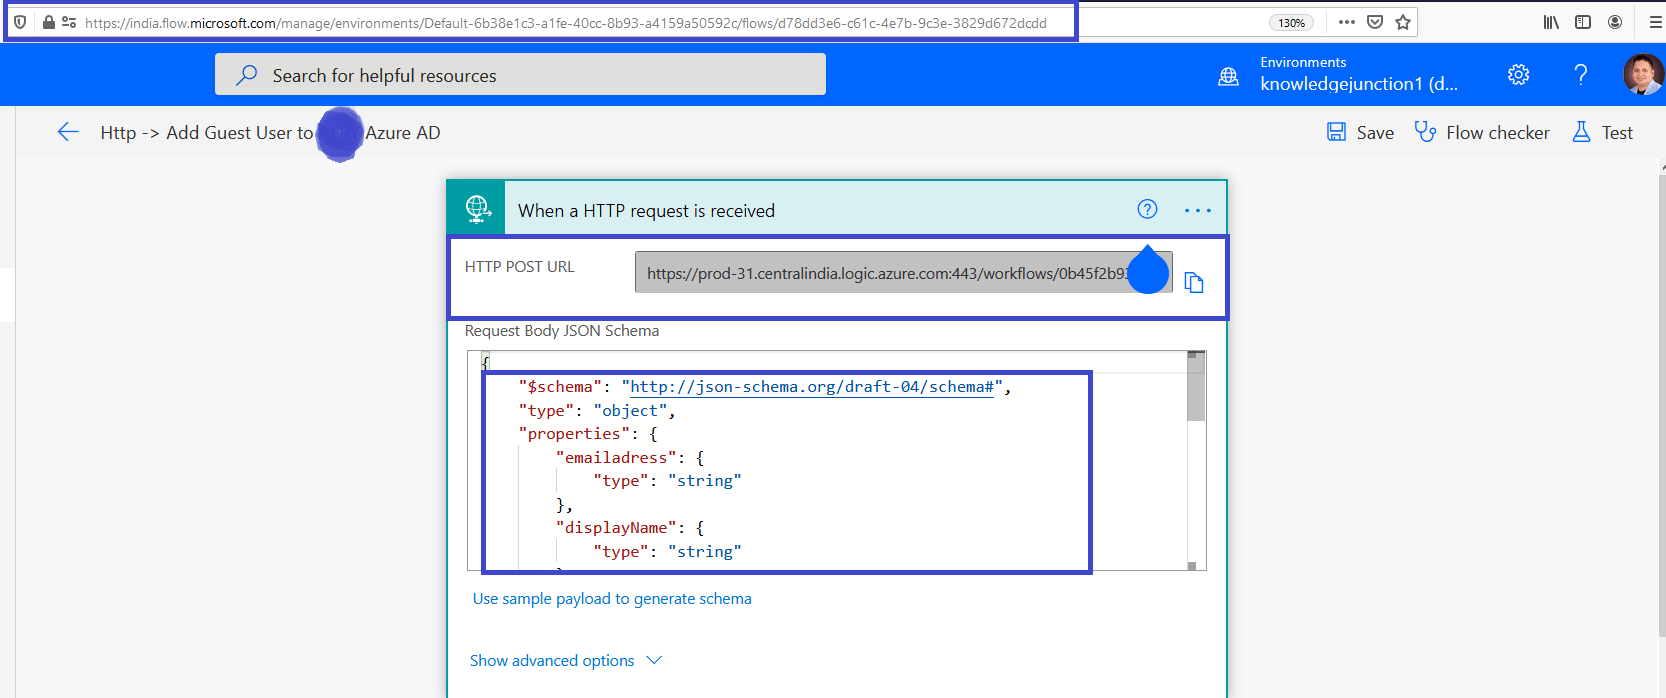
- Respective JSON body for Power Automate:
{
    "$schema": "http://json-schema.org/draft-04/schema#",
    "type": "object",
    "properties": {
        "emailadress": {
            "type": "string"
        },
        "displayName": {
            "type": "string"
        },
        "groupName": {
            "type": "string"
        },
        "groupOwner": {
            "type": "string"
        },
        "groupID": {
            "type": "string"
        }
    }
}- Here to trigger PowerAutomate from our Azure web job we need PowerAutomate URL.
- Copy PowerAutomate URL – HTTP POST URL as shown in above fig
Azure web job details / code :
- Once we have prerequisites in place we are ready for coding 🙂
- For PowerAutomate we need to send the details in JSON format
- So lets build require JSON
- We need external / guest user email address
- M365 Group ID
- Lets have a class – Guest User Details as
namespace KnoweldgeJunctionWebJob
{
    public class GuestUserDetails
    {
        public string emailadress { get; set; }
        public string displayName { get; set; }
        public string groupName { get; set; }
        public string groupOwner { get; set; }
        public string groupID { get; set; }
    }
}- Build require JSON continues…
- Instantiate the above class and prepare JSON body as
//Instantiating guest user details class
var guestUserDetails = new GuestUserDetails
{
  emailadress = "psabadra@gmail.com",
  displayName = "Prasham Sabadra",
  groupID = "a93adb24-322b-4443-a40d-b0aeebc56649",
  groupOwner = "prasham@knowledgejunction1.onmicrosoft.com",
  groupName = "KnoweldgeJunction"
};

//preparing JSON body
var jsonBody = Newtonsoft.Json.JsonConvert.SerializeObject(guestUserDetails);- Once we have JSON ready to pass to PowerAutomate, we are ready to trigger the PowerAutomate using RestClient and RestRequest APIs from RestSharp namespaces as shown in below code
//Power Automate URL
var url = "My Power Automate URL";
var client = new RestClient(url);
var restRequest = new RestRequest(Method.POST);
restRequest.AddHeader("content-type", "application/json");
restRequest.AddParameter("application/json", jsonBody,
                          ParameterType.RequestBody);
var response = client.Execute(restRequest);
string result = response.Content;
Complete code:
//FLOW URL Copied in Previous Step

 var url = "My Power Automate URL";

 var guestUserDetails = new GuestUserDetails
 {
    emailadress = "psabadra@gmail.com",
    displayName = "Prasham GMAIL",
    groupID = "a93adb24-322b-4443-a40d-b0aeebc56649",
    groupOwner = "prasham@knowledgejunction1.onmicrosoft.com",
    groupName = "KnoweldgeJunction"
  };

 var jsonBody =
  Newtonsoft.Json.JsonConvert.SerializeObject(guestUserDetails);

  var client = new RestClient(url);
  var restRequest = new RestRequest(Method.POST);
  restRequest.AddHeader("content-type", "application/json");
  restRequest.AddParameter("application/json", jsonBody,
                          ParameterType.RequestBody);
  var response = client.Execute(restRequest);
  string result = response.Content;
As we are done with the code we could publish this application as Azure Web Job.
We already have covered the detailed steps to publish our .Net core application as Azure Web Job in our article – Azure – Connect to Key Vault from .Net Core application using Managed Identity – Part 3 – Publishing / Deploying .Net core console application as a Azure WebJob and Schedule it please have a look once 🙂
I’ll stop here 🙂
Thanks for reading 🙂 If its worth at least reading once, kindly please like and share. SHARING IS CARING 🙂
Share In Teams:Enjoy the beautiful life 🙂 Have a FUN 🙂 HAVE A SAFE LIFE 🙂 TAKE CARE 🙂


You must be logged in to post a comment.