Microsoft Azure Storage and Database Part 4 – Work With Azure Blob Storage

Hello Friends,
Hope you all are doing good !!! 🙂 .
In our last article we have discussed on Azure Blob Storage. Today in this article we will continue with Blob Storage and discuss how to Create and Communicate with our blob storage. As we know the Blob storage service is one of the finest service provided by Azure.
Previous Azure series :
- Learn Basics Of Azure Networking In 60 Hours
- Learn Basic Of Azure Active Directory And Azure Identity And Access Management
- Azure DevOps – Learn at one place
If you have missed our previous articles on Azure Storage and Database Series, please check it in following links.
Part 1 – Overview Of Azure Storage and Database
Part 2 – Azure Storage Account
Next Article : Part 5 – Storage Explorer For Azure Storage
Configure Blob Storage using Portal :
As we discussed in our last article that an Azure storage account can have unlimited number of containers, in turn a container can have an unlimited number of blobs. A container is a logical directory for a set of blobs.
So As per the hierarchy, we must have our Storage Account and Container ready before go for any Blob. Let’s go through the following steps and see, how to create and configure Blob through Azure portal.
Step 1 : Login to Azure portal If we have a subscription, create a free account before you begin.
Step 2 : Select our storage account ( kj21storageacount) in the Azure portal as shown in the following figure. If you don’t have any storage account, create one new storage account by following our previous article Part 2 – Azure Storage Account.
Step 3 : In the left menu of storage account, scroll to the Blob service section, then select Containers. As we can see in the following figure, we don’t have any Container exists under our storage account.

So let’s add one Container as it is required to hold all blobs.
Step 4 : Select the + Container button to create a new container and let’s provide a meaningful name for our new container. The container name must be lowercase, start with a letter or number and can include the dash (-) character as showing in the following figure.
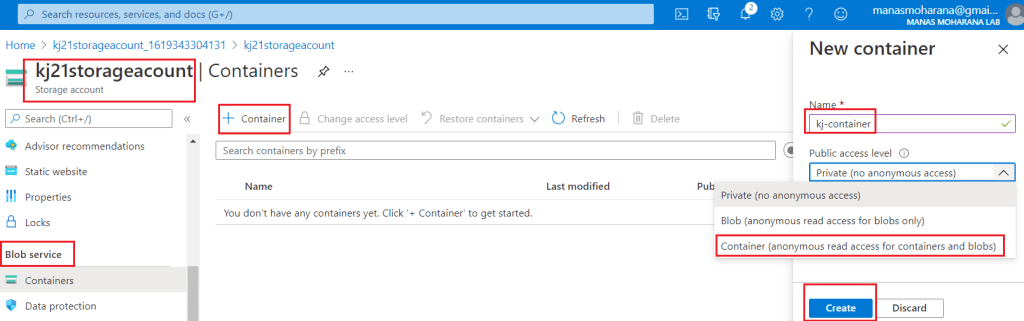
Step 5 : Configure the Public access level of the container. Here we have set it to Container(anonymous read access for containers and blobs) for testing purpose but it should be configure as per the requirement. Then click Create button to create the container and our container will be ready as showing in the following figure.

Now we are ready to create our Blobs. As we know there are three types of Blob ( Block Blob, Page Blob and Append Blob) but Block blob are used in most of the cases because of its simple nature and ideal for storing text and binary data in the cloud, like files, images, and videos. In this example I would like to use Block Blob and will upload pdf files.
Step 6 : Navigate to our newly created container. As this container is new, so it won’t yet contain any blobs.
Step 7 : Select the Upload button to open the upload blade and browse our local file system to find a file to upload as a block blob. As showing in the following figure we can optionally expand the Advanced section to configure other settings for the upload operation.

Also we can upload files in a hierarchal order by creating folders as I have uploaded my second file under a folder.


As showing in the following figure, there are many options available to manage our blobs through portal for example Download, Change access level, Delete selected blob, change tier etc.

Working With Blob Storage Using PowerShell :
In the above section, we have seen, how to manage Blob storage through portal. In this section we will discuss, how to communicate and list out all available blob in our container using powershell. So let’s start.
Step 1 : Login to Azure portal and open Cloud Shell and select PowerShell as showing in the following figure.

Step 2 : Use Get-AzStorageAccount to get our storage account by providing the Storage Account name and Resource Group name as showing in the following figure.

Step 3 : Once we got our Storage Account, let’s check its Context by using it property. In the following figure we can see the URL of our blob endpoint and other details of the Storage Account.

Step 4 : Use Get-AzStorageBlob to get a list of all available blobs by providing Storage Account context and container name as parameter as showing in the following figure.

In the above figure we can see the list of available blobs and their details. Now let’s access each blob and try to get the size of each blob s showing in the following figure.

The same way we can use power shell to create new container, upload new blobs , download blobs and many more operations.
I hope this is informative to you. Please let me know if I missed anything important or if my understanding is not up to the mark.
Next Article : Part 5 – Storage Explorer For Azure Storage
Keep reading, share your thoughts, experiences. Feel free to contact us to discuss more.
If you have any suggestion / feedback / doubt, you are most welcome. Stay tuned on Knowledge-Junction, will come up with more such articles.
Thanks for reading 🙂 .


Nice article Manas, thanks for sharing it.