Power Platform: Power Apps Tabbed Form with good looking design.

“Whatever you are, be a good one.”
.
Hello Everyone,
Hope you all are doing well.
Today in this article I am going to discuss about how to create tabbed form in PowerApps.
We have good number of articles on Power Platform, please have a look.
https://knowledge-junction.in/category/technology-articles/power-platform/
So without getting late, lets get started.
Background
In one of our project requirement is to develop a very long PowerApps form. We prepared a PowerApps form and use tabs to avoid the scroll bar on the form. And also designed the app with decent looking style.
Introduction
PowerApps:
Power Apps is a suite of apps, services, and connectors, as well as a data platform, that provides a rapid development environment to build custom apps for our business needs. Using Power Apps, we can quickly build custom business apps that connect to our data stored either in the underlying data platform or in various online and on-premises data sources (such as SharePoint, Microsoft 365, Dynamics 365, SQL Server, and so on).
Canvas App:
A canvas app is commonly seen in tablet or mobile apps when embedded in a Power BI dashboard. It’s exactly how it sounds – we get a blank canvas. From that, we can drag, drop, move, resize and reformat the components where we need them to build our user interface.
Power Apps Tabbed Form:
When a Power Apps form is very long a tabbed form can make it more organized and easier to use. A tabbed form is simple to build – create one button for each tab at the top of the form, when the user clicks on a tab store its name in a variable and then show only fields that should appear on that tab. Our users will love having all similar fields grouped together one screen without having to scroll.
SharePoint:
Microsoft SharePoint is a cloud-based service that helps organizations share and manage content, knowledge, and applications to:
- Empower teamwork
- Quickly find information
- Seamlessly collaborate across the organization
SharePoint List:
A list is a collection of data that we can share with our team members and people who we’ve provided access to. We’ll find a number of ready-to-use list templates to provide a good starting point for organizing list items.
Highlights
• Setup The SharePoint List
• Insert Buttons To Use As Power Apps Form Tabs
• Track The Current Tab Name In A Variable
• Change The Button Fill for Current Form Tab Selection
• Insert A Single Column Edit Form
• Show Form Fields Only For The Current Tab
• Move the Tabs with Continue Buttons
• Saving Data In A Tabbed Form
Detailed Steps
Setup The SharePoint List
Create a new SharePoint list called New Employee Details with the following columns. All columns are type single-line text apart from Comments which is type multiple-line text.
- Name
- Employee Id
- Job Title
- Department
- Director
- Mobile Phone
- Street Address1
- Street Address2
- City
- State Province
- Comments
Insert Buttons to Use as Power Apps Form Tabs
Open Power Apps Studio and create a new tablet app from blank.
Insert a new label with the text “New Employee Details” at the top of the screen to serve as a title bar.
Use this code in the following property of the label.
Size: 40

FontWeight: Bold

Align: Center

Height: 100

PaddingLeft: 5

PaddingRight: 5

PaddingTop: 5

PaddingBottom: 5

Width: App.Width

Color: RGBA(255, 0, 0, 1)

BorderStyle: Solid

BorderThickness: 5

BorderColor: RGBA(0, 18, 107, 1)

X: 0

Y: 0
Then create 4 new buttons which will become the form tabs. Position them side-by-side at the bottom-canter of the title bar label. Each button’s text should reflect the name our form tabs: GENERAL, CONTACT INFO, LOCATION and SUBMIT.
To match all tabs properties, use this code in the following properties of the tab buttons.
Size: 25

FontWeight: Bold

Align: Center

Height: 70

RadiusTopLeft: 10

RadiusTopRight: 30

RadiusBottomLeft: 30

RadiusBottomRight: 10

Track The Current Tab Name in A Variable
Next, we will write the logic to track which form tab the user is currently viewing.
Write this code in the OnSelect property of each button to set the current tab to match the button’s text.
For GENERAL tab
Set(
SharePointFormMode,
"New Employee Details"
);
Set(varFormTab,"GENERAL");
Set(b1click,0);
Set(b2click,1);
Set(b3click,1);
Set(b4click,1)
For CONTACT INFO tab
Set(varFormTab,"CONTACT INFO");
Set(b1click,1);
Set(b2click,0);
Set(b3click,1);
Set(b4click,1)
For LOCATION tab
Set(varFormTab,"LOCATION");
Set(b1click,1);
Set(b2click,1);
Set(b3click,0);
Set(b4click,1)
For SUBMIT tab
Set(varFormTab,"SUBMIT");
Set(b1click,1);
Set(b2click,1);
Set(b3click,1);
Set(b4click,0)
We should also make sure to set the current tab to GENERAL when the screen becomes Visible. Otherwise, no tab will initially be selected, and nothing will show in our form once we build it.
Use this code on App Onstart property.
Set(
SharePointFormMode,
"New Employee Details"
);
Set(varFormTab,"GENERAL");
Set(b1click,0);
Set(b2click,1);
Set(b3click,1);
Set(b4click,1)
Change The Button Fill for Current Form Tab Selection
When a tab becomes selected it should change color to show which section of the form the user is viewing. For the current tab we will make the button fill a different color than the other tabs.
Use this code in the properties of all 4 button tabs to achieve the desired styling.
For GENERAL tab
Fill: If(b1click,RGBA(56, 96, 178, 1),Brown)
For CONTACT INFO tab
Fill: If(b2click,RGBA(56, 96, 178, 1),Brown)For LOCATION tab
Fill: If(b3click,RGBA(56, 96, 178, 1),Brown)For SUBMIT tab
Fill: If(b4click,RGBA(56, 96, 178, 1),Brown)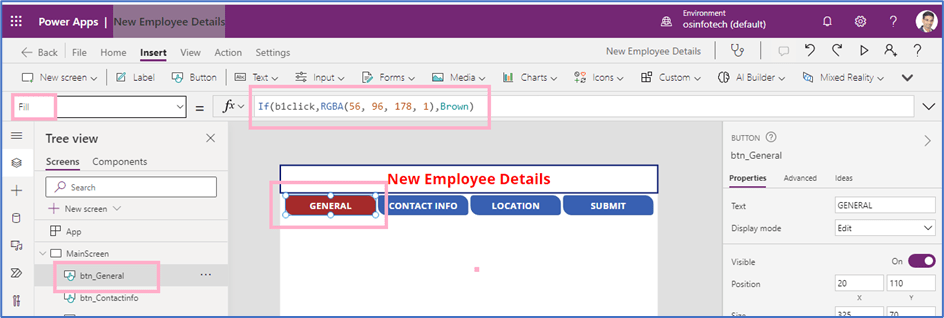
Insert A Single Column Edit Form
We are finished building the tabs system for our form, so the next task is to add the form itself. Start by adding a connection to the New Employee Details SharePoint list to the app.

Then insert a new Edit Form.

Now use the New Employee Details SharePoint list as a data source.
Change the form to a 1 column form with the layout vertical using the right-pane. The form fields will now be stacked in a single column.

Show Form Fields Only for The Current Tab
When a user selects a form tab only fields in the current section should appear and the remaining tabs should be hidden. We can make this happen with some simple logic.
Select the following 5 Data Cards: Name, Employee Id, Job Title, Department and Director. Then use the following code in the Visible property of the cards. Now they will only show when the current tab is GENERAL.
varFormTab="GENERAL"
Do the same for Mobile Phone and Email.
varFormTab="CONTACT INFO"Street Address1, Street Address2, City and State Province.
varFormTab="LOCATION"And finally for Comments and Attachments.
varFormTab="SUBMIT"One more thing: the Comments field only has an enough space for a single line of text. However, we defined it as a multiple-line text field in SharePoint. Increase the height to 200 pixels and change the mode to multiline to fix this problem.

Now the Power Apps tabbed form we built only shows the fields for the current selection when clicked. Make sure the FormMode is set to FormMode.New otherwise, we will get an error that says form isn’t connected to any data yet.
Move the Tabs with Continue Buttons
To add continue buttons on tabs, first add a custom data card to form by edit fields of the form.

Add 3 custom data cards for 3 tabs (GENERAL, CONTACR INFO and LOCATION), because on last tab (SUBMIT) we don’t need Continue button.
Move the data cards in their respective tabs by set their visible property.
Now insert the buttons on the custom data cards and rename them as Continue.

Use the code on GENERAL Tab Continue button’s OnSelect property. When the button is clicked moves to the next tab.
Set(varFormTab,"CONTACT INFO");
Set(b1click,1);
Set(b2click,0);
Set(b3click,1);
Set(b4click,1)
Use the code on CONTACT INFO Tab Continue button’s OnSelect property. When the button is clicked moves to the next tab.
Set(varFormTab,"LOCATION");
Set(b1click,1);
Set(b2click,1);
Set(b3click,0);
Set(b4click,1)
Use the code on LOCATION tab Continue button’s OnSelect property. When the button is clicked moves to the next tab.
Set(varFormTab,"SUBMIT");
Set(b1click,1);
Set(b2click,1);
Set(b3click,1);
Set(b4click,0)
Saving Data in A Power Apps Tabbed Form
Saving the data in a Power Apps tabbed form is easy. It can be done exactly the same way as a normal non-tabbed form.
To add Submit button on final tab (SUBMIT), first add a custom data card to form by edit fields of the form.
Move the data cards in their respective tabs by set their visible property.
Now insert the button on the custom data card and rename them as Submit.
Then write this code in the OnSelect property of the button. When the button is clicked a new record will be submitted to the SharePoint list.
SubmitForm(frm_NED)
.
Hope this article will help us to demonstrate tabbed form in PowerApps.
Also get my article updates on my social media handles.
LinkedIn – https://www.linkedin.com/in/khasim-shaik-8784a1232/
Twitter – https://twitter.com/KhasimShaik2009
Facebook – https://www.facebook.com/profile.php?id=100078255554660
Thank you for your support, will catch up with new article soon.
Keep learning and keep sharing.
Have a great day.
Thanks.


You must be logged in to post a comment.