Azure – Create And Assign Blueprints On Azure Subscription In Azure Portal

Hello Friends,
Hope you all are doing good !!!
In our last article Cloud Governance – Azure Blueprints we have discussed about basics of Azure Blueprints. In this article we will discuss, how to Create and Assign Blueprints on an Azure Subscription through Azure Portal. So without delaying, let’s go through the following steps to assign a Azure Blueprint.
Create Azure Blueprint :
1. Connect to your Azure portal dashboard using your subscription account. If you don’t have any subscription, in that case you can get trial Azure subscription with one-month of validity. Then you can connect to the azure portal dashboard as in following figure.
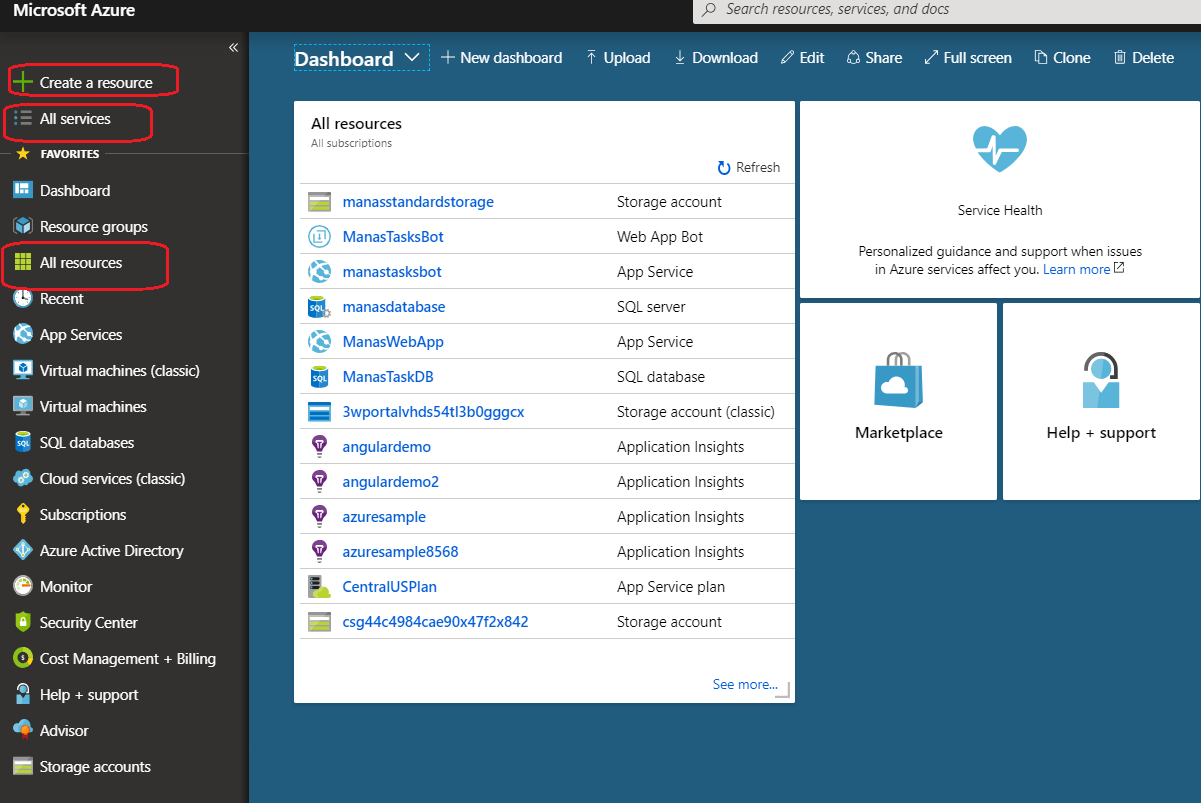
2. On the left side menu of the screen, select Create a resource > Then try to find Policy and then click Policy and this will take us to a Policy page and from there we can select Azure Blueprint (preview) as shown in following figure as shown in the following figures.

Figure 2 :Azure – Find Azure policy service

3. Click on Blueprint (preview) to go to Blueprint page, as shown in the following figure and from that page we can start with our first Azure Blueprint.

4. Now we will start to create the Blueprint. Select Blueprint Definition and click on Create Blueprint or click Create button. This will take us to select sample of blueprint. Here we will choose Blank Blueprint as shown in the following figure.

5. On create Blueprint page, first we need to fill Basic information like Blueprint Name, Description and Definition Location, where we need to set Subscription name as shown in the following figure.

6. In the above figure we can see that, my current subscription doesn’t have sufficient permission to manage Blueprint so I have used a different subscription to proceed. After filling Basic information, select Next Artifacts as shown in here below. We can create following Artifacts,
A Resource Groups
ARM Template
Azure Policy
Role assignment

Here in the above figure , I am adding Resource Group as my first artifact. My plan is to add other artifacts under my Resource group artifact. So now let’s add other artifacts under Resource Group as shown in the following figure.

7. Now we have added one Resource Group artifact. Let’s add one Policy Assignment artifact. In this case I am choosing inbuilt policy ( Allow Location), which will check the location, when deploying resources as shown in the following figure.

8. After adding Policy Assignment, I want to modify the newly added Policy Assignment and change the Allowed Location property, because initially I have set it to “East Asia” but due to permission issue, I have to change it to “West Europe” as shown in following figure.

9. Now let’s add a new Role Assignment artifact. Here I have assigned Contributor role to my logged in account.

10. In the above figure we have shown, how to add new Role Assignment. In following figure we can see how to add an ARM Template. Add new artifact under our Resource Group artifact and select Azure Resource Manager Template and fill the information. we can also copy and paste the code available below, to create a storage account under newly created Resource Group and click Add to proceed .
{
  "$schema": "https://schema.management.azure.com/schemas/2015-01-01/deploymentTemplate.json#",
  "contentVersion": "1.0.0.0",
  "parameters": {
    "storageAccountType": {
      "type": "string",
      "defaultValue": "Premium_LRS",
      "allowedValues": [
        "Premium_LRS",
        "Standard_GRS",
        "Standard_ZRS",
        "Standard_LRS"
      ],
      "metadata": {
        "description": "Storage Account type"
      }
    }
  },
  "variables": {
    "storageAccountName": "[concat(uniquestring(resourceGroup().id), 'manas')]"
  },
  "resources": [
    {
      "type": "Microsoft.Storage/storageAccounts",
      "name": "[variables('storageAccountName')]",
      "apiVersion": "2016-01-01",
      "location": "[resourceGroup().location]",
      "sku": {
        "name": "[parameters('storageAccountType')]"
      },
      "kind": "Storage",
      "properties": {}
    }
  ],
  "outputs": {
    "storageAccountName": {
      "type": "string",
      "value": "[variables('storageAccountName')]"
    }
  }
}
11. Once we have added all our required artifacts, click on Save Draft as shown in the following figure.

12. Select Blueprint Definition and select the Blueprint we have just created, this will open up a new window and publish this newly created Blueprint. we can’t assign a Blueprint until its published. provide a version to the Blueprint, if we edit this Blueprint to add more artifacts, we can always add a new version. when we assign a Blueprint to a subscription, latest version get’s applied. This versioning is helpful to determine which versioning has deployed what resources in our subscription.

13. Once we published the Blueprint, we can now assign this Blueprint to an Azure subscription. If the Blueprint isn’t published, it can’t be assigned. Now select the Blueprint, we want to assign and we will see Assign Blueprint will appear as shown below here.

14. Click Assign Blueprint and fill the information mentioned in below figures. We can assign a Blueprint to a Management Group or directly to subscription.


Figure 17 : Azure – Fill basic information when assign Blueprint
15. After assigned the Blueprint, let’s go back to Assigned Blueprints and select the assignment name, we used in previous step. This will show us the current progress of the assignment. if there was any failure, we will be able to see it here as shown in the following figure.

Here in the above figure, we can see that our Blueprint fail to deploying resource successfully. Let’s check the reason for this fail in following figure.

As we have discussed earlier, I have set Contributor role to my login user, when configuring Role Assignment artifact and that is the root cause of the issue. As in the above error message, we can see Blueprint required Owner role to the account, which is responsible to deploy the Blueprint. So let’s set the current user to Owner role and for testing purpose, let’s use different user account and give him same Contributor role. After update the artifact save the draft and publish it . Once it published successfully, reassign the Blueprint as shown in the following figure.

In the above figure, we can see, it success the reassignment step and now it is deploying the resources. But again it failed to deploy resource. Let’s see what is the current issue in the following figure.

Error details in the above figure says, that the Resource Group is already exists in eastasia region. In our previous article we have discussed, when we are modifying any artifact in a Blueprint, it does not delete the already deployed resources. it just trying to deploy a new one and left the previous one in place. Initially , I have tried to create Resource Group under “East Asia” region and deploy other resource under this Resource Group but unfortunately that account doesn’t have sufficient permission to deploy some major resource under East Asia region and deployment fails but it crated only Resource group under East Asia location. So later I updated the location to West Europe region.
Let’s modify the Resource Group name in artifact or delete the unnecessary Resource Group which deployed in previous deployment. Now let’s unassigned the Blueprint so that, we don’t have to assign the same Blueprint with different name again and again. So it is best to
unassigned the Blueprint before reassign again as shown in the following figure.

After unassigned the Blueprint, reassigned the updated published Blueprint and wait for the deployment result 🙂 .

Here you Go !!!. Now we can see, it deployed successfully. Let’s check the result in the following figures.


Figure 24: Azure – Successfully deployed Role Assignment

I hope this article gives you a very good understanding on how to create Azure Blueprint in Azure portal.
Thanks for reading 🙂
Keep reading, share your thoughts, experiences. Feel free to contact us to discuss more. If you have any suggestion / feedback / doubts, you are most welcome.
Stay tuned on Knowledge-Junction, will come up with more such articles.


2 Responses
[…] Azure Blueprints is one of the most important tool provided by Azure to enable Cloud Governance. In this article, we will discuss about Azure Blueprints and in our next article we will discuss, how to Create and Assign Blueprints on an Azure Subscription through Azure Portal. […]
[…] am continuing with one of my last article, How To Create And Assign Azure Blueprint. If you have missed our last articles on Azure Governance, please check it in following […]