Azure – Connect to Key Vault from .Net Core application using Managed Identity – Part1 – Introduction to Azure Key Vault

Hi All,
LIFE IS BEAUTIFUL 🙂 I hope we all are safe:) STAY SAFE, STAY HEALTHY 🙂 STAY HOME 🙂
UseCase: We have application where we need to use azure app client secret key and certificate for accessing Microsoft Graph APIs. So we decided to use the Azure Key Vault service to store azure app client secret key and certificate for security reasons. But then again to fetch the client secret key and certificate from Key Vault service we need to authenticate and here Managed Identity service come to picture 🙂
Since this article going to be big lets divide this articles into series. So we will discuss
- Azure Key Vault Service
- Managed Identity Service
- Creating Sample .Net core application and deploy to Azure
- Accessing secrets and certificates from Key Vault using managed identity service
- Best practices for Azure Key Vault
So lets begin the fun 🙂 In this article we will discuss Key Vault service, best practices, create Key Vault using Azure portal.
Take Away from this article: At the end of this article, we will got to know
- What is Azure Key Vault
- How to create Azure Key Vault from Azure Portal
- How to add keys (Azure App client secret key and certificate) to Key Vault from Azure Portal
- Best practices to use Key Vault
What is Azure Key Vault Service:
- Azure Key Vault is cloud service which gives secured storage for secrets like passwords, certificates, App secret keys, tokens, API keys and so on
- Azure Key Vault allows us to create, import, store and maintain keys and secrets can be used in our cloud applications
- Azure Key Vault is very easy to manage, maintain and configure
Why to use Azure Key Vault:
- Secrets and Keys in Azure Key Vault are very secured
- We developers no longer need to store secret keys in our application or in config files. Example – app secrets, db connection strings etc.
- These secret and keys can be protected either by software or FIPS 140-2 Level 2 validated HSMs (Note – HSMs – hardware security modules – A hardware security module (HSM) is a physical computing device that safeguards and manages digital keys, performs encryption and decryption functions for digital signatures, strong authentication and other cryptographic functions. (from Wikipedia). We application developer no need to worry of these HSMs.
- Authentication of caller is done via Azure Active Dierctory
- Authorization is done via role-base access control (RBAC) or Key Vault Policies. RBAC is used when dealing with the management of the vaults and key vault access policy is used when attempting to access data stored in a vault.
- We could easily monitor when and how our keys and secrets are accessed by enabling the logging.
- We can also restrict the access to the logs.
- We can delete the logs
- These logs can
- archived to storage account
- stream to event hub or
- can be send to Azure Monitor Logs
- Multiple administrative options are available like through Azure Portal, Azure CLI or PowerShell
- The Key Vault management system for programmers consists of several interfaces. Following are supported programming and scripting languages:
- REST
- .NET
- Java
- Node.js
- Python
- Azure CLI
- Azure PowerShell
Creating Key Vault from Azure Portal:
- Log in to the Azure Portal – https://portal.azure.com as shown in below Fig

- Click on “Key vaults” from right hand side top corner. Click on “+ Create” link as shown in above Fig.
- We will be redirected to “Key vaults” dashboard as shown in below Fig

- On “Key vaults” dashboard we have various options including “+Add” – for creating new Key vault, Managing view, we have export option to export the list in .CSV file and so on
- When we click on “+Add” link, we will be redirected to “Create key vault” dialog as shown in below Fig
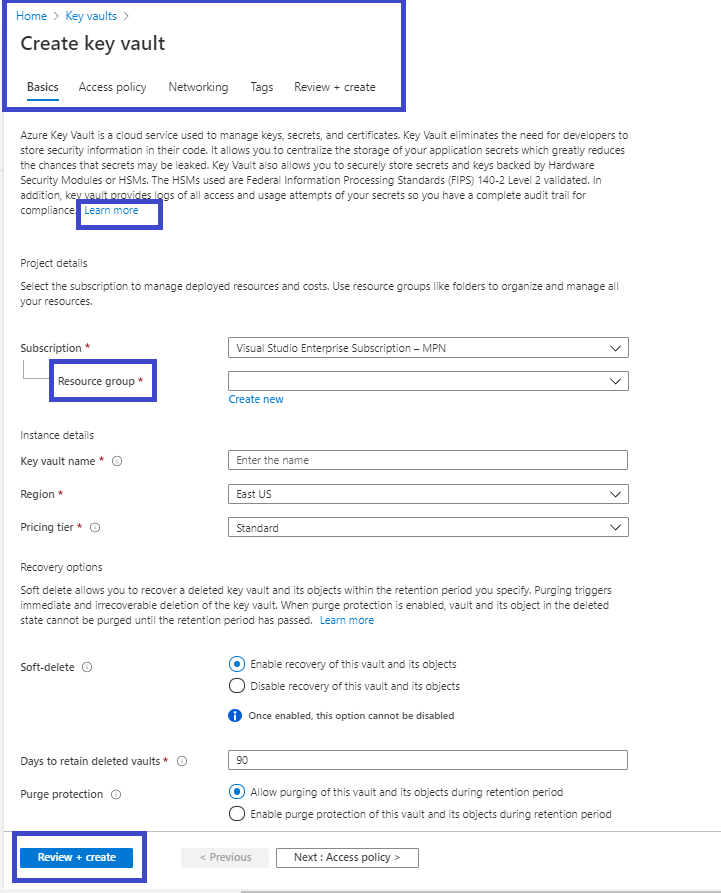
- On “Create key vault” dialog we have “learn more” link which redirects to Key vaults documentation. There is very good documentation on Key vault from Microsoft
- We need to select “Resource group” or we have option to create new resource group as well
- Here we are creating new “Resource group” having name “Knowledgejunction” as shown in below Fig
- If you want more details on Azure Resource and Resource group, we have very good article – Azure – Resource and Resource group please have a look once.

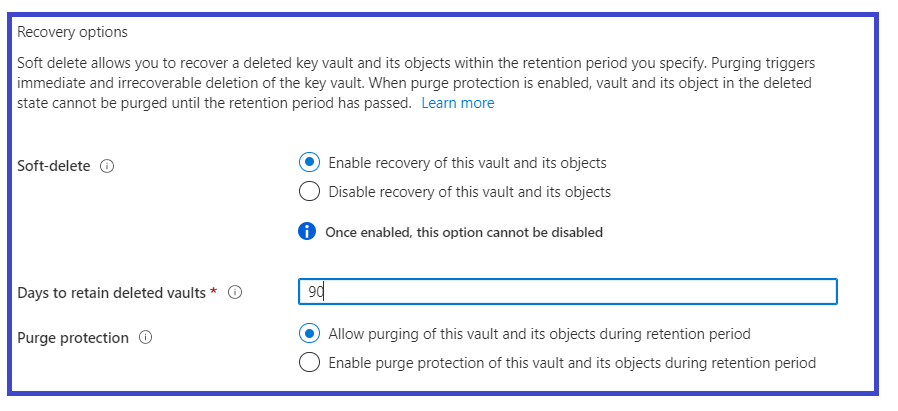
- While creating new “Key vaults” we have to specify “Recovery options” as well as shown in below Fig
- “Recovery options” include “Soft-delete” means, Soft delete allows us to recover a deleted key vault or objects within the key vault within the retention period we specified as shown in below Fig – “Days to retain deleted vaults* ”
- Once we click on “Review + Create” button at the bottom, validation process starts and we will be redirected to “Review + create” tab
- “Running validation” message appears as shown in below Fig, till the time “Create” button is disabled

- Once validation done successfully we get message “Validation passed” message and create button get enabled as shown in below Fig
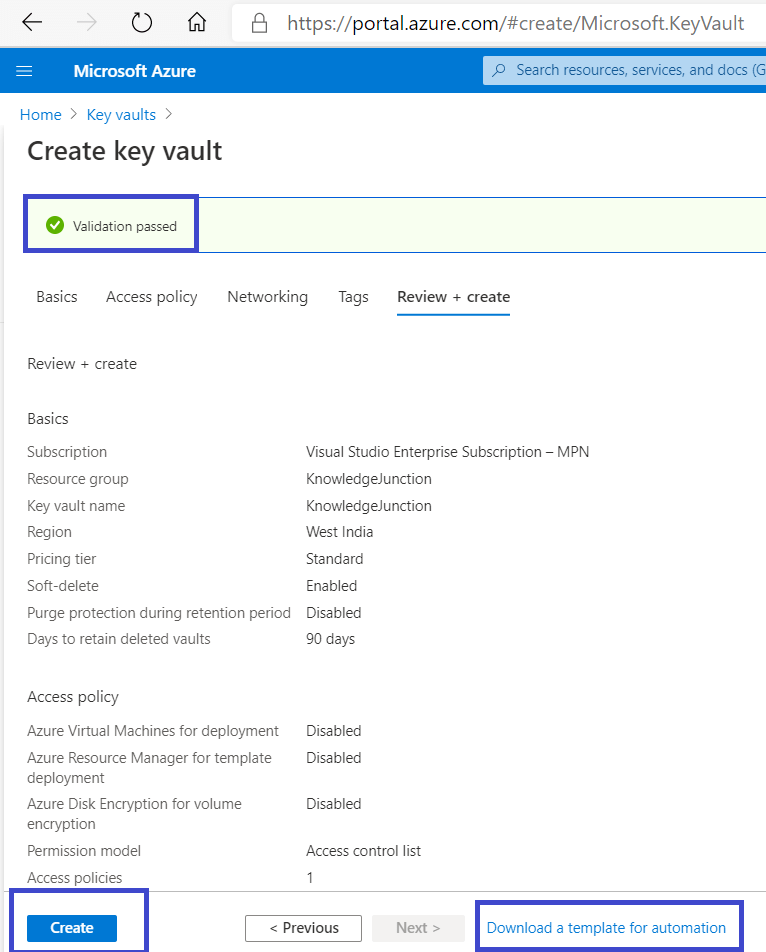
- Please click on “Create” button as shown in above Fig
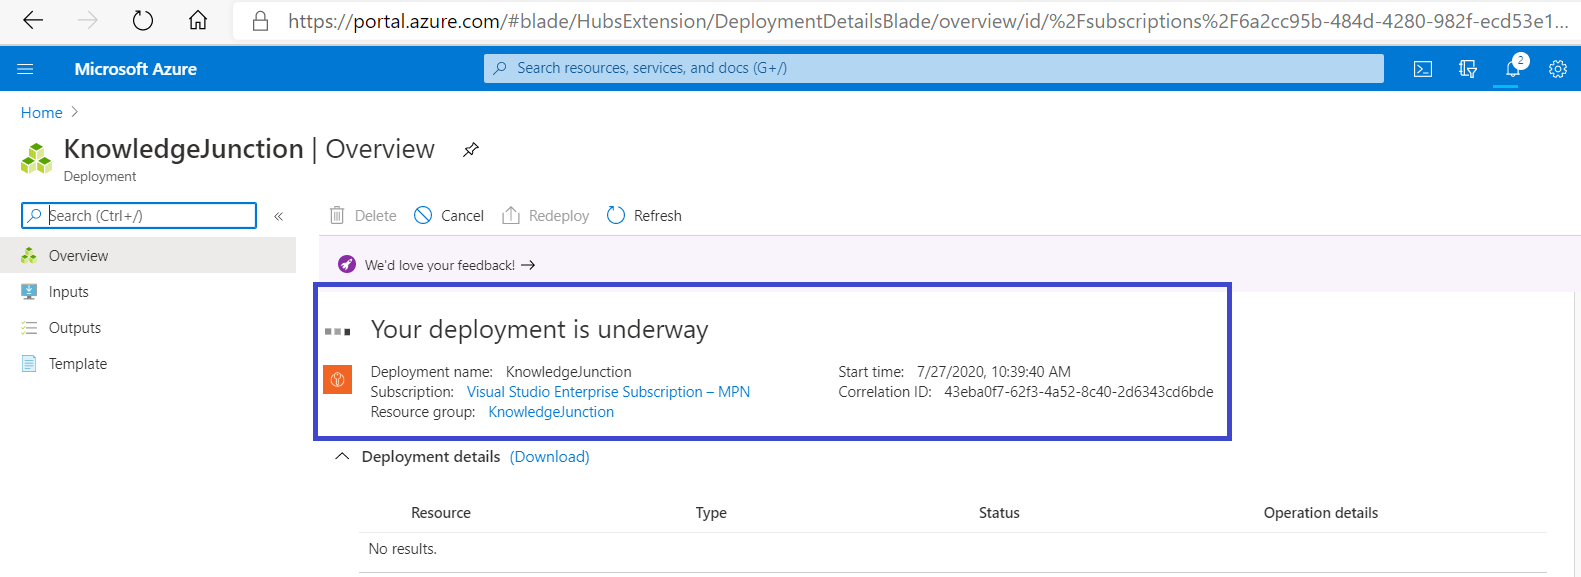
- Deployment for new “Key vault” get started as shown in below Fig
- Once deployment is completed we get an message “Your deployment is complete” as shown in below Fig
- Please check the Status – “OK”
- We have option to go to newly created “Key vault” by clicking “Go to resource” button as shown in below Fig
- We could see the more details of newly created “Key vault” by clicking on “Operation details” as shown in below Fig

- Click on “Operation details” link, info bar will appear with lots of details as shown in below Fig

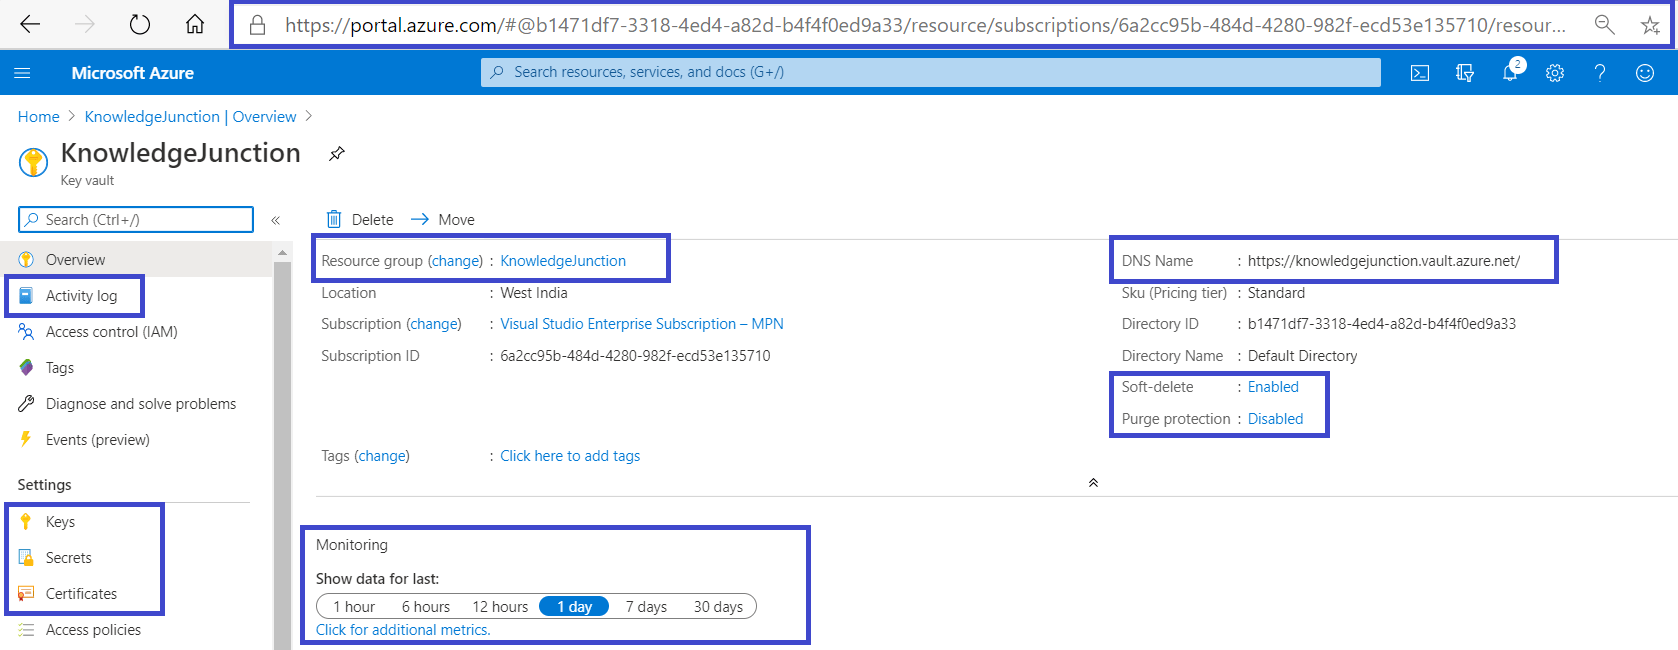
- Following are the details for newly created Key vault
- We have various option as in left menu – Activity log, options to create “Keys”, “Secrets” and “Certificates, we have DNS name and other settings like “Soft-delete”, “Purge protection” as shown in below Fig
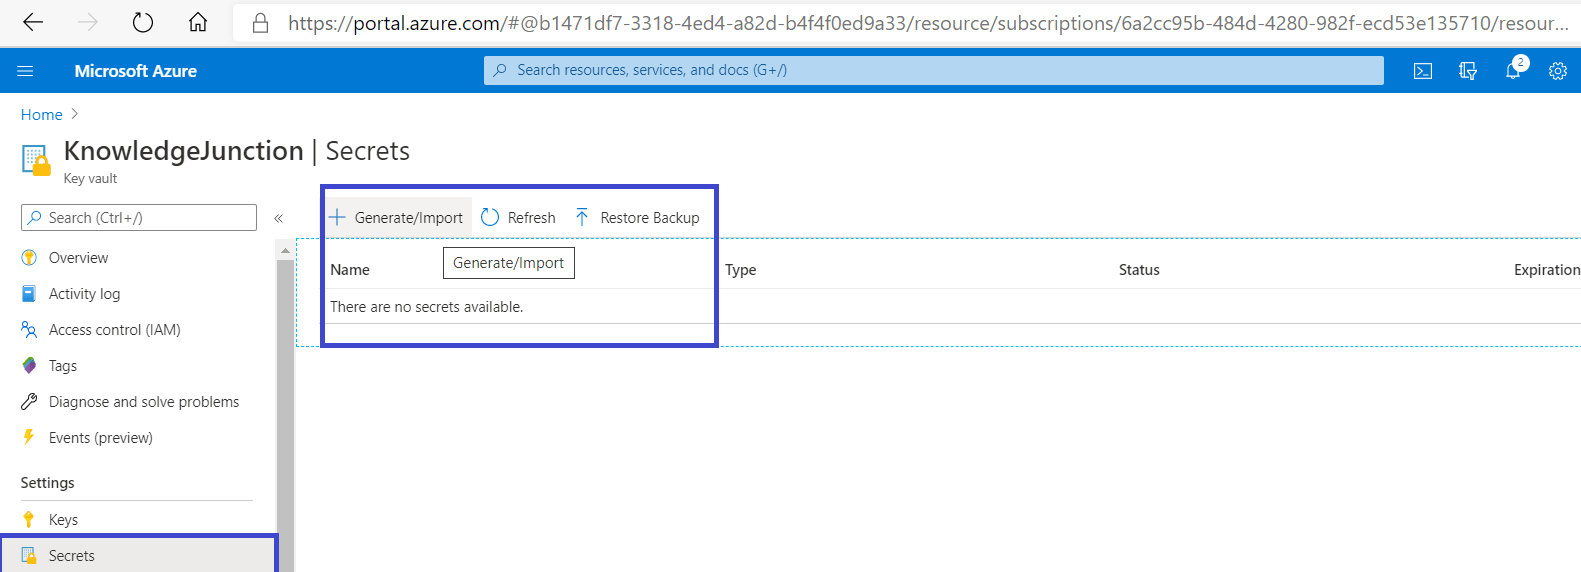
- Now lets add one new “Secrets”
- From Key vaults detail page, from left navigation click on “Secrets” to “+ Generate / Import” new secret as shown in below Fig
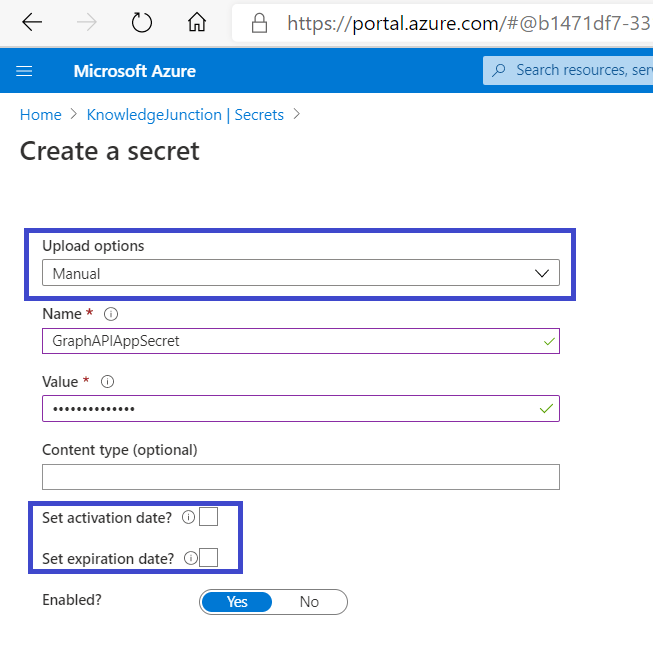
- Once we click on ” + Generate / Import” link as shown in above Fig, we will have “Create a secret” dialog as shown in below Fig
- We have couple of options like “Activation date”, “expiration date”, whether we need to enable it or not
- Here we are creating new secret key – “GraphAPIAppSecret”
- Once Secret created successfully, we will be redirected to “Secrets” list

- Click on newly created secret “GraphAPIAppSecret”, we will be redirected to secret details as shown in below Fig

Best Practices using Key Vault:
- Use least privilege access principal to grant access
- Turn on Firewall
- Use a separate key vault per application and per tenant (Development, Test and Production tenant)
- Regular back ups of Vault – There are Power-Shell commands available for backups – Backup-AzureKeyVaultCertificate, Backup-AzureKeyVaultKey and Backup-AzureKeyVaultSecret
- Enable the logging on Key Vault and use alerts. Monitor logs
- Turn on Soft Delete for the Key Vault
We have very good series on Azure, lots of discussion on Azure, please visit – https://knowledge-junction.in/?s=azure
Thanks for reading 🙂 If its worth at least reading once, kindly please like and share. SHARING IS CARING 🙂
Share in Teams:Enjoy the beautiful life 🙂 Have a FUN 🙂 HAVE A SAFE LIFE 🙂 TAKE CARE 🙂


good