Microsoft Azure Storage and Database Part 16 – Azure File Service – Mount File Share On Window Server Using File Share URL

Hello Friends,
Hope you all are doing good !!! 🙂 .
In our previous article we have have discussed how to Mount File Share On Window Server Using PowerShell. Today in this article we will discuss how to mount Azure File Share on a windows virtual machine using file share url.
Previous Azure series :
- Learn Basics Of Azure Networking In 60 Hours
- Learn Basic Of Azure Active Directory And Azure Identity And Access Management
- Azure DevOps – Learn at one place
If you have missed our previous articles on Azure Storage and Database Series, please check it in following links.
Part 1 – Overview Of Azure Storage and Database
Part 2 – Azure Storage Account
Part 4 – Work With Azure Blob Storage
Part 5 – Storage Explorer For Azure Storage
- .
- .
- .
- .
Part 11 – Get Shared Access Signature (SAS) Using PowerShell
Part 12 – Azure Blob Storage – Host Static Website In Azure Storage Account
Part 13 – Azure Blob Storage – Work With AzCopy Tool
Part 14 – Azure File Service – Overview
Part 15 – Azure File Service – Mount File Share On Window Server Using PowerShell
Next Article : Part 17 – Azure File Service – Create File Share Using Power Shell
Mount Azure File Share :
Without delaying more let’s go through the following steps to mount Azure File Share using File Share URL.
Step 1 – Log-In to Azure portal and navigate to our Azure File Share overview page as showing in the following figure.


Step 2 – From selected File Share overview page, select Properties from left side menu and copy the file share URL as showing in the following figure. We will use this copied File Share path later in this demo.

Step 3 – One point need to remember is that, we need username and password to mount file share on windows using this approach so it’s good if we copy and keep them for later use. In this case, by default the username is the name of Storage Account and the password is the key of the Storage Account. This is the default behavior of Azure file share. So let’s get the user name and password from Azure portal.

Step 4 – We have now almost done with azure portal. Let’s log-in to our windows virtual machine (VM) to mount the File Share there.

Step 5 – Right click on ‘This PC‘ to get the context menu and select Map network Drive.. as showing in the following figure.
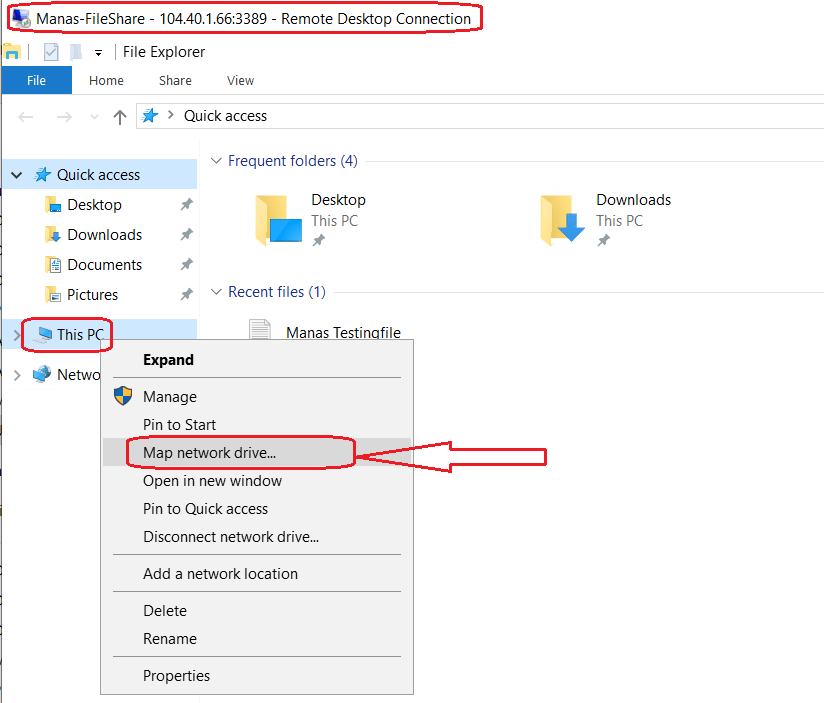
Step 6 – Now we need to provide following information as showing in the following figure.
- Select one Drive as here I have selected drive ‘M‘ here.
- Modify the path of Azure File Share, which, we copied in the above step 2 . Remove ‘Https:‘ or ‘Http:‘ from the URL and replace all front ward slash ‘/’ to back word slash ‘\’ and put the modified path in the Folder text box. Our File share path was “https://kjstorageaccount1.file.core.windows.net/manas-file-share” and after modify as per the above instruction the File Share path is “\kjstorageaccount1.file. core.windows.net\manas-file-share“
- Select the check box “Connect using different credentials” so that it will ask for credential.

Step 7 – As we discussed in the above Step 3, by default, the user id is our Storage Account name and the password is the account key of the Storage Account. We have copied them in our above step. So now as sowing in the following figure provide those credentials and press Ok button.
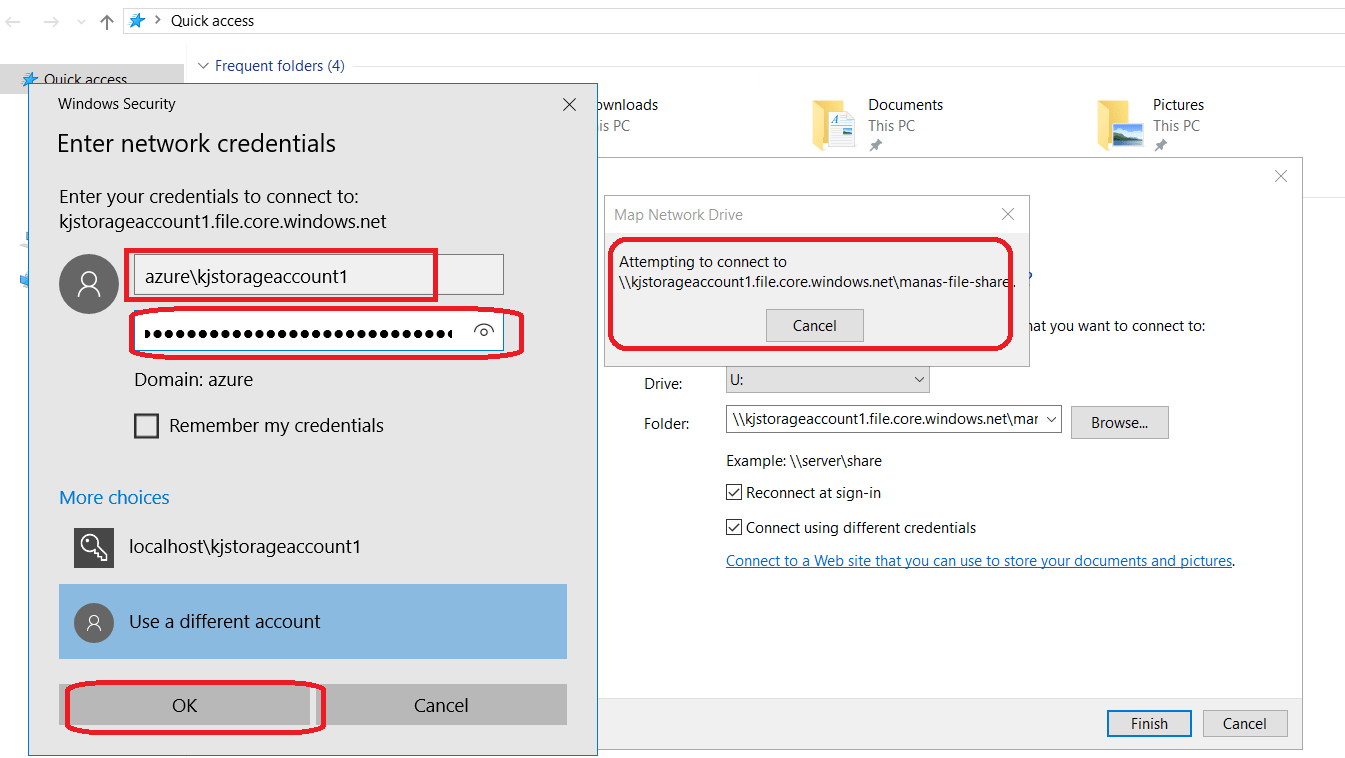
Step 8 – In the following figure we can see that, we got one notification as “The network folder specified mapped using a different user name and password.“

Actually in our last demo/article, we have mapped the same file share using PowerShell and we have forgot to disconnect that mounted network folder. So let’s disconnect as showing in the following figure.
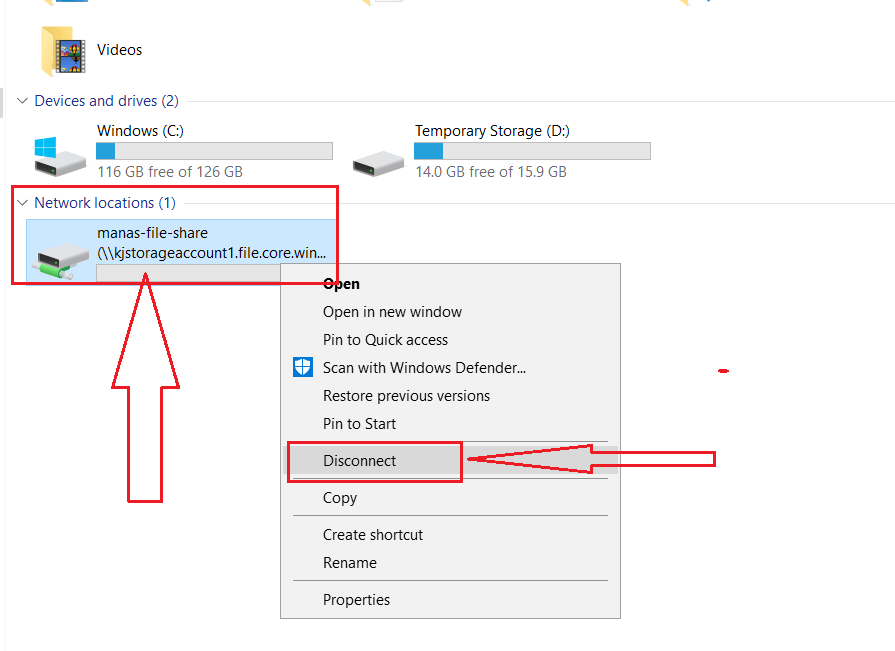
Step 9 – Try to connect again after disconnected the drive.
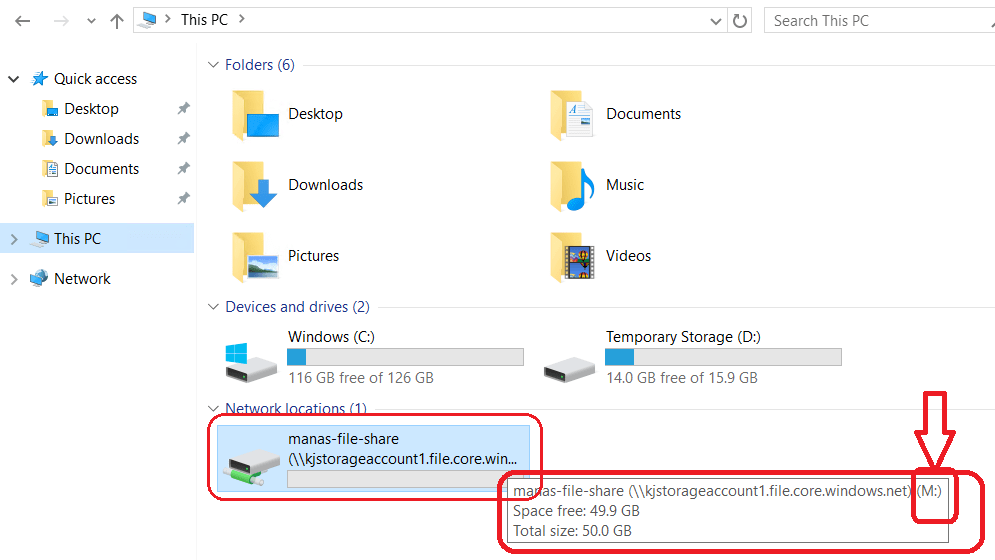
Now we can see in the above figure, the drive is mounted successfully with drive as ‘M’. let’s compare files between Azure portal and mounted drive on windows.

As we can see in the above figure, all the files are identical in both place.
I hope this is informative to you. Please let me know if I missed anything important or if my understanding is not up to the mark. Keep reading, share your thoughts, experiences. Feel free to contact us to discuss more.
Next Article : Part 17 – Azure File Service – Create File Share Using Power Shell
If you have any suggestion / feedback / doubt, you are most welcome. Stay tuned on Knowledge-Junction, will come up with more such articles.
Thanks for reading 🙂 .


15 Responses
[…] our previous articles we have discussed, how to create Azure File Share using PowerShell. Today in this article we will discuss how to upload, download and copy files in Azure File Share […]
[…] Part 16 – Azure File Service – Mount File Share On Window Server Using File Share URL […]
[…] Part 16 – Azure File Service – Mount File Share On Window Server Using File Share URL […]
[…] Part 16 – Azure File Service – Mount File Share On Window Server Using File Share URL […]
[…] Part 16 – Azure File Service – Mount File Share On Window Server Using File Share URL […]
[…] Part 16 – Azure File Service – Mount File Share On Window Server Using File Share URL […]
[…] Part 16 – Azure File Service – Mount File Share On Window Server Using File Share URL […]
[…] Part 16 – Azure File Service – Mount File Share On Window Server Using File Share URL […]
[…] Part 16 – Azure File Service – Mount File Share On Window Server Using File Share URL […]
[…] Part 16 – Azure File Service – Mount File Share On Window Server Using File Share URL […]
[…] Part 16 – Azure File Service – Mount File Share On Window Server Using File Share URL […]
[…] Part 16 – Azure File Service – Mount File Share On Window Server Using File Share URL […]
[…] Part 16 – Azure File Service – Mount File Share On Window Server Using File Share URL […]
[…] Part 16 – Azure File Service – Mount File Share On Window Server Using File Share URL […]
[…] Part 16 – Azure File Service – Mount File Share On Window Server Using File Share URL […]