Microsoft 365 – SharePoint Online – Configuring Theme, Header, Navigation, and Footer of a Communication Site

“All things are difficult before they are easy”
Hello Everyone,
Hope you all are doing well.
In previous article discussed about SharePoint Online Communication Site and its features. If you miss the article please go through it, it will help to start from here.
Microsoft 365 – SharePoint Online – Exploring Communication Site (Previous Article)
Today I am going to discuss about how to customize the Theme, Header, Navigation, and Footer of a Communication site in this article.
So without getting late, lets get started with Communication Site.
Background
A SharePoint Communication site is a great place to broadcast information to others. Share news, reports, status updates, and more in a visually appealing format. Use communication sites to engage and inform broad audiences. Create portals, department, or project-specific sites.Showcase stories, spotlight topics, and broadcast news and events to audiences across your organization.Communication sites often have a few site owners and members that help manage and update site content, and many site visitors that view content.
Create Communication Site
- If you don’t have Microsoft 365 account, you could create it under the Microsoft 365 developer program from Microsoft. – https://developer.microsoft.com/en-us/microsoft-365/dev-program
- Login to Microsoft 365 account from portal – https://www.office.com/?auth=2
- Navigate to SharePoint from app launcher.
- You will be redirected to SharePoint Online home page. – _layouts/15/sharepoint.aspx
- Now create a Communication site.
How to customize the Theme of a site in SharePoint Online
- Click the Gear/Settings icon in right side corner of the top bar.
- In settings, Select Change the look

- In Change the look, Select Theme

- Now check the SharePoint themes which one to apply to the Site.

- Also customize the theme colors by click on customize.

- Now Select the main color and accent color and click on save.

- Select the desired site theme and click on save.

- Now the look of the site will change accordingly.
How to customize the Header of a site in SharePoint Online
- Click on Gear icon -> select Change the look -> select Header.

- Click on Layout, select Minimal. See the Header changes on layout selected.

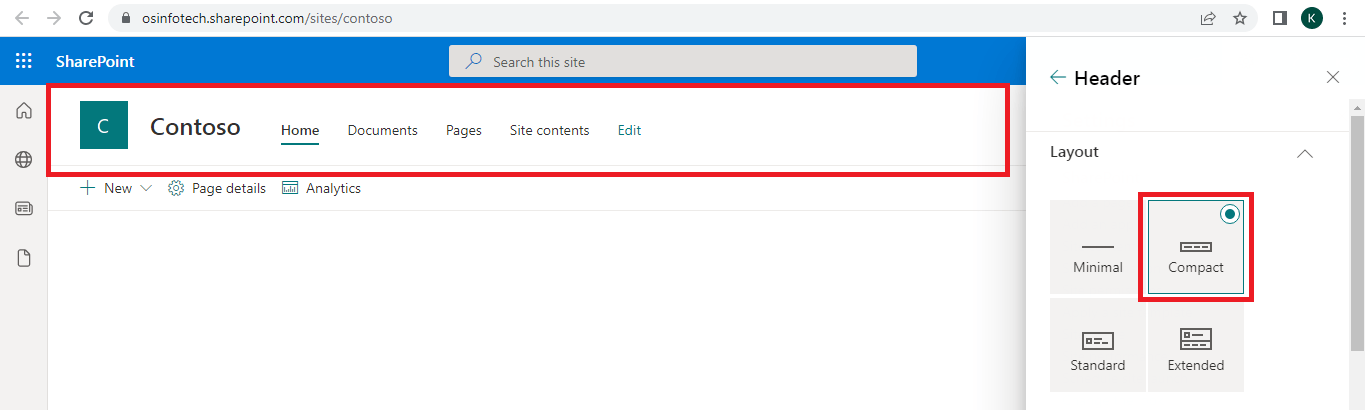
- Click on Layout, select Compact. See the Header changes on layout selected.
- Click on Layout, select Standard. See the Header changes on layout selected.

- Click on Layout, select Extended. See the Header changes on layout selected.

- Click on Background, here select the theme color. See the Header changes on color selected.

- Click on Background, here select the theme image (optional). See the Header changes on image selected. This image option appears only in header extended layout.

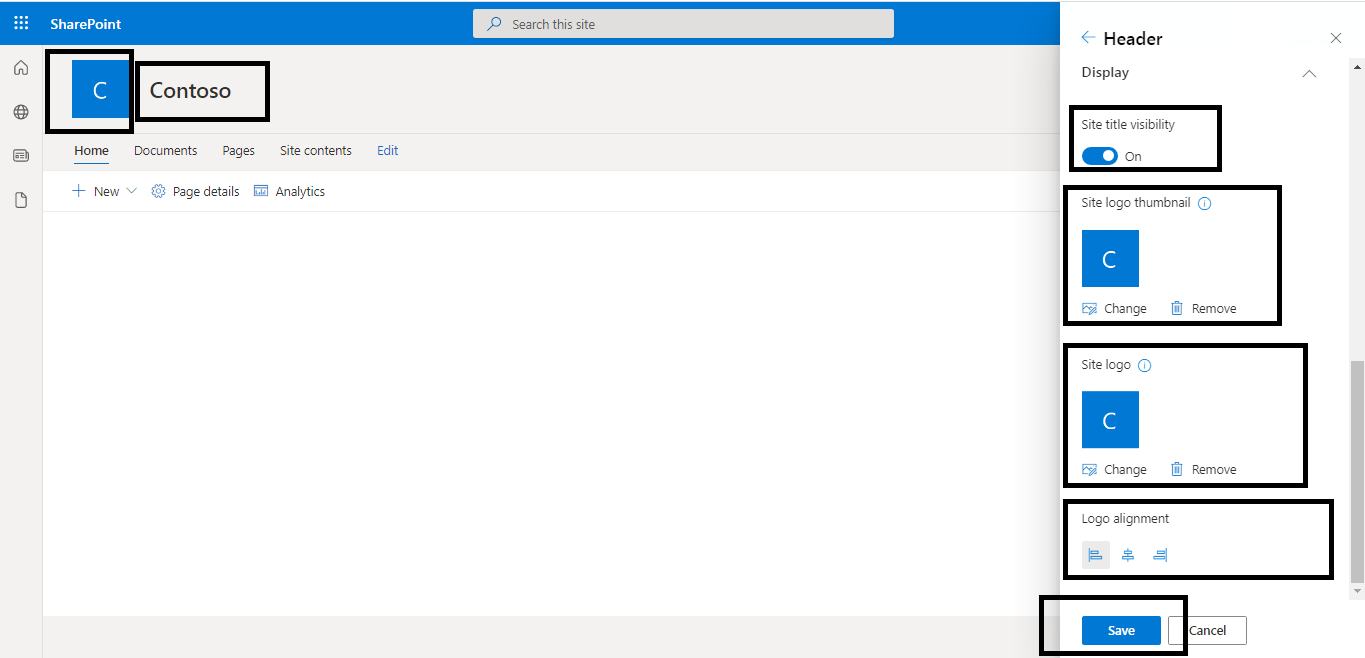
- Click on Display, here select Site title visibility – on/off, Site logo thumbnail – change/remove, Site logo – change/remove and logo alignment – left/center/right.
- Click on Save to apply the changes to the Header.
How to customize the Navigation of a site in SharePoint Online
- Click on Gear icon -> select Change the look -> select Navigation.

- In Navigation, here choose site navigation visibility on/off mode.
- On site navigation visibility off mode, the navigation bar doesn’t appear in the Header.

- On site navigation visibility on mode, the navigation bar will shows in the Header.

- In Navigation choose Menu style as Mega menu/Cascading and click on Save.

- To customize the Navigation click on edit in the Navigation.

- Click on (+) symbol to add link/label to Navigation.

- To add, choose an option – link/label, give the address, display name and click on Ok.

- The link/label can be edit, move up, move down remove, make sub link, or remove.

- Enable site navigation audience to targeting on/off. Click on Save.

- Now link/label will add to the navigation accordingly.

How to customize the Footer of a site in SharePoint Online
- Click on Gear icon -> select Change the look -> select Footer.

- In Footer, here choose enable on/off mode.
- On Footer enable off mode, the Footer will not show at the bottom of the site.

- On Footer enable on mode, the Footer will show at the bottom of the site.

- On Footer enable on mode, select the Layout as Simple/Extended, change the logo, give the Display name, select Footer background color and click on Save.

- To customize the Footer click on edit in the Footer.

- Click on (+) symbol to add link/label to Navigation.

- To add link/label, choose an option – link/label, give the address, display name and click on Ok.

- The link/label can be edit, move up, move down remove, make sub link, or remove.

- Enable site navigation audience to targeting on/off. Click on Save.

- The link/label will add to the Footer accordingly.

Hope this article will help you to know about how to customize the Theme, Header, Navigation, and Footer of a Communication Site in SharePoint Online.
You can also get my article updates on my social media handles.
LinkedIn – https://www.linkedin.com/in/khasim-shaik-8784a1232/
Twitter – https://twitter.com/KhasimShaik2009
Facebook – https://www.facebook.com/profile.php?id=100078255554660
Thank you for your support, will catch up with new article soon.
Keep learning and keep smiling 🙂
Thanks.


You must be logged in to post a comment.