Azure – How To Create And Connect Azure SQL Database (Cloud)
Hello Friends,
Hope you all are doing good !!!
In our last blog we have explore how to deploy web app into AZURE. As we know Microsoft Azure comes with many services provided by Microsoft and SQL Database is one of them. Today in this blog we will discuss how can we make use of this service to create Azure SQL database and after that we will try to connect the Azure database from our client using SQL Server management studio (SSMS). We will go step by step to achieve this goal.
- Connect to your Azure portal dashboard using your subscription account. If you don’t have any subscription, in that case you can get trial Azure subscription with one-month of validity. Then you can connect to the azure portal dashboard as in following figure.
- Once we are on our Azure Dashboard, we can find the SQL Database service link in the left side menu, as shown in the above figure. Click on the SQL database link to create a new SQL Database and fill all required information like, Name of the Database, Resource group, Server Name etc as in following figure.
- If you don’t have your own Resource group, then you can create a new one by click Create new link in Resource Group section and provide your nearest region so that it will improve the performance.
- Same as Resource group, if you don’t have any Database server exist, you can configure a new one by providing the required information like Server name, Server Admin Login name and password etc. as shown in the following figure.
- Once we configure the server then click Create button to start deploying our requirements. It will take some time to finish all required configuration with our new database under our Resource group as shown in following figure.
- After successfully done with both database server and database, we need Database Server name and Database Server Admin name to connect to the database from our SQL Server Management Studio (SSMS) from client.
- To get Database server name click on SQL database name link as shown in above figure and it will open a separate detail section with server name as shown in following figure.
- Same as Server name we need the Server Admin login name and we can get it by clicking the database Server name link and we will get the Database admin name from its detail section as shown in following figure.
- Now we have all information to connect to our Azure database from our client machine using SSMS .So let’s open SQL Server Management Studio and provide all information to connect to the Azure database as shown in following figure and click connect.
- Mostly we will get following error if the configuration not done completely and successfully. Here we forgot to provide our client IP information to Azure firewall. As in Azure, there is one extra layer of security maintained by Microsoft for SQL Database to provide more security to our data.
- Now we need to finalise our configuration with firewall setting for database server. Click on Server name link as we have done to get server admin name. From Database server detail page, we can start configuring firewall by clicking Configure Firewall link as shown in the following figure.
- Once you click on Show firewall settings, it will move you to a firewall configuration section and allow you to configure the firewall as shown in following figure.
- Once we done with our firewall configuration, go back to SQL Server Management Studio (SSMS) and try to connect to Azure SQL server database again and we should be able to successfully connect to our database and we can create our required data tables as shown in following figure.

Figure 1: Azure – Azure Portal Dashboard

Figure 2: Azure – Create Azure SQL Database

Figure 3: Azure – Configure Azure Database Server

Figure 4: Azure SQL Server and Database Under Resource Group
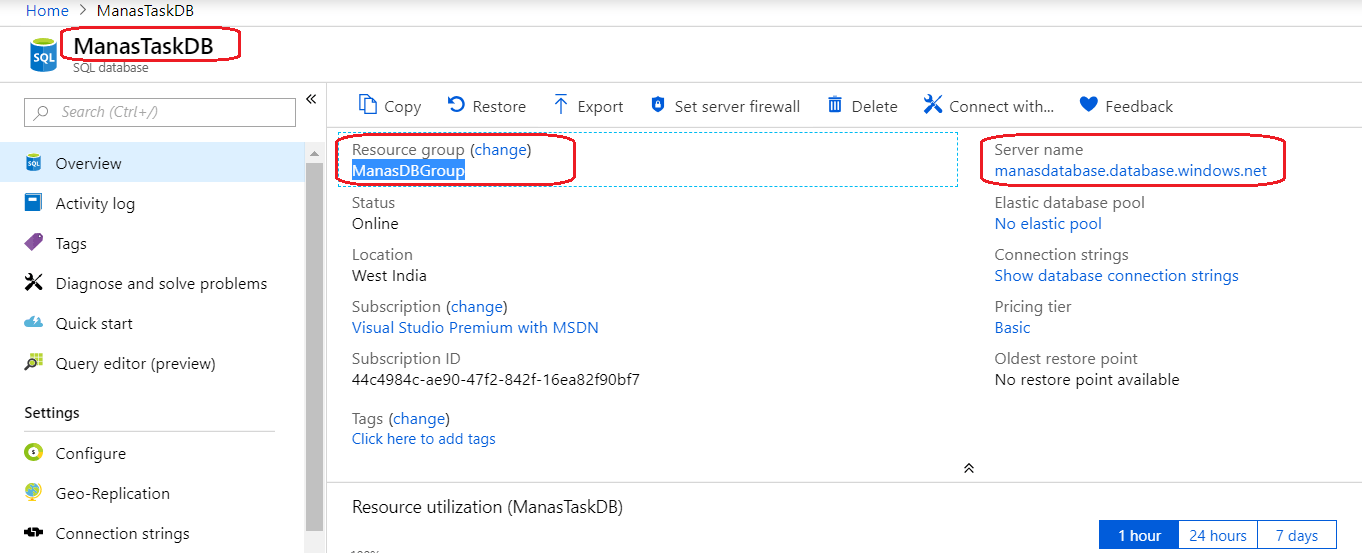
Figure 5: Azure – Get Azure SQL Database Serve Name
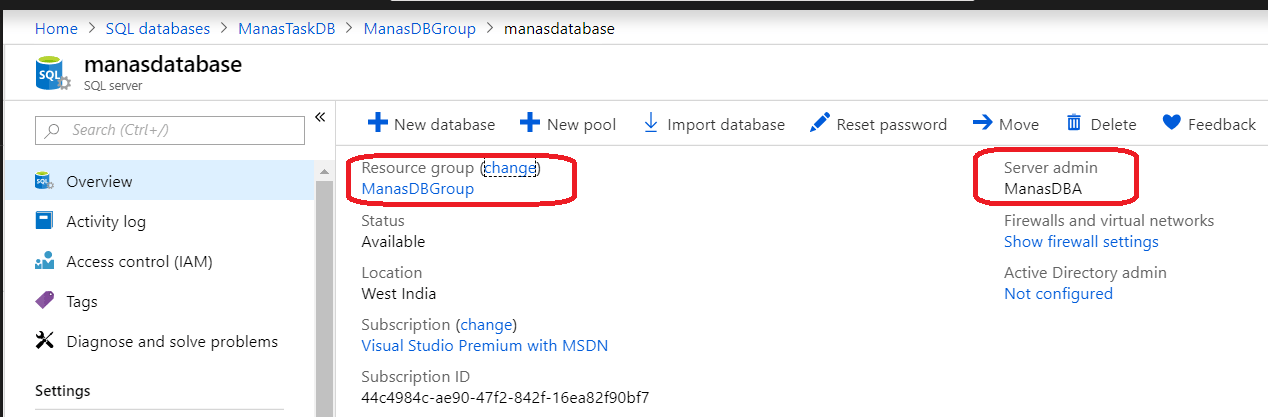
Figure 6: Azure – Get Azure SQL Database Serve admin Name

Figure 7: Azure – Connect to Azure SQL Database
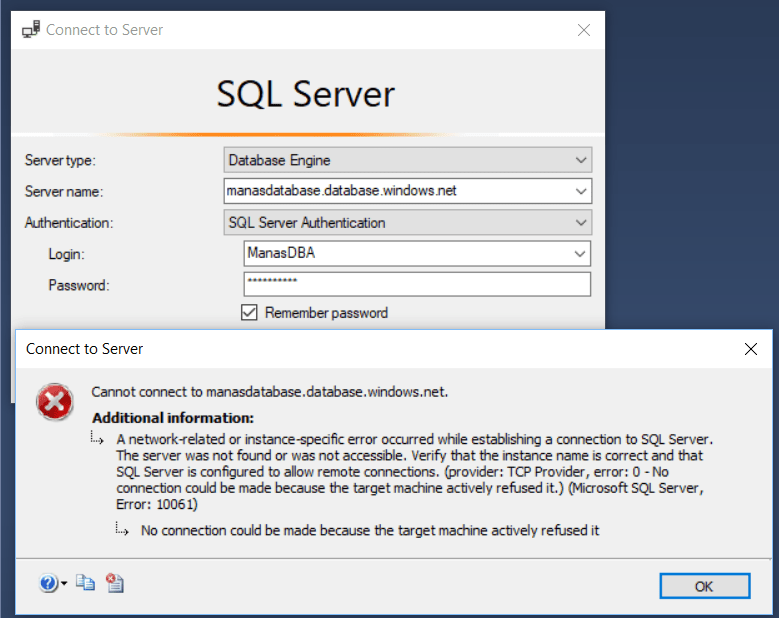
Figure 8: Azure – Error to Connect Azure Database

Figure 9: Azure – Start configuring firewall for Azure Database

Figure 10: Azure – Configure Firewall for Azure Database server

Figure 11: Azure – Successfully Connected to Azure SQL Database
Thanks for reading
Keep reading, share your thoughts, experiences. Feel free to contact us to discuss more. If you have any suggestion / feedback / doubt, you are most welcome.
Stay tuned on Knowledge-Junction, will come up with more such articles


very nice
Nice article!!