Azure – Modify Azure Bot service using Visual Studio 2017
Hello Friends,
In my last blog, we have discussed how to Create Basic Azure Bot Service. Today in this blog, we will discuss, how to customise and test an Azure Bot locally using Visual studio 2017 and Bot Framework Emulator.To implement this solution, I took few suggesstions from my colleague Bhupendra Rayate.
In previous blog, we have discussed, how to download the source code of a Bot service from Azure portal after download the solution open it in Visual studio 2017 as shown in the following figure.
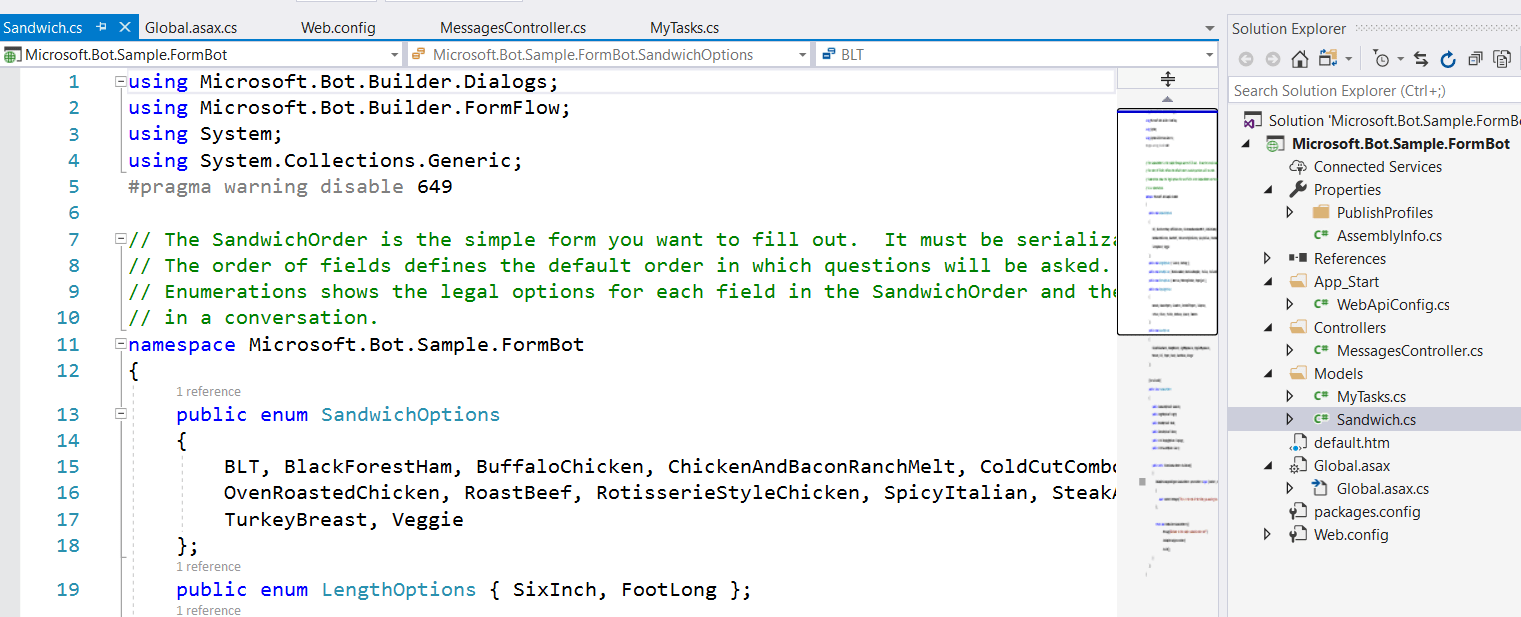
Figure 1: Azure – Open Bot Solution in Visual Studio 2017
Once the solution is opened, right click on the project and click on Manage NuGet packges. On NuGet package manager page, select Installed tab and it will ask you to resote all the installed NuGet packages.Please restore all required packages as sown in following figure.

Figure 2: Azure – Restore all installed packages in NuGet package manager.
Rebuild the solution to fix any issue if exists.Now we are ready to modify our azure bot as per our requirement.
Our Requirement
Here we have a requirement, to create new tasks for user.User needs to put information like for which purpose, we are creating the task,Task name ,Task description and task priority.
In this case , Azure Bot will take all information from user and as per the nature/purpose of the Task, the Azure Bot servic will add a new record in the Azure Sql database.Lets check how should we proceed with this.
Originally the Bot was designed for taking sandwhich orders.Now we are modifing the bot for our Task management.For that we have to add a new class file named MyTask.cs in Model folder as shown in the following figure and replace the code with below code.

Figure 3: Azure – Add new Task Class to Model folder.
MyTasks.cs code :
using Microsoft.Bot.Builder.Dialogs;
using Microsoft.Bot.Builder.FormFlow;
using System;
using System.Collections.Generic;
using Microsoft.Bot.Builder.Dialogs;
using Microsoft.Bot.Builder.FormFlow;
using System.Data.SqlClient;
using System.Configuration;

namespace Microsoft.Bot.Sample.FormBot
{
    public enum TaskType
    {
        Farming,KnowledgeJunction,Personal,Tito
    };

    [Serializable]
    public class MyTasks
    {

        public TaskType? Task;

        [Prompt("What is the task Name? {||}")]
        public string TaskTitle;

        [Prompt("What is the task Description? {||}")]
        public string TaskDescription;

        [Prompt("What is the task Priority? {||}")]
        public string TaskPriority;


        public static IForm<MyTasks> BuildForm()
        {
            return new FormBuilder<MyTasks>().Message("Welcome to the Task creation bot! and please select task type!!!").OnCompletion(async (context, profileForm) => {


                await context.PostAsync("Please wait for a while task saving is in progress...");
                await context.PostAsync(CreateTask(profileForm.Task.ToString(), profileForm.TaskTitle, profileForm.TaskDescription, profileForm.TaskPriority));

                // Tell the user that the form is complete
                await context.PostAsync("Your request is completed.");

             }).Build();
        }

        private static string CreateTask(string taskFor,string taskName,string taskDescripton,string taskPriority)
        {

            try
            {
                string dBNameForTask = string.Empty;
                switch (taskFor)
                {
                    case "Farming":
                        {
                            dBNameForTask = "FarmingTasks";
                                break;
                        }
                    case "KnowledgeJunction":
                        {
                            dBNameForTask = "MSTechsTasks";
                                break;
                        }
                    case "Personal":
                        {
                            dBNameForTask = "PersonalTasks";
                                break;
                        }
                    case "Tito":
                        {
                            dBNameForTask = "TitoTasks";
                                break;
                        }
                }

                if (!string.IsNullOrWhiteSpace(dBNameForTask))
                {
                    string connString = ConfigurationManager.AppSettings["MyTaskSqlConnection"];

                    using (SqlConnection connection = new SqlConnection(connString))
                    {
                        // insert a log to the database
                        string query = "INSERT INTO [dbo].["+ dBNameForTask + "] (TaskName,TaskDescription,TaskPriority) VALUES (@TaskName,@TaskDescription,@TaskPriority)";
                        using (SqlCommand cmd = new SqlCommand(query, connection))
                        {
                            cmd.Parameters.AddWithValue("@TaskName", taskName);
                            cmd.Parameters.AddWithValue("@TaskDescription", taskDescripton);
                            cmd.Parameters.AddWithValue("@TaskPriority", Convert.ToInt32(taskPriority));

                            connection.Open();
                            cmd.ExecuteNonQuery();
                            connection.Close();
                            //log.Info("Data saved successfully!");
                        }
                    }
                }
                return string.Empty;
            }
            catch(Exception expr_1EB)
            {

                return string.Empty;
                //log.Info($"Unable to process your request!");
            }

        }

    }
}
Now open MessagesController.cs class under Controler Folder and replace the code with following code.In this class, we are just replacing teh existing Sandwhich order form with our custom task form.
MessagesController.cs
using System.Threading.Tasks;
using System.Web.Http;

using Microsoft.Bot.Connector;
using Microsoft.Bot.Builder.Dialogs;
using Microsoft.Bot.Builder.FormFlow;
using System.Net.Http;
using System.Web.Http.Description;
using System.Diagnostics;

namespace Microsoft.Bot.Sample.FormBot
{
    [BotAuthentication]
    public class MessagesController : ApiController
    {
        internal static IDialog<MyTasks> MakeRootDialog()
        {
            return Chain.From(() => FormDialog.FromForm(MyTasks.BuildForm));
        }

        /// <summary>
        /// POST: api/Messages
        /// receive a message from a user and send replies
        /// </summary>
        /// <param name="activity"></param>
        [ResponseType(typeof(void))]
        public virtual async Task<HttpResponseMessage> Post([FromBody] Activity activity)
        {
            if (activity != null)
            {
                // one of these will have an interface and process it
                switch (activity.GetActivityType())
                {
                    case ActivityTypes.Message:
                        await Conversation.SendAsync(activity, MakeRootDialog);
                        break;

                    case ActivityTypes.ConversationUpdate:
                    case ActivityTypes.ContactRelationUpdate:
                    case ActivityTypes.Typing:
                    case ActivityTypes.DeleteUserData:
                    default:
                        Trace.TraceError($"Unknown activity type ignored: {activity.GetActivityType()}");
                        break;
                }
            }
            return new HttpResponseMessage(System.Net.HttpStatusCode.Accepted);
        }
    }
}
Once we did with the above modification now time to configure the connection string of our database.In this case, our databse exists in Azure.We have written a blog, how to create and configure a SQL Database in Azure.
To provide the databse connection string to the solution, open Web.config file and add a new key to AppSetting section as shown in following figure.

Figure 4: Configure Connection string in Web.config
After configure the connection string in Web.config file, rebuild the solution and fix, if there is any using or referess missing issue.Once the solution is rebuild successfully, we are done with our Azure Bot with customisations for testing.
Test your bot locally using the Bot Framework Emulator
Now that we’ve created and built our bot, we’ll test it.
- Start the Bot Framework Emulator.
- Back in Visual Studio, select Debug | Start Debugging.
- In the web browser that opens, make a note of the port.
- Switch to the emulator and type our bot’s URL in the box Enter our endpoint URL.
- On the New bot configuration Enter the bot name and the endpoint we saved from the browser when we started debugging. Leave the MSA app ID and MSA app password blank.
- Click Save and connect. Save the MyTasksBot.bot file in the project folder for our bot.
- In the Type In our message field, enter a message like Hello, and press Enter. We should see what we typed followed by the bot’s reply like the following
- Switch to our web browser and close it (or at least the tab used by our bot).
- In Visual Studio, select Debug | Stop Debugging
- Select Windows | Close All Documents to tidy up Visual Studio.

Figure 5: Azure – Open Bot Framework Emulator
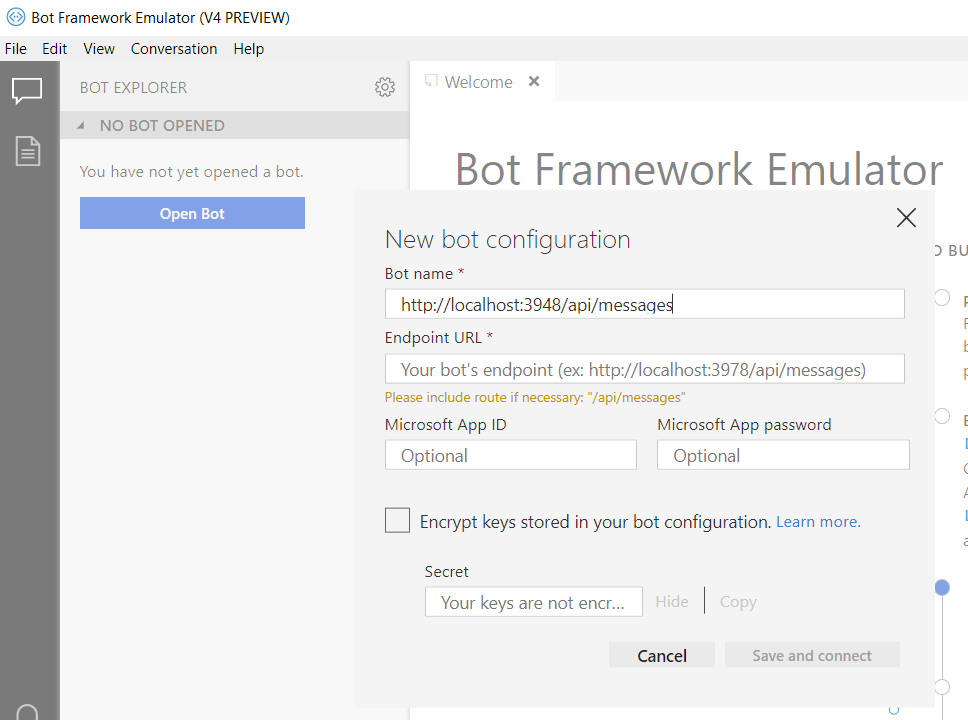
Figure 6: Azure – Open Bot Framework Emulator 1
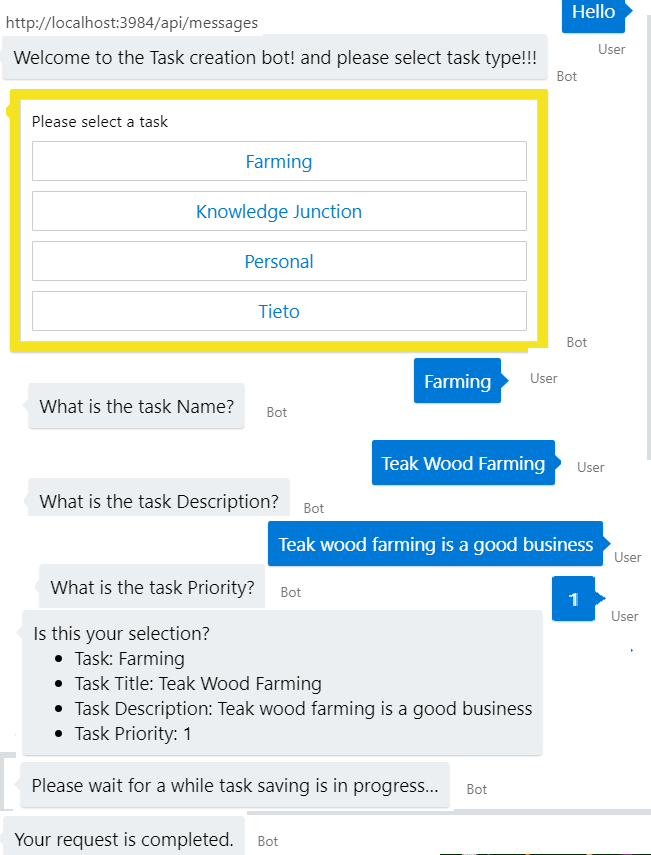
Figure 6: Azure – Testing our Azure Bot
Testing Result :
After Taking all required informtion from user, Azure Bot will start working on the final task , by adding a new row in the Azure Sql database as shown in the following figure.

Figure 6: Azure – New Task added to the database
Once we have satisfied with our customisation and testing, we can deploy our customised Azure Bot back to Azure/cloud by same way using the Publish Profile. We have post a blog Create and Deploy a Web App into Azure
Thanks for reading 🙂
Keep reading, share your thoughts, experiences. Feel free to contact us to discuss more. If you have any suggestion / feedback / doubt, you are most welcome.
Stay tuned on Knowledge-Junction, will come up with more such articles.


Good one 👍