Microsoft Azure Storage and Database Part 31 – Azure Table Storage – Work with Azure Table Storage

Hello Everybody,
Hope you all are doing good !!! 🙂 .
In our previous article we have discussed about the Overview Of Azure Table Storage service. Today in this article we will discuss, how to work with Azure Table Storage using C#.
Tool Installation Articles :
- Configure Azure Command Line Interface ( Azure CLI) On Windows
- Configure PowerShell For Microsoft Azure Az Module On Windows
Previous Azure Series :
- Learn Basics Of Azure Networking In 60 Hours
- Learn Basic Of Azure Active Directory And Azure Identity And Access Management
- Azure DevOps – Learn at one place
If you have missed our previous articles on Azure Storage and Database Series, please check it in following links.
Part 1 – Overview Of Azure Storage and Database
Part 2 – Azure Storage Account
Part 4 – Work With Azure Blob Storage
Part 5 – Storage Explorer For Azure Storage
- .
- .
- .
Part 24 – Azure File Service – Storage Sync Service
Part 25 – Azure File Service – Storage Sync Service – Configure Azure File Sync – 1
Part 26 – Azure File Service – Storage Sync Service – Configure Azure File Sync – 2
Part 27 – Difference Between Azure Blog Storage And Azure File Storage
Part 28 – Azure Queue Storage – Overview
Part 29 – Azure Queue Storage – Store And Process Messages In Azure Queue
Part 30 – Azure Table Storage – Overview
Next Article : Part 32 – Azure Disk Storage – Overview
Lab Exercise
In this article we will see how to .
- How to create a new Azure Table Storage.
- How to add new Entity
- How to find Entities using properties
Collect Information’s From Azure Portal
To connect with Azure Storage Account and create a new Azure Storage Table, we need to get the Connection String of the Storage Account.
To get those information, let’s login to Azure portal ==> Select Storage Accounts ==> Select our Storage Account (kjstorageaccount1) ==> Access Keys ==> Copy Connections string for our future use as showing in the following figure.

Configure Visual Studio Application
The first step of this section is to create a new console application and then we need to install required package using Nuget manager as showing in the following figure.

If the required package has not installed yet, then Go to Browse tab and try to find Microsoft.Azure.Cosmos.Table Nuget package and install it, as showing in the following figure.

After install the package, lets start with the coadding part and to connect the required Storage Account using the connection string as showing in the following figure.

Next, if we see the above figure, we can see after getting CloudStorageAccount object by providing connection string, we are adding a new Table Storage (KJTable).

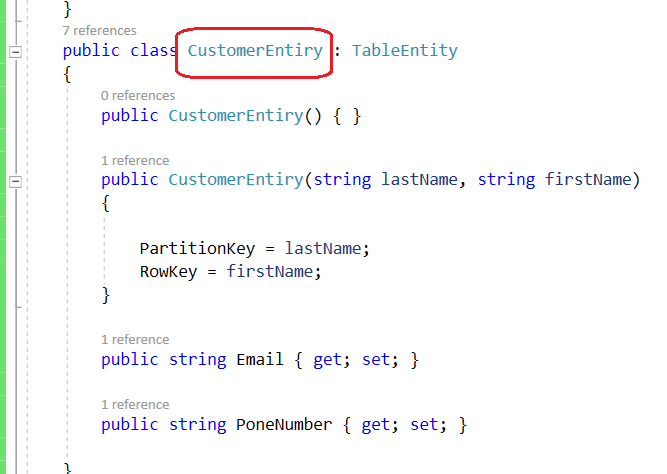
After create the Table storage now the next step is to add new entity to it. In our previous article we have discussed more on the component of the Table storage and we saw, Partition Key and Row Key are two very important default properties of the Table Storage entity. When we add a new entity those properties are added by default and have very significant role when querying entity from Table storage.
Following is our custom Customer class which derived from TableEntity class. We will use this class to define a new customer entity.
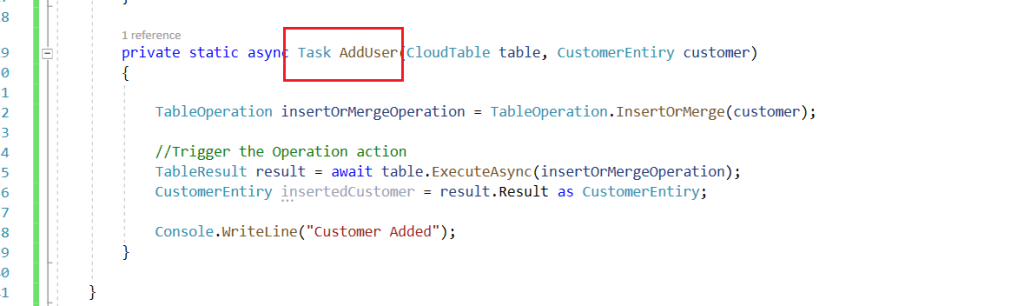
Following method is adding a new customer to Storage Account using one TableOperation.
As we can see in the following figure we are adding one customer by providing the required information through our customer object.
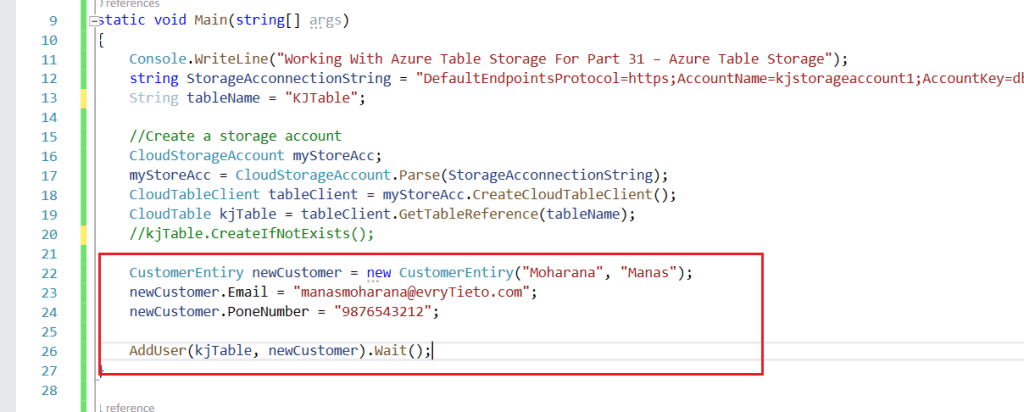
The above coad added a new customer entity to KJTable storage.
NOTE : We can not directly access Table storage from Azure portal. To check the details of a Azure Storage Table we can use Storage Explorer client version y installing the tool on our machine or we can use Storage Explorer preview version as it is showing in the following figure.

In our following coad snippet, as it is showing, we are updating the email id of previous entity and adding a new customer without his telephone number.
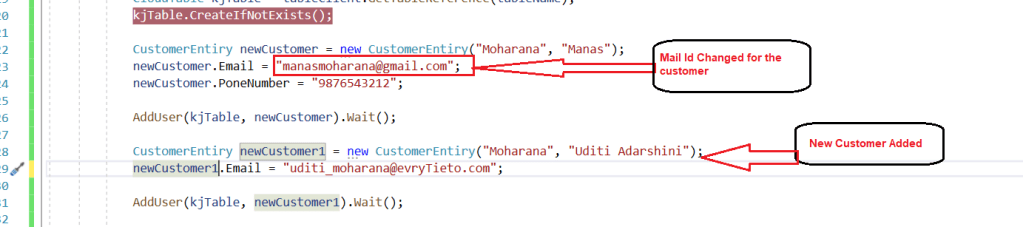


In the above figure we can see the new entity added with only email id and without phone number. So it means, the storage table does not have any specified schema with it.
The following method will query and display the customer entity from the Table Storage as per our filter.

Now we are using the above method to find Manas Moharana entity from the Table storage.

As per the query in our coad it filter Manas Moharana customer entity as showing in the following figure.

With the above information, I am concluding this article. I hope this is informative to you. Please let me know if I missed anything important or if my understanding is not up to the mark. Keep reading, share your thoughts, experiences. Feel free to contact us to discuss more.
Next Article : Part 32 – Azure Disk Storage – Overview
If you have any suggestion / feedback / doubt, you are most welcome. Stay tuned on Knowledge-Junction, will come up with more such articles.
Thanks for reading 🙂 .


2 Responses
[…] our previous article we have discussed on, how to work with Azure Table Storage using C# . Today in this article we will discuss about the Overview Of Azure Disk Storage […]
[…] Part 31 – Azure Table Storage – Work with Azure Table Storage […]