Microsoft Azure Storage and Database Part 33 – Azure Disk Storage – Create And Attach Azure Data Disk To Azure VM

Hello Everybody,
Hope you all are doing good !!! 🙂 .
In our previous article we have discussed on the Overview of Azure Disk Storage Service. Today in this article we will continue on this topic and will discuss how to create and attach azure data disk to azure Virtual Machine.
Tool Installation Articles :
- Configure Azure Command Line Interface ( Azure CLI) On Windows
- Configure PowerShell For Microsoft Azure Az Module On Windows
Previous Azure Series :
- Learn Basics Of Azure Networking In 60 Hours
- Learn Basic Of Azure Active Directory And Azure Identity And Access Management
- Azure DevOps – Learn at one place
If you have missed our previous articles on Azure Storage and Database Series, please check it in following links.
Part 1 – Overview Of Azure Storage and Database
Part 2 – Azure Storage Account
Part 4 – Work With Azure Blob Storage
- .
- .
- .
- .
- .
Part 29 – Azure Queue Storage – Store And Process Messages In Azure Queue
Part 30 – Azure Table Storage – Overview
Part 31 – Azure Table Storage – Work with Azure Table Storage
Part 32 – Azure Disk Storage – Overview
Next Article : Part 34 – Azure Disk Storage – Create And Attach Azure Data Disk To Azure VM Using PowerShell
Azure Disk Storage
As we know, storage plays a vital role in a virtual machine. Because we used it to store necessary data and also we know that, OS disk will not be enough and we may need extra storage to store the data. So let us see how can we attach a new data disk to an Azure VM. In our last article we have already discussed about a data disk is. Please check our last article here to know about Azure Disk.
Add New Data Disk To Virtual Machine
In this section we will see, how to create and attach data disk to VM in Azure portal. Let’s consider a scenario where we have windows virtual machine in Azure and we want to move data from C: drive to another drive to save some space. To do so we want to add a storage or data disk. So let’s go through the following steps to achieve this.
Step 1 – Login to Azure portal => Select Virtual Machine from left side menu => Select the virtual machine to which we want to add a new Data disk. In our case I have “testVM” as showing in the following figure.

Step 2 – On the virtual machine page, click Disks.

Step 3 – As we can see in the following figure, now there are two options to attach a new data disk under Data Disks section. one is “Create and attach a news disk” and the other one is “Attach existing disks“. In this section, we will go with the first option and in the next section we will check the second option. So click on Create and attach a news disk.

Step 4 – After click on Create and attach a news disk, it will add a new row and allow us to provide required information for our new disk. Information like Name, Size, Type of the disk etc. as showing in the following figure.
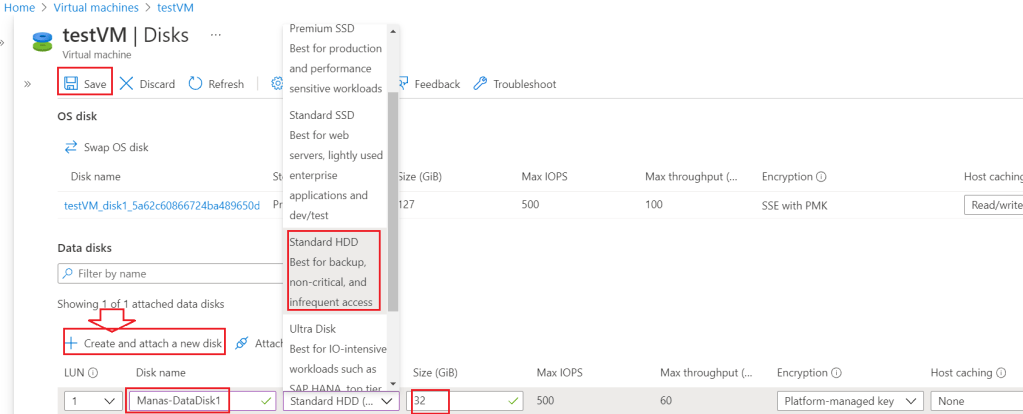
Step 5 – After we provided all the required information, let me go ahead and click Save button to save the changes and add the new data disk (Manas-DstaDisk1) to our VM as showing in the following figure.

Create New Disk
As I said in the previous section, we will check the second option (Attach existing disks) to add a new data disk. Here we can create a disk and attach it later so in this case, we can attach existing disk if we have and please note that disks are always a sperate entity. So let’s go through the following steps, to create a new disk and then attaché the newly created disk to our “testVM” virtual machine.
Step 1 – Login to Azure Portal => search disk in Azure market place and select Disks as showing in the following figure.

Step 2 – It will allow us to provide all the required information to create or configure a new Azure Data Disk. As in the following figure, it is asking many information in different tabs. Following figure showing the Basics tab where we need to provide some basic information for the disk.

Step 3 – In the following figure, it show the Encryption tab, where we need to select one encryption type.

Step 4 – Networking is another tab, where it is asking us to choose a connectivity method. Here I have selected the first option as Public endpoint as this disk can be accessible from any network if user has access.

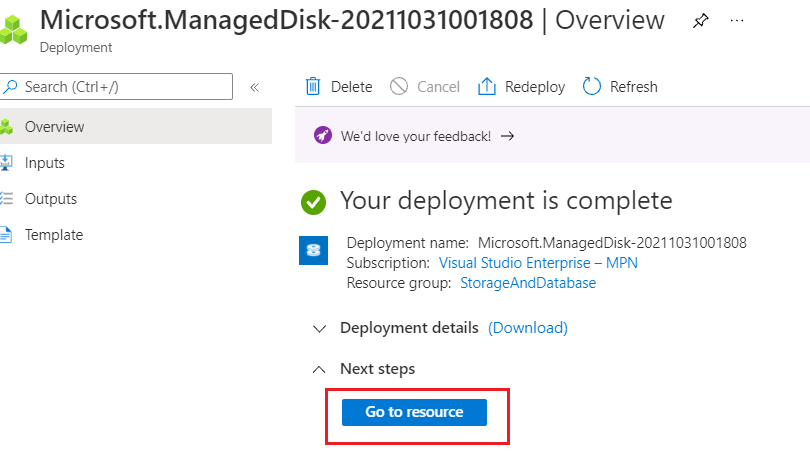
Step 5 – I leave all of the rest tab as it is and hit Review + Create button to validate our provided information.


Step 5 – As showing in the above figure once validation passed, let me go ahead and click Create button to create the new data disk.

In the above image we can see our new data disk (Manas-DataDisk2 ) is ready. So now we will go to our target virtual machine and attaché this newly created disk to the VM.
Step 6 – As showing in the following figure, go to the disk section of the Disks and click on Attach existing disks from Data disks section.

Step 7 – It will allow us to select a Data Disk from a list of existing disk as showing in the following figure. Here I have selected my newly created disk and click Save button to attach the new disk to our VM.


In the following figure we can see that our new data disk is attached to our VM.

Detach Data Disk
Some time we required to detach a data disk from a VM. Suppose we want to decommission a VM and before that we want to save our data, in that case we can detach our data disk from the VM , which is to be decommission. As we can see in the following figure , we can simple click on the cross mark and Detach link to detach the data disk. To save the changes hit Save button.

With the above information, I am concluding this article. I hope this is informative to you. Please let me know if I missed anything important or if my understanding is not up to the mark. Keep reading, share your thoughts, experiences. Feel free to contact us to discuss more.
Next Article : Part 34 – Azure Disk Storage – Create And Attach Azure Data Disk To Azure VM Using PowerShell
If you have any suggestion / feedback / doubt, you are most welcome. Stay tuned on Knowledge-Junction, will come up with more such articles.
Thanks for reading 🙂 .


2 Responses
[…] our previous article we have discussed on how to create and attach azure data disk to azure Virtual Machine in Azure portal. Today in this article we will continue on the same topic and will discuss how to create and attach […]
[…] Chapter 33 – Azure Disk Storage – Create And Attach Azure Data Disk To Azure VM […]