Getting started with Scratch

Hello Friends
Greetings for the day🙂
Today in this article we are going to discuss about how to use Scratch
Some of the Scratch articles
When we open the Scratch we will see this screen

There are total 9 blocks in scratch and you can also make your own blocks.
Scratch offers two editors:
- online
- offline
Both are very similar, but have minor differences. The online editor can be accessed by clicking the Create tab on the website. The offline editor can be the current version of Scratch.
Programming
Before starting the programming first we need to understand the following steps-
- Access this area of the Scratch program:

Select the blue block called move() steps, and drag it in the script area in the the right side of the blocks
2. Then release the block in the script area

3. When you click the block the sprite will move 10 steps front, isn’t it very funny

4. Check out the other categories blocks here

Starting with basic and small programming
- Assemble the given blocks below

2. Assemble the blocks properly
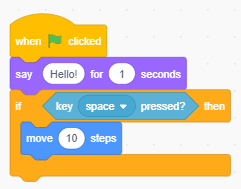
3. Click the Green flag to run the project

It will say hello! for 1 second and unless we press space key it will not move 10 steps front do you no why it happened? first look at script again

The script begins with when green flag click, when the green flag is clicked it say “Hello!” for one second then it will detect that the space key is not pressed it will not move ten steps front and if space key is pressed it will move 10 steps.
Sprites
The sprites are the characters of project. Each sprite has its own blocks, and they can communicate with each other using Broadcasts. For example the alien is chasing the human, the alien is programmed to chase the human. There are the different types of sprites in Scratch, you can see in the down image

Creating new sprites
Most projects on Scratch have more than one sprite. At the bottom-right of the sprites pane is a button for creating a new sprite. Hovering over it opens up four options:
With these buttons, a new sprite can be imported as either a plain image or one that already has scripts. The buttons, going from bottom to top, do the following:
- Selecting a sprite from the sprite library
- Opening the Paint editor to draw a sprite
- Getting a surprise sprite
- and uploading an image from the computer using Scratch
Backdrops
The background of a project can also do a job as well. Backdrops cannot move, but they can play music, send broadcasts, and much more. Like sprites, they also have a picture that can be edited using the Paint editor. Below the backdrop, there is a button to create a new backdrop.
Tutorials
Tutorials can be checked out in Scratch. In the project editor, click the Tutorials button on the top blue bar. Choose a tutorial, and start creating using it.

Paint and Sound Editors
In next article we will discuss about “Paint and Sound Editors“
Thanks for reading this article 🙂
Have a nice day 🙂 🙂


Very Good Job . Keep it up 🙂
Thanks a lot sir
hey
I am also from scratch https://scratch.mit.edu/users/Tinevimbonashe/
Thanks