Docker – Introduction to Containers and Docker – part 2 – Creating first Docker program – our first container with detailed steps :)

Hi All,
Greetings for the day 🙂 LIFE IS BEAUTIFUL 🙂
Since I started exploring Docker / Containers, sharing is continuing.
In previous article – Docker – Beginning with Docker – Introduction to Containers and Docker – part 1 – Try to simplify the concepts / Helps to prepare interviews 🙂 we discussed
- What is DOCKER
- What are CONTAINERS
- Few Docker Terms
- Docker Image
- Docker Repository / Docker Hub
- Docker Host
- VM vs DOCKER / CONTAINER
Today we will do one small docker program, will create the docker image to understand the docker and containers concepts in more depth
Creating first Docker HelloWorld application / HelloWorld image from scratch
- First step is to know whether Docker is installed or not on our box
- We could verify Docker installation by executing docker –version command
- I connected to my Ubuntu VM created / hosted in my Azure using PuttY so that bash is available to execute the commands
docker --version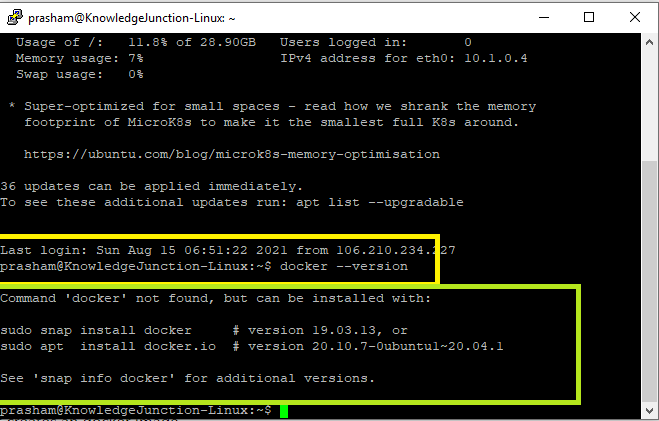
- From the output of command “docker –version” it seems that docker is not installed
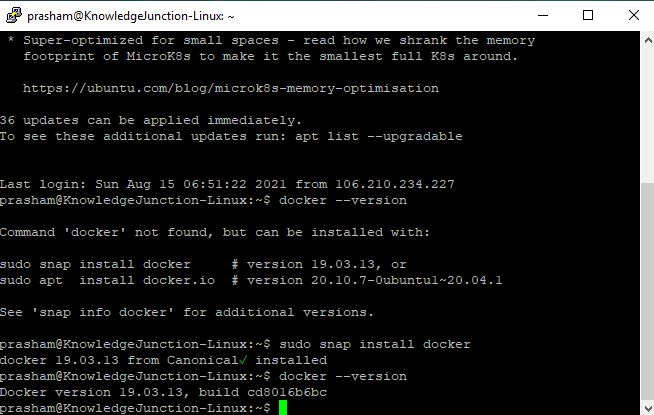
So Next step is to install Docker on our Ubuntu box
Install Docker on Ubuntu box
- Execute the command – sudo snap install docker
sudo snap install docker
- One downloaded and installed successfully, we could verify by using docker –version
Once Docker is ready on our box we are ready to write our first application. Hence NEXT STEP is to create application which we need to create as docker image and execute as container.
- Here we will create simple .NET CORE console “Hello World” application
- We have an already article – how to create to .NET CORE CONSOLE “Hello World” application – Ubuntu : Running .NET Core console application please have a look and create it
- Here we assume as per article application is created and ran successfully
- We need to publish our application in “Release” folder using the command dontnet publish
dotnet publish -c Release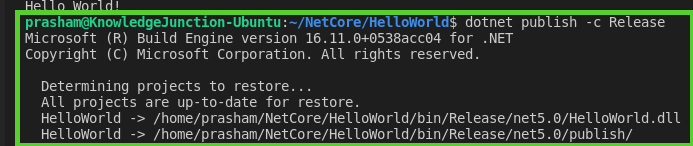
Next step is – create DOCKER FILE which is input for our DOCKER IMAGE / Container
What is Dockerfile ?
- Simple text file with no extension having pre-defined set of instructions
- Set of instructions that creates an docker image
- The Dockerfile file is used by the
docker buildcommand to create a container image - Each instruction in the Dockerfile creates a layer in the image
- For the most part, when we rebuild the image, only the layers that have changed are rebuilt
- Dockerfile always starts with FROM instruction – FROM <Docker container base image name on which our image is based>
FROM <Fully qualified Docker container base image name>

Example :
FROM mcr.microsoft.com/dotnet/aspnet:5.0- Here,
- MCR, mcr.microsoft.com => syndicate of Docker Hub
- dotnet => container repository
- aspnet => container image name
- Here our base image will be => ASP.NET Core runtime image which contains .NET Core runtime image. We will require .NET Core runtime image for our .NET Core console application to build and run successfully
- Once we have Dockerfile ready we are ready for our first container 🙂 we need to use docker build command
docker build -t <image name> -f Dockerfile

Example:
docker build -t KnowledgeJunction-repository -f Fockerfile .

Here, "." indicates current folder
- Once we have docker image build successfully. We can list all docker images by executing command => docker images
docker images
- Important point here to notice is IMAGE ID same for both the images – base image and new image. This is because only command in Dockerfile is to base the new image on existing image
- Lets add few more commands to our Dockerfile as
COPY bin/Release/net5.0/publish/ App/
WORKDIR /App
ENTRYPOINT ("dotnet", "HelloWorld.dll")- Lets discuss above commands / Dockerfile instructions:
- COPY : Copy the folder from our local folder to container folder. Here we are copying the publish folder to container App folder
- WORKDIR : Changes the current dir. Here working directory will be changed to container APP directory
- ENTRYPOINT : This commands tells Docker to configure container to run as an executable. This command runs when container starts. Once command executed container stops

- Once again build happen successfully, we could run the application using => docker run command , we will see the output
docker run <image name>

Example:
docker run -it knowledgejunction-repository")
Here, I’ll stop now 🙂 If you have any thoughts / suggestions / comments, feel free to discuss or comment 🙂
We have very good series of Docker articles, please have a look – https://knowledge-junction.in/2021/02/06/index-containerisation/
Thanks for reading 🙂 HAVE A SAFE LIFE 🙂 TAKE CARE 🙂


4 Responses
[…] one of our previous article – Docker – Introduction to Containers and Docker – part 2 – Creating first Docker program – ou… we have created our first docker image / […]
[…] In last couple of articles we are discussing Docker and Kubernetes. We have created simple .NET CORE application and created docker image – Docker – Introduction to Containers and Docker – part 2 – Creating first Docker program – o… […]
[…] In one of our previous article of Docker we install Docker on Linux – Docker – Introduction to Containers and Docker – part 2 – Creating first Docker program – ou… […]
[…] On Linux / Ubuntu : Docker – Introduction to Containers and Docker – part 2 – Creating first Docker program – ou… […]