Microsoft 365 – Power Platform – Power Apps – Empowering Your Learning Journey: A Comprehensive Guide to Power Apps for Beginners – A Step-By-Step Guide To Creating Canvas Apps – Part 5

“Never give up on a dream just because of the time it will take to accomplish it. The time will pass anyway.”
Hello Everyone,
Hope you all are doing well.
This is a comprehensive tutorial on creating a canvas app in PowerApps from a SharePoint list. Step by step, I will guide you on customizing SharePoint New, Edit, and Disp forms using Microsoft PowerApps.
We’ll delve into the essence of a Power Apps Canvas app, its creation process, connecting it to a SharePoint list, and various steps involved.
Embark on a journey of empowerment with Power Apps! Whether you’re a beginner or looking to enhance your skills, our comprehensive guide provides you with in-depth insights into the Power Platform. Dive into the world of Power Apps, explore its features, tools, and discover the wonders of designing your business with Canvas Apps. To kickstart your learning journey, check out the detailed information available in our four-part series:
- Empowering Your Learning Journey: A Comprehensive Guide to Understanding Power Platform and Getting Started with Power Apps- https://knowledge-junction.in/2023/11/17/microsoft-365-power-platform-power-apps-empowering-your-learning-journey-a-comprehensive-guide-to-power-apps-for-beginners-part-1/
- Exploring the Power Apps Wonderland: Features, Tools, and More – A Comprehensive Guide for Beginners (Part 2)- https://knowledge-junction.in/2023/11/20/microsoft-365-power-platform-power-apps-empowering-your-learning-journey-a-comprehensive-guide-to-power-apps-for-beginners-part-2/
- No Code, No Problem: Designing Your Business with Canvas Apps in the Power Apps Wonderland (Part 3)- https://knowledge-junction.in/2023/11/22/microsoft-365-power-platform-power-apps-empowering-your-learning-journey-a-comprehensive-guide-to-power-apps-for-beginners-no-code-no-problem-designing-your/
- Decoding the Business Toolset: SPFx vs Power Apps – A Beginner’s Guide to Making the Right Choice (Part 4)- https://knowledge-junction.in/2023/11/23/microsoft-365-power-platform-power-apps-empowering-your-learning-journey-a-comprehensive-guide-to-power-apps-for-beginners-decoding-the-business-toolset-spfx/
Explore these articles to deepen your understanding, unleash your creativity, and master the art of building powerful apps with ease. Let the Power Apps adventure begin!”
Key takeaways from this article
At the end of this article, we will understand
- How to create a Canvas app from a SharePoint List in Power Apps
- Developing an Edit Form in Power Apps
- Previewing a Canvas app in Power Apps
- Saving and Publishing a Power Apps Canvas App
- Sharing the Power Apps Canvas App with other members
Now, let’s embark on this journey of app creation, exploring each step with simplicity and clarity.
Unleash Creativity: PowerApps, Where Building Apps Feels Like Play!

- Creating a custom app is a breeze with Microsoft’s PowerApps! Whether you’re just starting or already a pro, we can all design awesome apps without needing to be coding experts. Imagine it like building with blocks – it’s that simple.
- Here’s the cool part: PowerApps gives us a drag-and-drop playground for creating what we call “Canvas apps.” Think of it like arranging puzzle pieces on a board. This not only makes building apps faster but also lets us decide how our app looks and how people move around in it – all without breaking a sweat.
- Now, the magic happens when our app can grab information from lots of different places, like cloud services or even our own computers. It’s like our app has secret agents bringing in data from everywhere!
- And guess what? Our friends, colleagues, or anyone we want can use our app on their phones, computers, or even inside other apps. It’s like sharing a magic portal to our digital world.
- What makes this even more awesome is that we’re not stuck in one way of doing things. We can change our app whenever we want, like adding new features or making it look cooler. It’s like having our app evolve and grow with our ideas.
- So, if we ever thought making an app is only for tech wizards, think again! PowerApps opens up a whole new world where we’re the bosses, and creating apps is as easy as playing with our favorite toys. Let the app adventures begin!
When Should We Make A Canvas App?

Let’s think about creating a canvas app together when:
- We Want to Customize Everything:
- We like the idea of designing every part of the app, like picking colors and deciding how things move around.
- We Need a Fancy User Experience:
- Imagine making the app smart, so it does different things based on what we’re doing. Like hiding or showing stuff when we need it.
- We Don’t Like Ready-Made Designs:
- Other apps come with fixed designs, but we want the freedom to create our own layout.
Business Use Cases

We can use our canvas app for all sorts of everyday business tasks, such as:
- Contact Directory:
- Making a quick directory for easy access to contact info.
- Getting IT Help:
- Creating a simple way to ask for IT support.
- Asking Customers for Thoughts:
- Getting feedback from customers in a friendly way.
- Dealing with Databases:
- Making it easy to see and change information in our database.
- Collecting Suggestions:
- Setting up a box for everyone to drop their cool ideas.
Building The App

Creating our canvas app is like a little adventure. Here’s how we can start:
- Go to the PowerApps Maker Portal:
- Let’s visit the PowerApps Maker Portal together.
- We can choose to make a blank canvas app or pick a common data source like Microsoft Dataverse, SharePoint, Excel, or SQL Server.

- Pick Our Data Source:
- If our data source isn’t listed, no worries.
- We’ll start with a blank canvas app and connect to our source as we go.
- Check out the Create tab and select “More Data Sources” to set up our connection.
And there we go! We’re ready to make our own canvas app that fits what we need. Let’s have some fun building our app!
Creating Your First Canvas App in PowerApps from a SharePoint List
Alright, let’s make our very own app using PowerApps and SharePoint. It’s like building your own custom tool without any complicated stuff. Here’s how we do it:
Setting Up SharePoint List
- Go to SharePoint:
- Imagine SharePoint as a cool place where you can organize information. Let’s go there!
- Create a List:
- Think of a list like a neat table where you put your data. Create a list with things you want to keep track of.
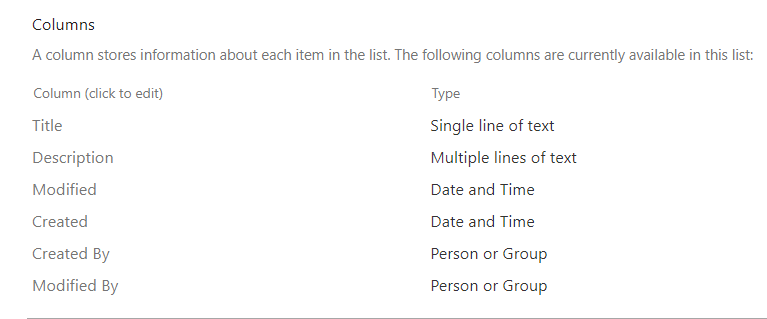
The following image depicts a SharePoint Online List (Feedback Form):

In this SharePoint list, each field is tailored to capture specific types of information. Examples include:
- Title(Name) = Single line of text.
- Description = Multiple line of text.
Now, the SharePoint list is prepared for integration into Power Apps. But before we proceed, let’s outline the necessary conditions.
Requirement:
- Let’s delve into the specific prerequisites for constructing a canvas app in Power Apps using a SharePoint list.
- In Power Apps, we’ll keep it simple with just two screens i.e.
- Feedback form (Blank Screen with Edit Form).
- Feedback Successfully Submited (Success Screen).
Linking SharePoint to Power Apps:
Moving forward, we’ll establish a connection between our SharePoint list, known as the “Feedback Form,” and Power Apps. Follow these straightforward steps to seamlessly integrate the two platforms.
- Step 1: Create a Canvas App from Blank
- Log in to Power Apps using your credentials.

- Choose the Blank app option from the “Start from” list on the Power Apps Home page.

- Select Blank canvas app and click Create.
- Step 2: Provide a Name for the Canvas App

- Enter a name for your app, for example, “Feedback Form.”
- Choose the layout format for tablet or phone.
- Click Create to launch the Power Apps studio.
- Step 3: Connect SharePoint List Data Source to the App
- Navigate to the Data tab or click on the “Connect to data” link in the middle of the screen.
- Expand the + Add data, and search for the SharePoint connector.
- Click on SharePoint.

- If the SharePoint connection already exists, there’s no need to create a new one. Otherwise, create a new SharePoint connection by providing valid credentials.
- Enter the URL of the SharePoint site where your list is located.

- Select the Feedback Form checkbox in the Choose a list window and click Connect.

Now, you’ll notice that the SharePoint list connector has been successfully added to your Power Apps Canvas app. This establishes the connection between your app and the Feedback Form in SharePoint, allowing for easy data integration.
Navigating SharePoint Fields in Power Apps:
Now, let’s explore how we can utilize SharePoint list fields in Power Apps, especially in Edit forms and Display forms, using the example of a Feedback Form.
- Understanding the Power Apps Edit Form:
- Imagine the Edit Form in Power Apps as a versatile instrument. It empowers us to create new feedback entries, make adjustments to existing ones, and seamlessly save all the data in the SharePoint list. For instance, when someone submits feedback through the Power Apps edit form, their input gets neatly stored in the SharePoint list once they hit the SUBMIT button.
- Decoding the Power Apps Display Form:
- On the flip side, the Display Form in Power Apps acts like a read-only viewer. It’s perfect for reviewing details without making any alterations. So, if we want to check specific feedback details, the Power Apps Display Form allows us to do that effortlessly.
Creating the First Screen: Feedback Form Entry
Now, let’s dive into constructing the initial screen of our app, called “Feedback Form.” This screen is designed to facilitate the input of new feedback entries. Here’s a beginner-friendly guide:
- Inserting the Edit Form:

- Click on the “+” icon to insert a new component.
- Navigate to “Insert” -> “Expand Input” -> Select “Edit form.”
- Configuring the Edit Form:

- Choose the data source for this form; in our case, it’s the SharePoint List (Feedback Form).
- You can customize the fields by adding or removing them using the “Edit fields” option.
- Adjusting Form Properties:

- Modify the form properties like Columns, Layout, and Size according to your preferences.
- Before making changes inside the form, ensure to unlock the data cards. To do this, select the DataCard -> Advanced -> Unlock the key.
Adding a Header to the Feedback Form:
Now, let’s make the top of our feedback form look organized by adding a header section. Here’s how you can do it in a beginner-friendly way:
- Inserting a Label Control:

- Click on the “+” icon to insert a new component.
- Navigate to “Insert” -> “Text label” to add a label control.
- Setting Text Property:

- Once the label is added, look for the “Text” property in the right-side menu.
- Set the “Text” property to the desired title, for example, “Feedback Form.”
- Customizing the Title:
- Feel free to use any name you prefer for the title of the feedback form.
- Additional attributes like Font, Font size, Font weight, Color, etc., can be adjusted to enhance the appearance.
By following these straightforward steps, you’ve successfully created a clear header section for your “Feedback Form.” This makes it visually appealing and easy for users to understand the purpose of the form.
Adding a Save Button to the Feedback Form:
Now, let’s make it easy for users to save their feedback by adding a Save Button to the form. Here’s how you can do it in simple terms:
- Inserting a Button:

- Click on the “+” icon to insert a new component.
- Navigate to “Insert” -> “Button” to add a button to your form.
- Setting Up the Button:
- Select the newly added button.
- In the right-side menu, look for the properties of the button.
- Configuring OnSelect Property:

- Find the “OnSelect” property and set it to the following formula:
- OnSelect = SubmitForm(Form1); ResetForm(Form1); NewForm(Form1);
- Here, Form1 is the name of your edit form.
- SubmitForm function updates the data source with any changes.
- ResetForm function restores the form to its original state.
- NewForm function opens a new form for the next entry.
By doing this, you’ve added a convenient Save Button to your Feedback Form. Users can now easily save their feedback entries with a simple click.
Creating a Success Screen for the Feedback Form:
In this step, let’s utilize the Success Screen template in Power Apps to design a screen that appears when users successfully submit the Feedback Form. Here’s a simplified walkthrough:
- Adding a New Screen:

- Click on the “+” icon to add a new screen.
- Choose the “Success Screen” template for a pre-designed layout.
- Customizing Text:

- Locate the default text on the screen.
- Modify it to convey a positive message like “Feedback Submitted Successfully!”
- Personalizing Appearance:
- Customize the appearance of the success message.
- Adjust font size, color, and style to match our app’s theme.
- Enhancing Visuals (Optional):
- Leverage the template’s visual elements or insert additional icons/images.
- Consider using a checkmark icon or any positive symbol.
Previewing and Testing our Feedback Form in Power Apps:
Once we’ve finished creating your Feedback Form in Power Apps, it’s time to test and preview it. Here’s a step-by-step guide in simple terms for beginners:

- Previewing the App:
- To see how our Feedback Form will look and function, press the “F5” key or click on the “Run” icon at the top of the page.
- This action initiates the Preview mode, allowing us to interact with the app as if it’s live.
- Submitting Feedback:

- In the Feedback Form screen, we’ll encounter a form where users can provide feedback.
- Fill in all the required fields in the form. Include details such as name, description, and any other relevant information.
- Clicking the Submit Button:
- Look for the “Submit” button on the form.
- Clicking this button will save the feedback details in the SharePoint list and trigger the necessary actions.
- Success Screen Transition:

- After submitting, the app will automatically redirect to the Success Screen, confirming that the feedback was successfully submitted.
- Reloading SharePoint List:

- To verify the entry, reload the SharePoint list associated with the Feedback Form.
- Our new feedback entry should now be visible in the list.
This simple process ensures that your Feedback Form functions correctly, and users can seamlessly submit their feedback. The Success Screen serves as positive reinforcement, assuring users that their input was received successfully.
Saving and Publishing Your Power Apps Canvas App:
Save Your Work:

- Location: Find the “Save” button in the top right corner.
- Options:
- Save with version notes
- Save as
- Download a copy
- Action: Click the save icon to directly save the Canvas app.
Publishing Your App:

- Find the Icon: Locate the “Publish” icon in the top right area.
- Edit Details (Optional):
- Need Changes? Click “Edit details” to modify the app’s name, icon, or description.
- Ready to Go? Skip this step if no changes are needed.
- Final Step: Click “Publish this version” to make your Canvas app available.
By following these steps, you ensure that your Power Apps Canvas App is securely saved and published, making it accessible for users.
Sharing Your Power Apps Canvas App:
To make your Power Apps Canvas app accessible to others, follow these straightforward steps:
- Using Apps Studio Page:

- Navigate to “Apps” on the left navigation.
- Select your specific Canvas app (e.g., Feedback Form).
- Click on the ellipses (…) and choose “Share.”
- Share Directly from the App:

- Inside the app, click on the Share icon at the top.
- Enter the name or email of the user you want to share the Canvas app with.
- Add an explanatory message and optionally upload an image to showcase your app.
- Select “Co-owner” if needed.
- Click “Share” to complete the process.
- Additional Tips:
- Co-owner Option: If selected, the user can use, edit, and share the app but cannot delete or change the owner.
- Email Invitation: Sending an email invitation is optional; use it to introduce your app’s purpose and functionality.
- App Web Link: When shared, an App Web link is automatically generated for easy access.
After sharing, you’ll see a successful notification, indicating that permission changes were saved. You can also open the app through the provided weblink. If needed, you can cancel the process. Sharing your Power Apps Canvas app is now simple and efficient!
In conclusion, creating a canvas app in PowerApps from a SharePoint list is a rewarding journey that empowers users to design and share customized apps effortlessly. From designing the feedback form to adding a save button and creating a success screen, the step-by-step guide ensures a seamless process. Saving and publishing the Power Apps Canvas app is simple, and sharing it with others enhances collaboration. Stay tuned for the next article, where we’ll explore deploying our canvas app to another tenant or environment, unlocking even more possibilities in the PowerApps realm.
Also get my article updates on my social media handles
Twitter – https://twitter.com/PrajyotYawalkar?t=oovP0r9FnDtz5nNSJGKO0Q&s=09
LinkedIn – https://www.linkedin.com/in/prajyot-yawalkar-093716224/
Have a wonderful day.
Thanks for reading.


2 Responses
[…] Empowering Our Learning Journey: A Step-By-Step Guide to Creating Canvas Apps (Part 5) – In this hands-on tutorial, we, as a team, guide each other through the creation of Canvas Apps.- https://knowledge-junction.in/2023/11/27/microsoft-365-power-platform-power-apps-empowering-your-lea… […]
[…] Hands-On Creation: Team-guided Canvas App creation. Create with Part 5. […]