Microsoft Azure Storage and Database Part 19 – Azure File Service – BackUp And Restore Azure Files From Recovery Services Vault

Hello Friends,
Hope you all are doing good !!! 🙂 .
In our previous articles we have discussed how to upload, download and copy files in Azure File Share using PowerShell. Today in this article we will discuss How to configure Recovery Service Vault and BackUp and Restore Azure File share From Recovery Service Vault.
Tool Installation Articles :
- Configure Azure Command Line Interface ( Azure CLI) On Windows
- Configure PowerShell For Microsoft Azure Az Module On Windows
Previous Azure series :
- Learn Basics Of Azure Networking In 60 Hours
- Learn Basic Of Azure Active Directory And Azure Identity And Access Management
- Azure DevOps – Learn at one place
If you have missed our previous articles on Azure Storage and Database Series, please check it in following links.
Part 1 – Overview Of Azure Storage and Database
Part 2 – Azure Storage Account
Part 4 – Work With Azure Blob Storage
Part 5 – Storage Explorer For Azure Storage
- .
- .
- .
- .
Part 15 – Azure File Service – Mount File Share On Window Server Using PowerShell
Part 16 – Azure File Service – Mount File Share On Window Server Using File Share URL
Part 17 – Azure File Service – Create File Share Using Power Shell
Part 18 – Azure File Service – Upload And Copy Files In File Share Using Power Shell
Next Article : Part 20 – Azure File Service – BackUp And Restore Azure Files From The File Share Pane
Why To BackUp
Organizations uses Azure file shares for many reasons, such as replacing on-prem hardware or shifting the workload to the Cloud to reduce global connections into one on-prem point. As soon as we mention files, we should have a backup strategy in place that meets our organization’s restore point objectives and recovery time objectives for example. we need a file that someone just accidentally deleted or we need a file from four years ago as part of an audit investigation. This new capability gives administrators the ability to easily restore individual files, without wrangling an entire storage account or virtual machine backup, and control the costs associated with now only backing up the required file shares.
Benefits Of Azure File Share BackUp
As per Microsoft documentation, following are the ley benefits of taking BackUp.
- Zero infrastructure: No deployment is needed to configure protection for our file shares.
- Customized retention: We can configure backups with daily/weekly/monthly/yearly retention according to our requirements.
- Built in management capabilities: We can schedule backups and specify the desired retention period without the additional overhead of data pruning.
- Instant restore: Azure file share backup uses file share snapshots, so we can select just the files we want to restore instantly.
- Alerting and reporting: we can configure alerts for backup and restore failures and use the reporting solution provided by Azure Backup to get insights on backups across our files shares.
- Protection against accidental deletion of file shares: Azure Backup enables the soft delete feature on a storage account level with a retention period of 14 days. Even if a malicious actor deletes the file share, the file share’s contents and recovery points (snapshots) are retained for a configurable retention period, allowing the successful and complete recovery of source contents and snapshots with no data loss.
File Share Backup Cost :
Followings are two costs associated with Azure file share backup solution:
- Snapshot storage cost: Storage charges incurred for snapshots are billed along with Azure Files usage according to the pricing details mentioned here
- Protected Instance fee: The protected instance fee depends on the total size of protected file shares in a storage account.
Recovery Services vault :
A Recovery Services vault is a management entity that stores recovery points created over time and provides an interface to perform backup related operations. These include taking on-demand backups, performing restores, and creating backup policies.
Let’s go through the following steps to create and configure one Recovery Services Vault because this is the starting point for all types of back and restore operations.
Step 1 – Sign in to your subscription in the Azure portal.
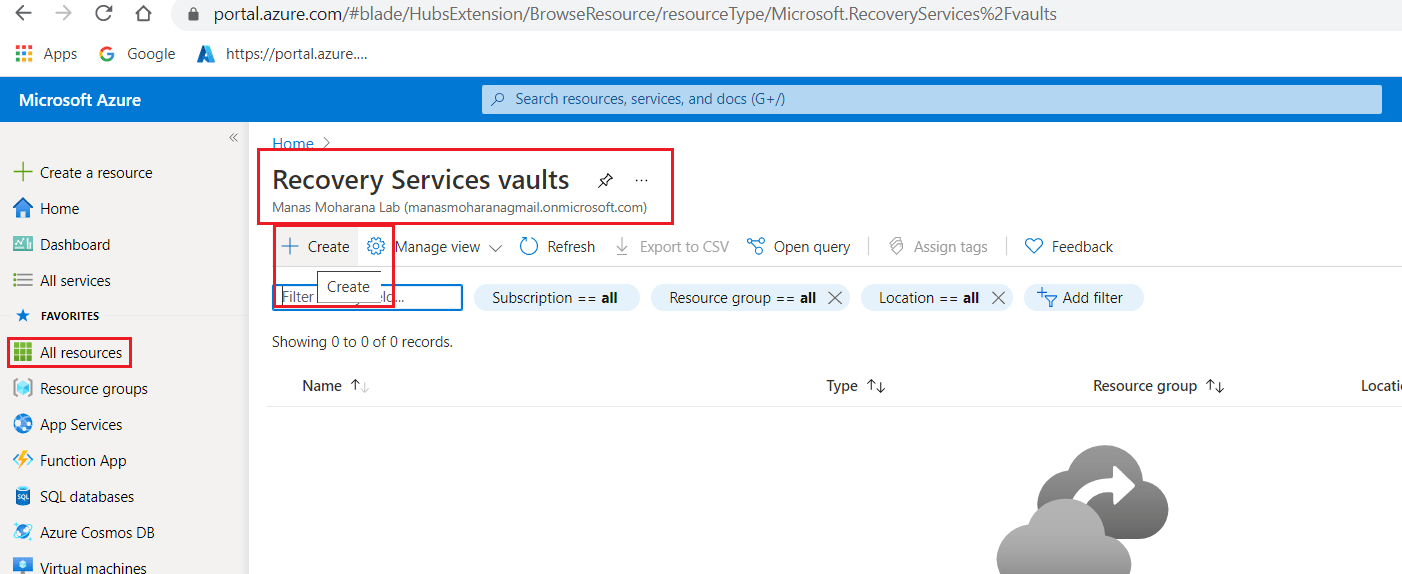
Step 2 – Search for Recovery Services vault in the Azure portal and select Recovery Services vault.

Step 3 – Click on + Create button to start configuring one Vault as showing in the following figure.
Step 4 – The Recovery Services vault dialog box opens. Provide values for the Name, Subscription, Resource group, and Location. For Location select the geographic region for the vault. To create a vault to protect any data source, the vault must be in the same region as the data source.
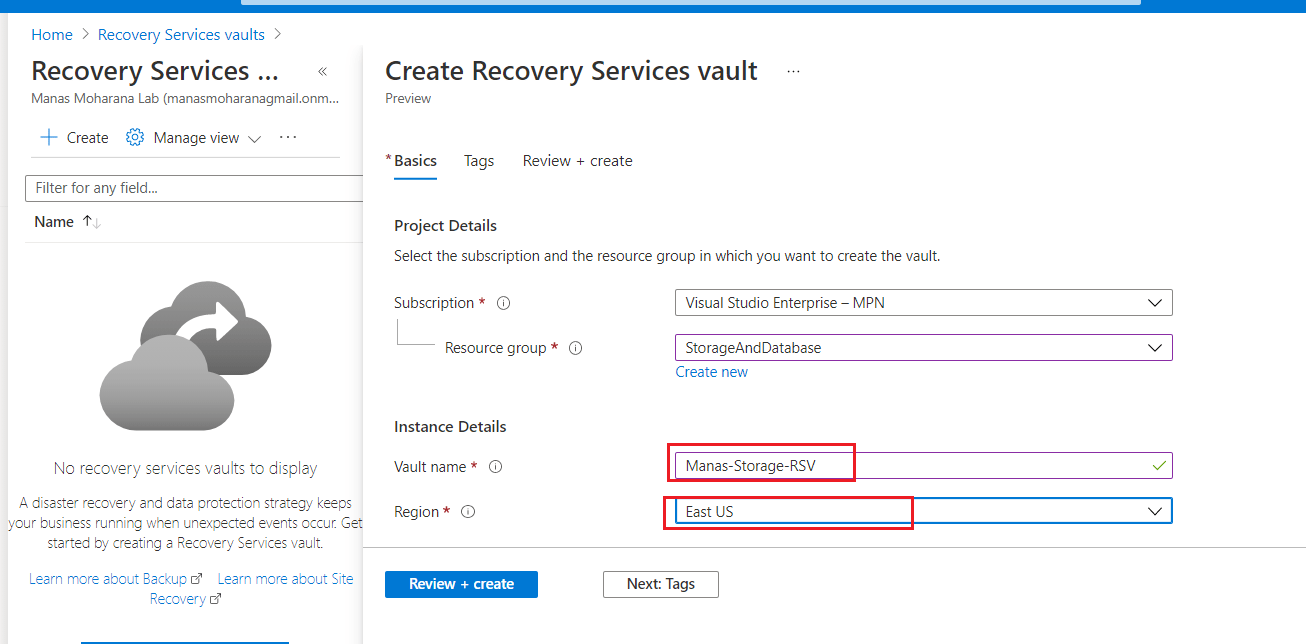
NOTE : If we’re not sure of the location of your data source, close the dialog box. Go to the list of our resources in the portal. If we have data sources in multiple regions, create a Recovery Services vault for each region. Create the vault in the first location before we create the vault for another location. There’s no need to specify storage accounts to store the backup data. The Recovery Services vault and Azure Backup handle that automatically.
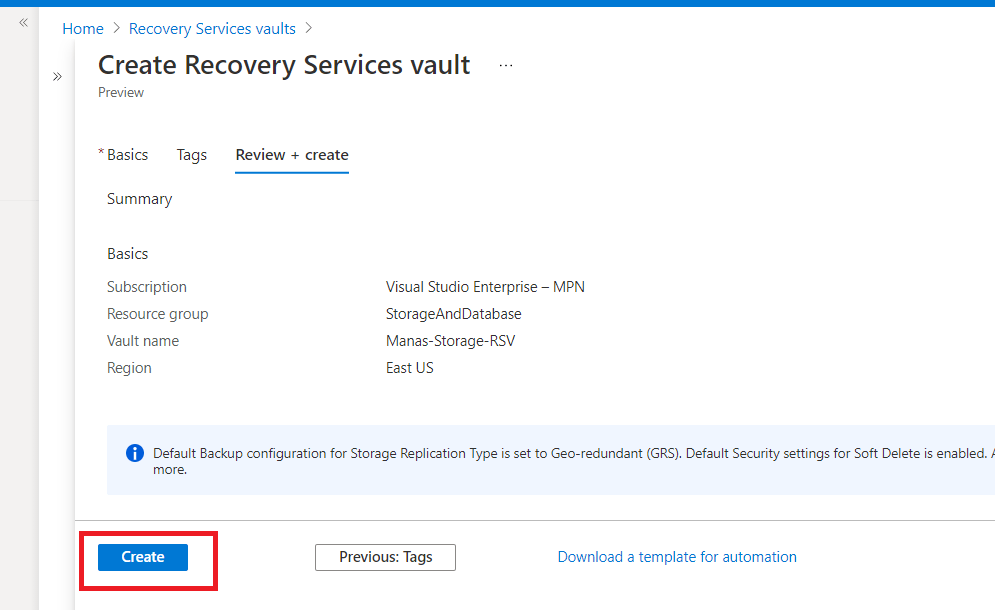
Step 5 – When reviewed is done, click Create to create the Recovery Services vault as showing in the following figure.
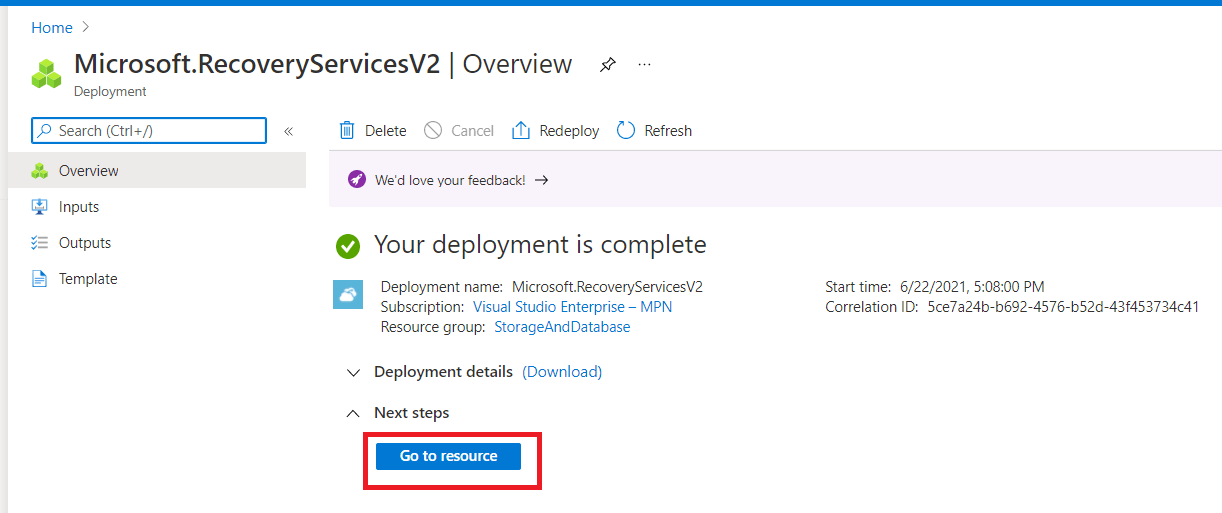
Step 6 – It will take a while to create the Recovery Services vault. Once created, it allow to click Go To Resource 🙂 as showing in the following figure. Click on that to go to the overview page of Recovery Services vault.
BackUp File Share
In the above section we have configured the Recovery Service Vault and it is now ready to configure backup for any workloads. So in this article we are going to discuss, how to take backup of our File Share. let’s go through the following steps to configure and take our first file share backup.
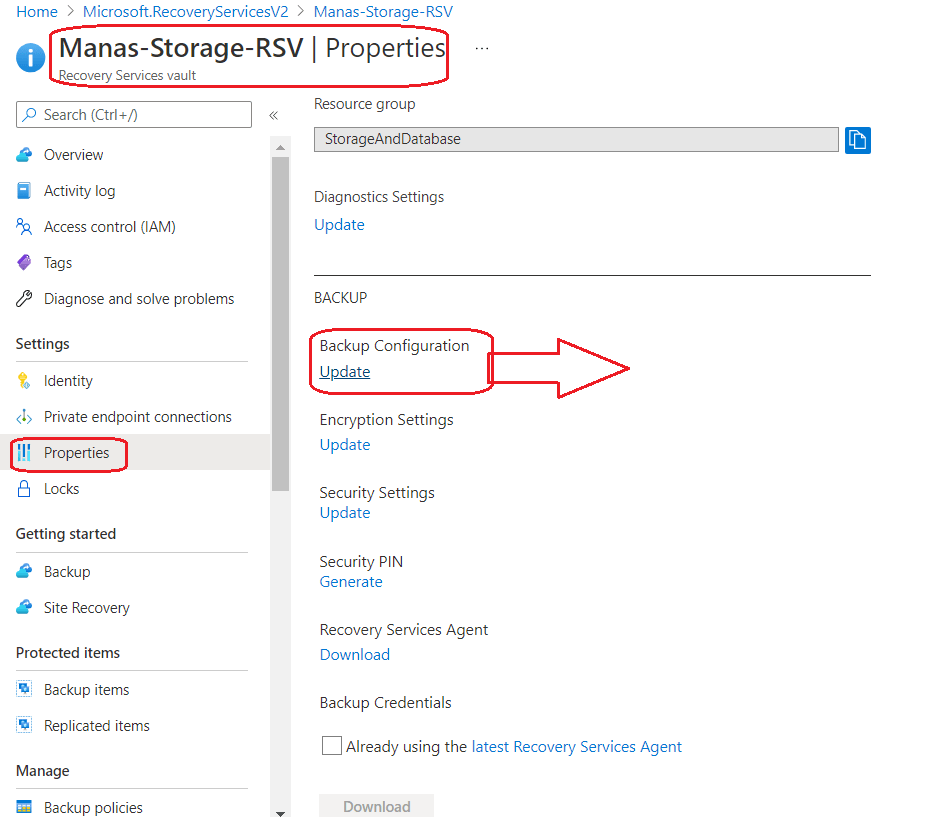
Step 1 – As Microsoft recommend us to review the default settings for Storage Replication type and Security settings before configuring backups in the vault,. From Vault page select Properties ==> click Update for Backup Configuration as shown in the following figure.
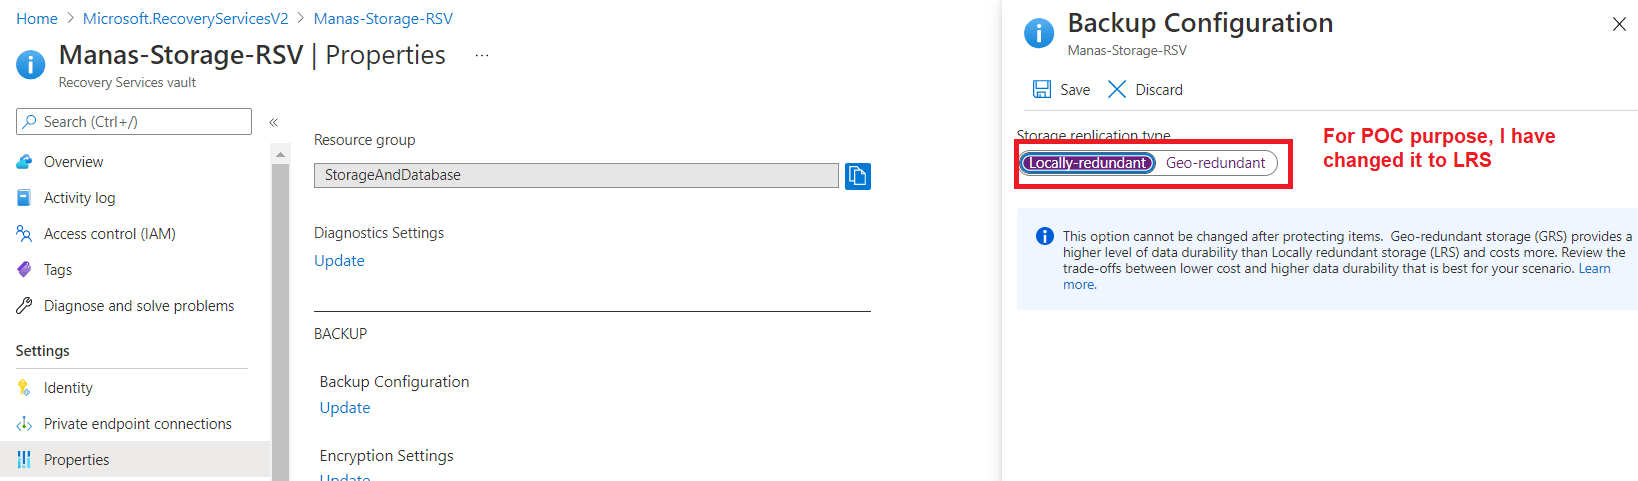
Step 2 – As this backup is for demo purpose, I have change the replication type to LR from GR as showing in the following figure to save cost.
Step 3 – Now we are ready to configure BackUp from Recovery Service Vault. There is another approach to configure backup from Azure File Share. We will discuss that in our next article. So select BackUp from Getting Started section from left side menu as showing in the following figure.
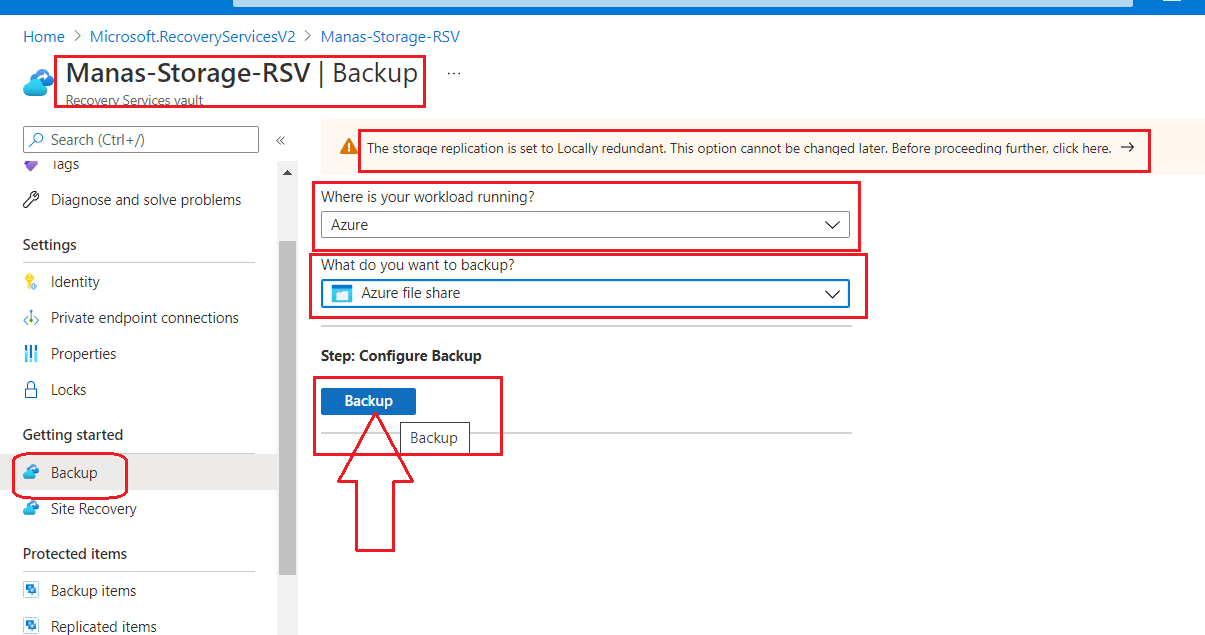
Step 4 – As showing in the above figure, select Azure for Where is your workload running? There are two other options available in the dropdown those are Azure Stack and On-Premise, we can select them as per the requirement.

Step 5 – As per the above figure, In What do you want to back up?, select Azure File Share from the drop-down list. because we are now configuring this for our Azure File Share. Then Click BackUp Button to register the Azure file share extension in the vault.
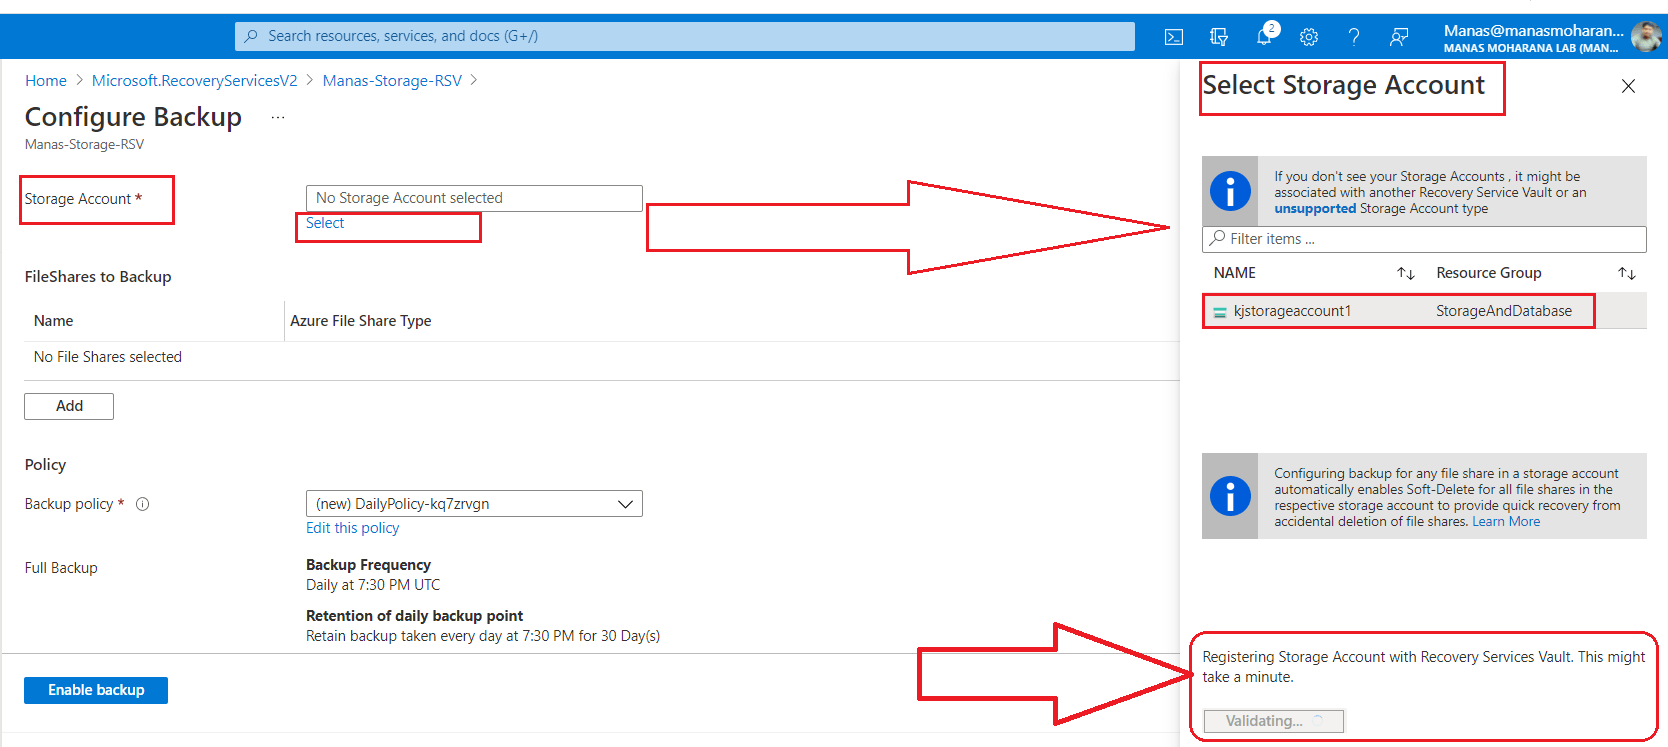
Step 6 – From the Backup pane select our Storage Account and click Ok to validate. It will take some time to validate and register the Storage Account with Vault as showing in the following figure.
Step 7 – Select the file shares we want to back up. Click the Add button in the FileShares to Backup section It will open Select File shares context pane. From the Select File Shares list, select one or more of the file shares you want to back up. Select OK.
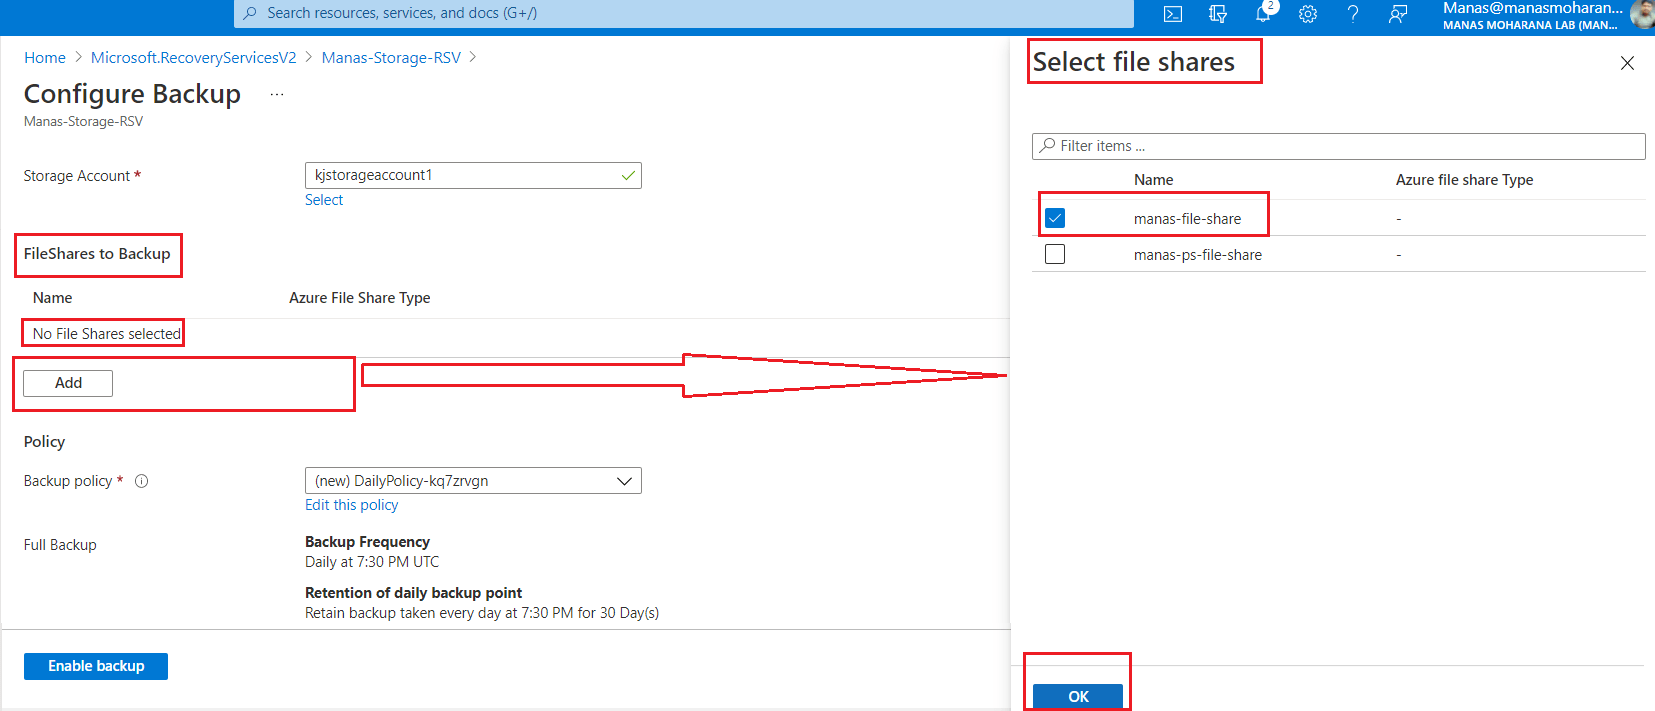
Step 8 – The last one is to configure the policy for the backup. To choose a backup policy for our file share, we have three following options.
Choose the default policy: This option allows you to enable daily backup that will be retained for 30 days.Choose one of the existing backup policies: To choose one of the existing backup policies for configuring protectionCreate a new policy: To create a new backup policy for our file share, select the link text below the drop-down list in the Backup Policy section as shown in the following figure . The Backup Policy context pane opens on the right. Specify a policy name in the text box and choose the retention period according to your requirement. After specifying the retention values and a valid policy name, click OK to create the new policy.

In our case I have selected the first option and I choose the default policy as showing below and then click Enable Backup button to start deploy the backup.


In the above figure we can see the deployment is going on and it will take few moment to complete. In the following figure, it shows the backup configuration is done. Now time comes to take our first back up manually because the time we configured has already passed for today and there would be one backup in pending state.
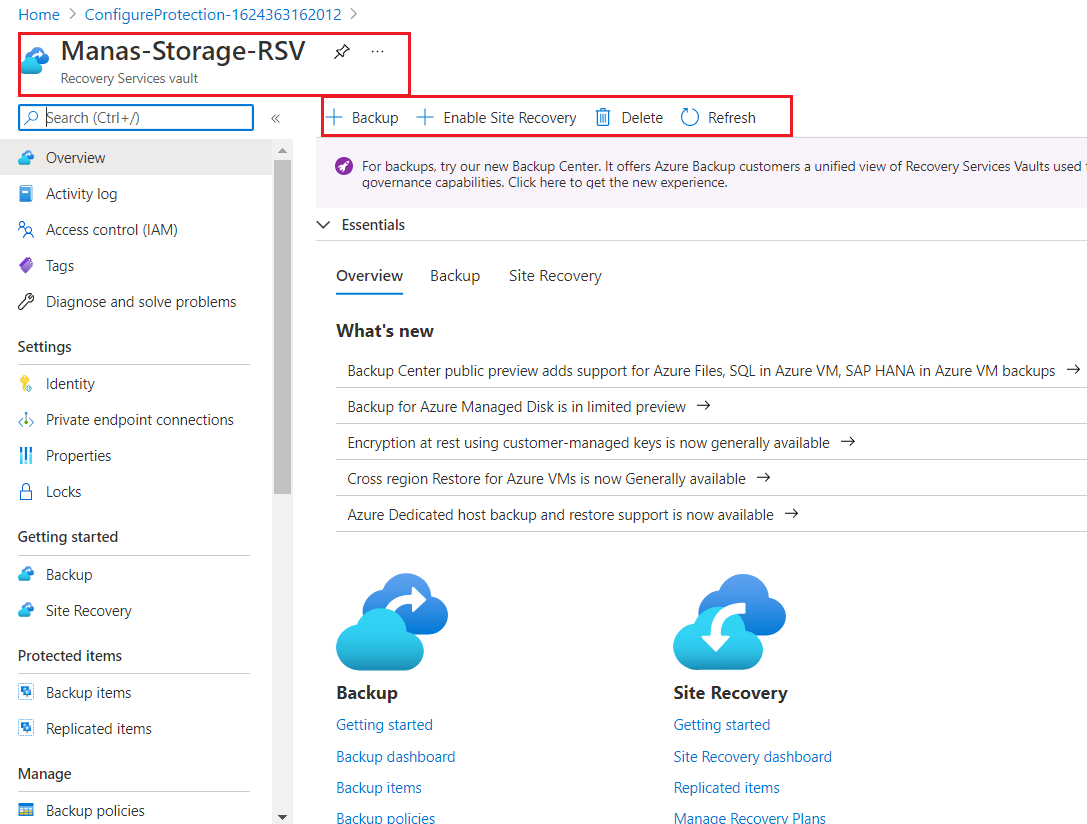
Step 9 – Go to the Recovery Services vault we used to back up our file share. On the Overview pane, select Backup items under the Protected items section. It will open a new pane that lists all Backup Management Types appears next to the Overview pane.
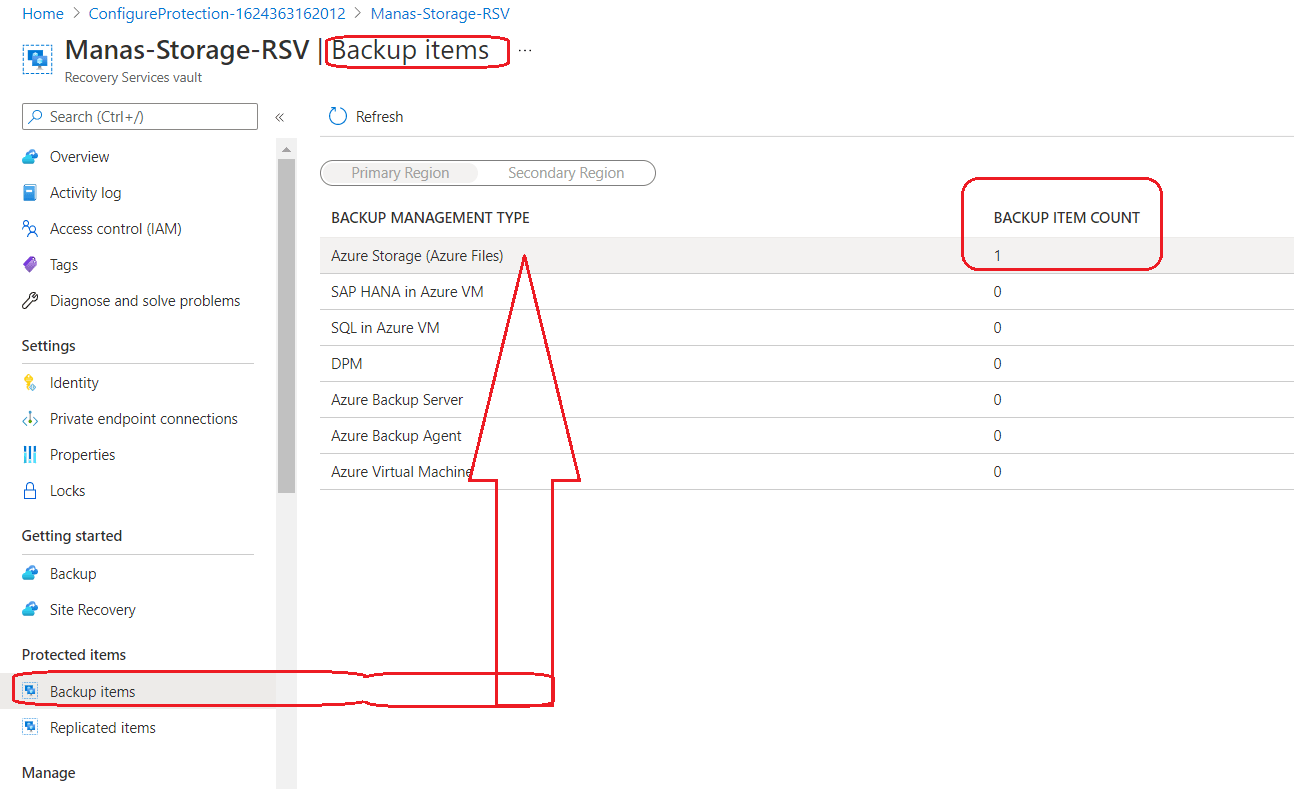
Step 10 – From the Backup Management Type list, select Azure Storage (Azure Files) as showing in the above figure. we will see a list of all the file shares and the corresponding storage accounts backed up by using this vault. Here we have just associated one back up with one storage account and that is pending and waiting for the initial backup.
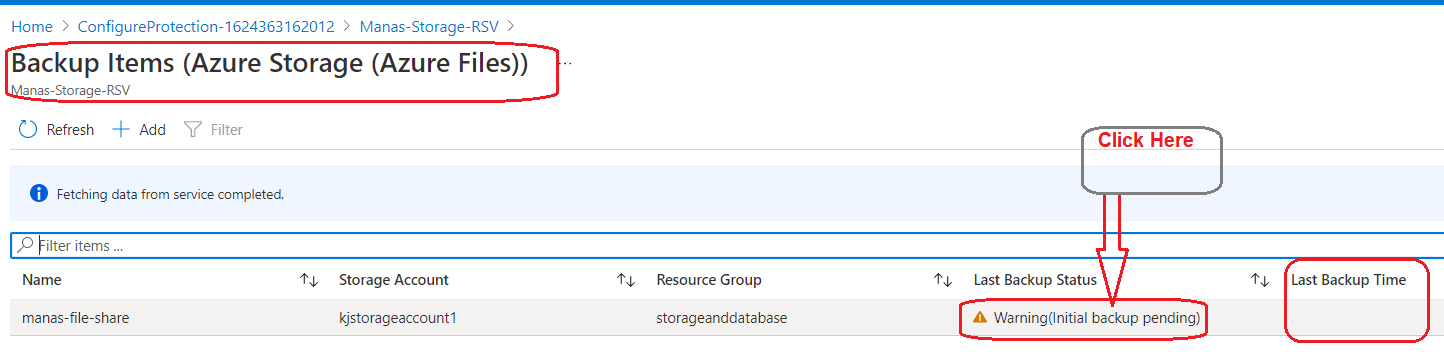
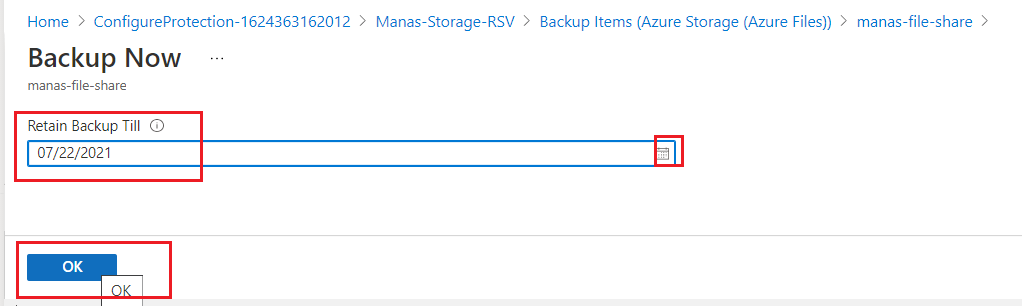
Step 11 – Select the backup item from the list and click BackUp Now to start taking backup as showing in the above figure. If we see in the following figure the last backup time is empty because we are now taking backup first time after it configured.

Step 12 – Click OK button after select a Retain backup till date.
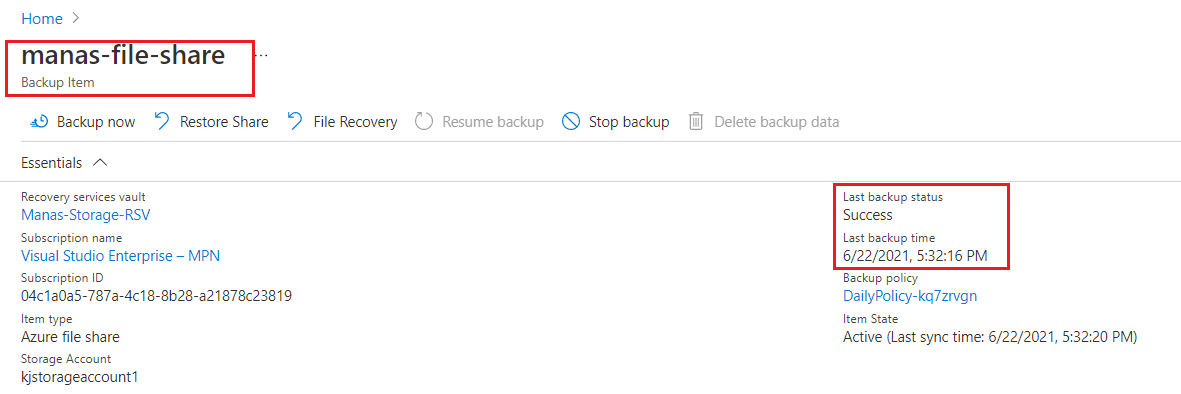
We can now see in the following figures, the status of the backup as Last backup status is Success and it now shows Last backup time.

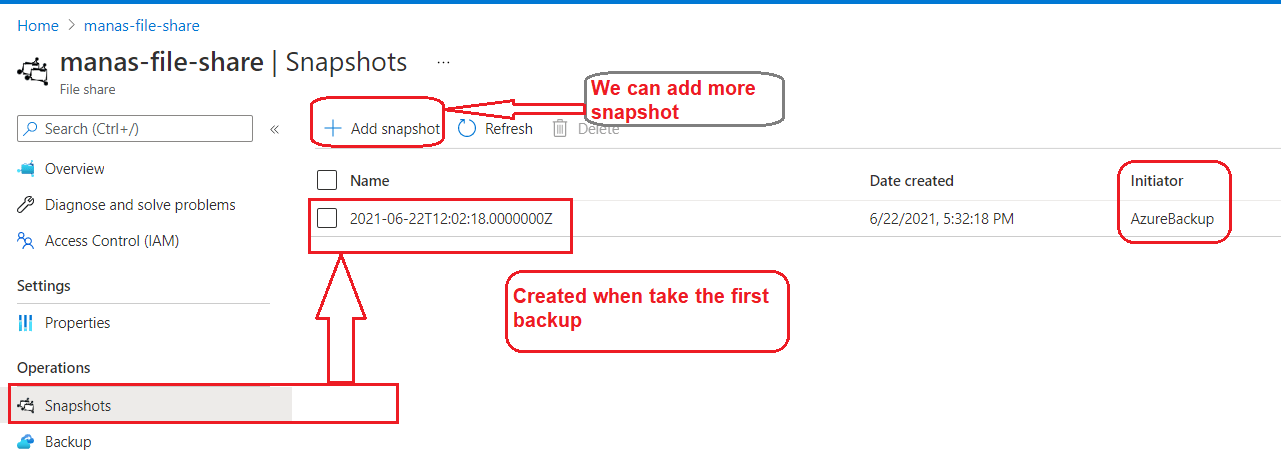
Now we are done with our first BackUp. It generated a snapshot and stored at Snapshot section of the selected File Share as we can see in the following figure.
Restore File Share
Now we will test and see how could we Restore our file from BackUp we have taken. To test that, first we need to delete one file from the current version of file share.
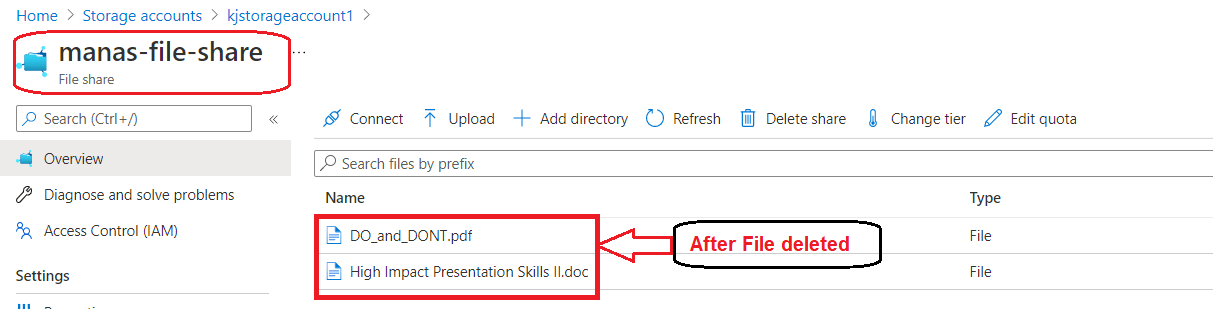
Step 1 – Navigate to the File Share (manas-file-share) for which we have taken a backup and Delete one file from the File Share as showing in the following figure.

As we can see in the following figure, one file is deleted and there are only 2 files remain in the file share.
Step 2 – In the Azure portal, open the Recovery Services vault you used to configure backup for the file share.
Step 3 – In the overview pane, select Backup items under the Protected items section.
Step 3 – Select Backup items, a new pane that lists all backup management types opens next to the overview pane.
Step 4 – In the Backup Items pane, under Backup Management Type, select Azure Storage (Azure Files). You’ll see a list of all the file shares and their corresponding storage accounts backed up by using this vault.
Step 5 – From the list of Azure file shares, select the file share for which you want to perform the restore operation.
We have already done the above 5 step in our above section and respected figures added over there so skips all the figures.
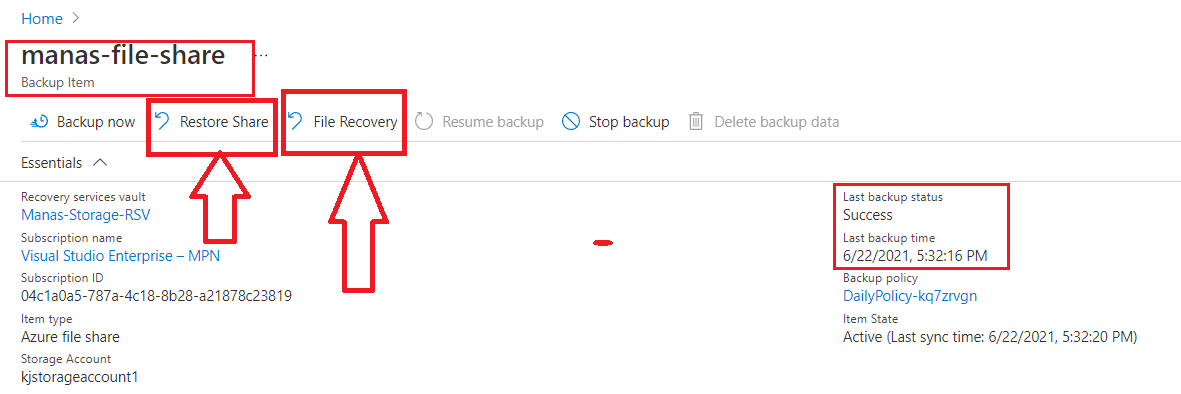
In the above figure, we can see there two following options available to restore.
- File Recovery : we can use this restore option to restore individual files or folders in the original location or an alternate location.
- Restore Share : we can use this restore option to restore complete File Share in the original location or an alternate location.
Step 6 – Here we have selected the File Recovery option as we have deleted one file from our file share so it will be easy for our testing. After selecting File Recovery option, it will open Restore pane as showing in the following figure.
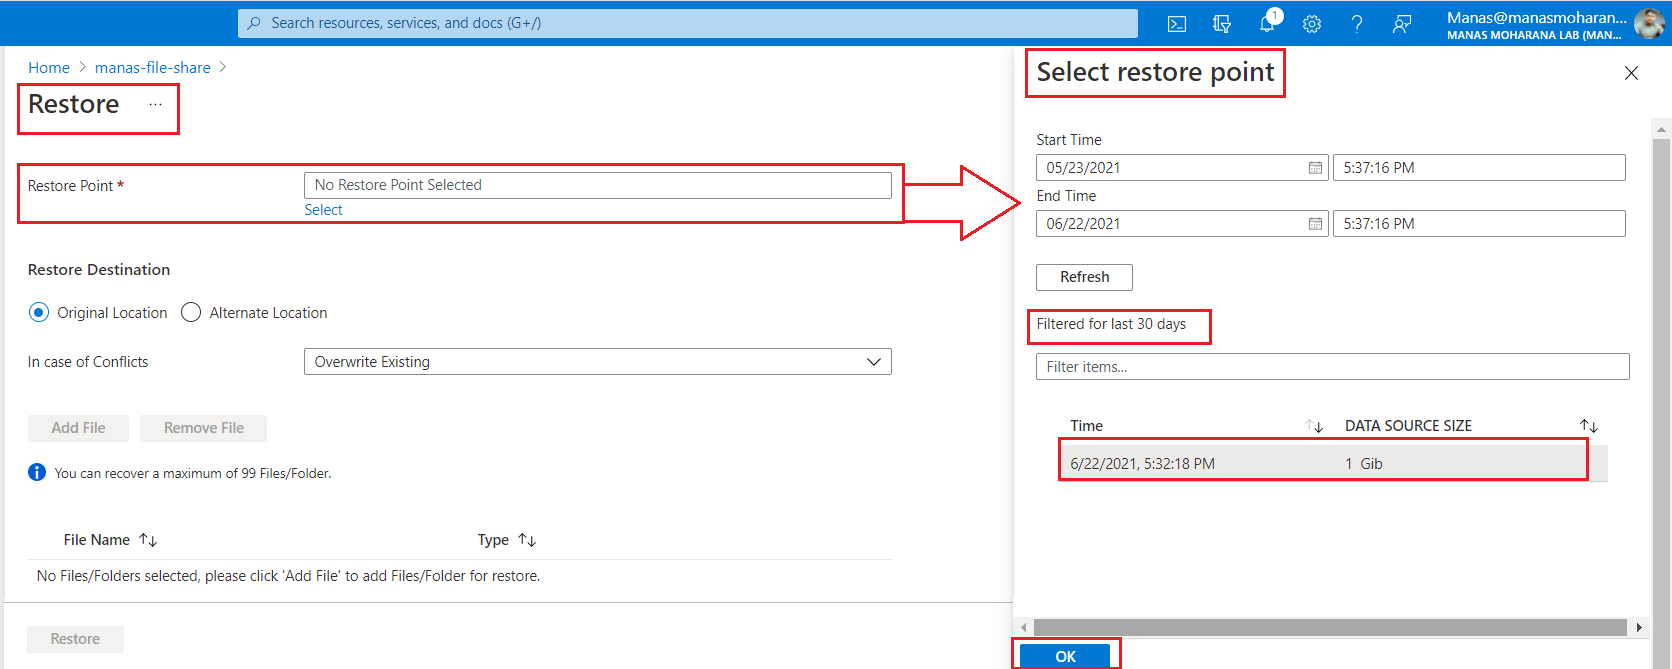
Step 7 – As showing in the above figure, to select the restore point we want to use for performing the restore operation, click the Select link text below the Restore Point text box. The Select Restore Point context pane opens on the right, listing the restore points available for the selected file share. Select the restore point we want to use to perform the restore operation, and select OK.
Step 8 – The next step is to choose the Restore Location. In the Recovery Destination section, we need to specify where or how to restore the data. We can select one of the following two options.
- Original Location: Restore selected files or folders to the same file share as the original source.
- Alternate Location: Restore selected files or folders to an alternate location and keep the original file share contents as is. It will allow to chose Storage Account and File Share where we want to restore the files.
Here in the demo we have used the Original Location option because we have deleted the file from the original location.
Step 9 – let’s select whether to skip or overwrite if there are conflicts, from the In case of conflicts drop-down list. Here I have selected Overwrite.
Step 10 – Click the Add File button to select the files or folders we want to restore. It will open a new pane where it displaying the contents of the file share recovery point we selected for restore as showing in the following figure.
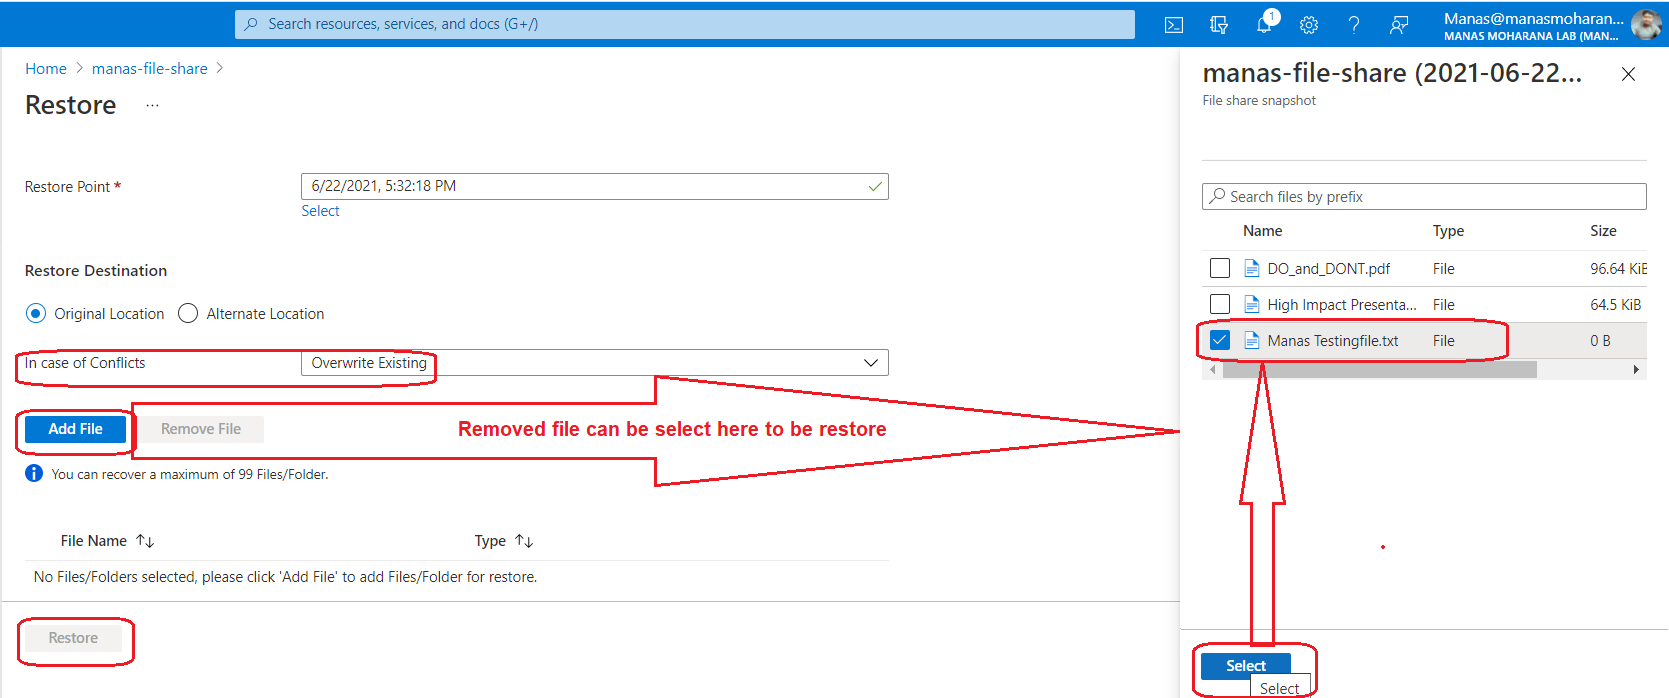
Step 11 – Select the check box that corresponds to the file or folder we want to restore, and click Select as showing in the above figure. we can add multiple files if we want. Here we want to only restore our deleted file so we selected only that deleted file.
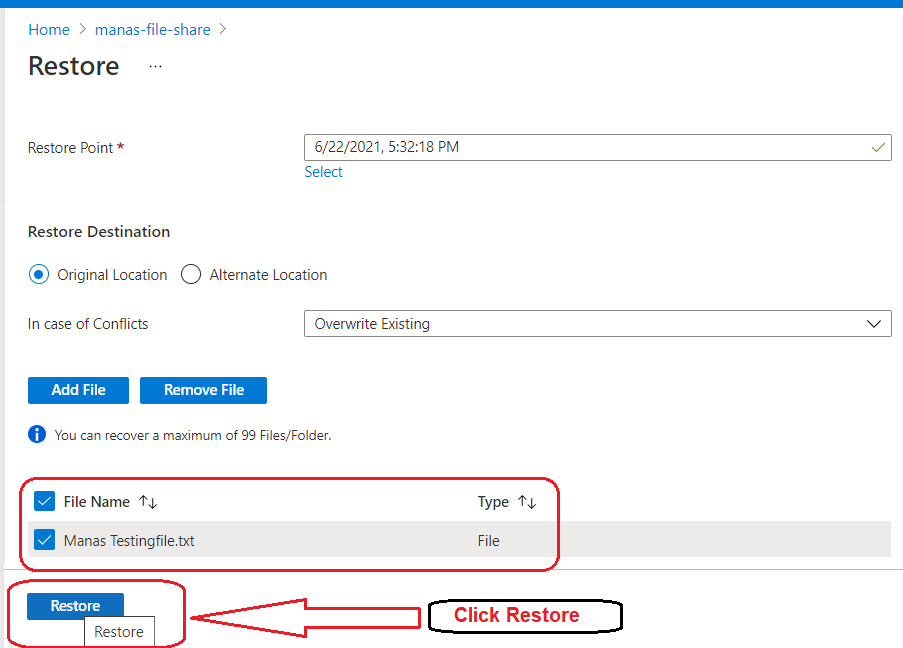
Step 12 – After select all our required items, we want to restore, select Restore button to start the restore operation.
Step 13 – Now the restore operation successfully done. Let’s navigate to our file share to check if the file successfully restored.
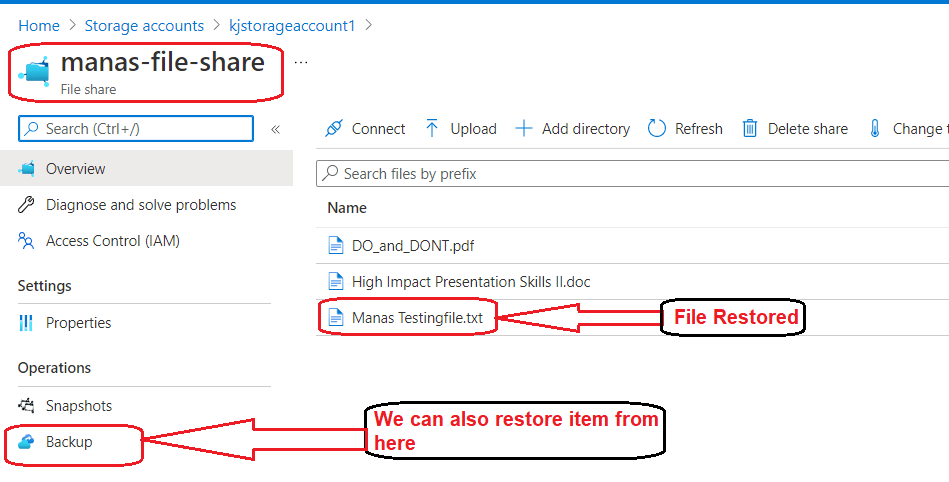
As we can see in the above figure, our deleted file has been restored successfully.
I hope this is informative to you. Please let me know if I missed anything important or if my understanding is not up to the mark. Keep reading, share your thoughts, experiences. Feel free to contact us to discuss more.
Next Article : Part 20 – Azure File Service – BackUp And Restore Azure Files From The File Share Pane
If you have any suggestion / feedback / doubt, you are most welcome. Stay tuned on Knowledge-Junction, will come up with more such articles.
Thanks for reading 🙂 .


5 Responses
[…] our previous articles we have discussed How to configure Recovery Service Vault and BackUp and Restore Azure File share From Recovery Servi…. Today in this article we will discuss How to BackUp and Restore Azure File share From File share […]
[…] Part 19 – Azure File Service – BackUp And Restore Azure Files From Recovery Services Vault […]
[…] Part 19 – Azure File Service – BackUp And Restore Azure Files From Recovery Services Vault […]
[…] Part 19 – Azure File Service – BackUp And Restore Azure Files From Recovery Services Vault […]
[…] Part 19 – Azure File Service – BackUp And Restore Azure Files From Recovery Services Vault […]