Microsoft Azure Storage and Database Part 23 – Azure File Service – Restore Azure Files From Back Up Using PowerShell

Hello Friends,
Hope you all are doing good !!! 🙂 .
In our previous articles we have discussed How To Configure Azure File Share Back Up Using PowerShell. Today in this article we will discuss How To Restore Azure Files From Back Up Using PowerShell.
Tool Installation Articles :
- Configure Azure Command Line Interface ( Azure CLI) On Windows
- Configure PowerShell For Microsoft Azure Az Module On Windows
Previous Azure series :
- Learn Basics Of Azure Networking In 60 Hours
- Learn Basic Of Azure Active Directory And Azure Identity And Access Management
- Azure DevOps – Learn at one place
If you have missed our previous articles on Azure Storage and Database Series, please check it in following links.
Part 1 – Overview Of Azure Storage and Database
Part 2 – Azure Storage Account
Part 4 – Work With Azure Blob Storage
- .
- .
- .
- .
Part 19 – Azure File Service – BackUp And Restore Azure Files From Recovery Services Vault
Part 20 – Azure File Service – BackUp And Restore Azure Files From The File Share Pane
Part 21 – Azure File Service – Create And Manage File Share Snapshots Using PowerShell
Part 22 – Azure File Service – Configure Azure File Share Back Up Using PowerShell
Next Article : Part 24 – Azure File Service – Storage Sync Service
In this article we will discuss, how to restore an entire file share, or specific files, from a restore point created by the Azure Backup service using Azure PowerShell. Without delaying more let’s go through the following steps to restore our file share. As we can see our previous articles, we can restore an entire file share or specific files on the share. We can restore to the original location, or to an alternate location. In this article we will try to restore the file share to it’s original location.
Collect All Recovery Points
First we need to collect all available recovery points for a backup item. Then we will choose the latest one and restore the backup to either same original location or to a alternate location as described in the following steps.
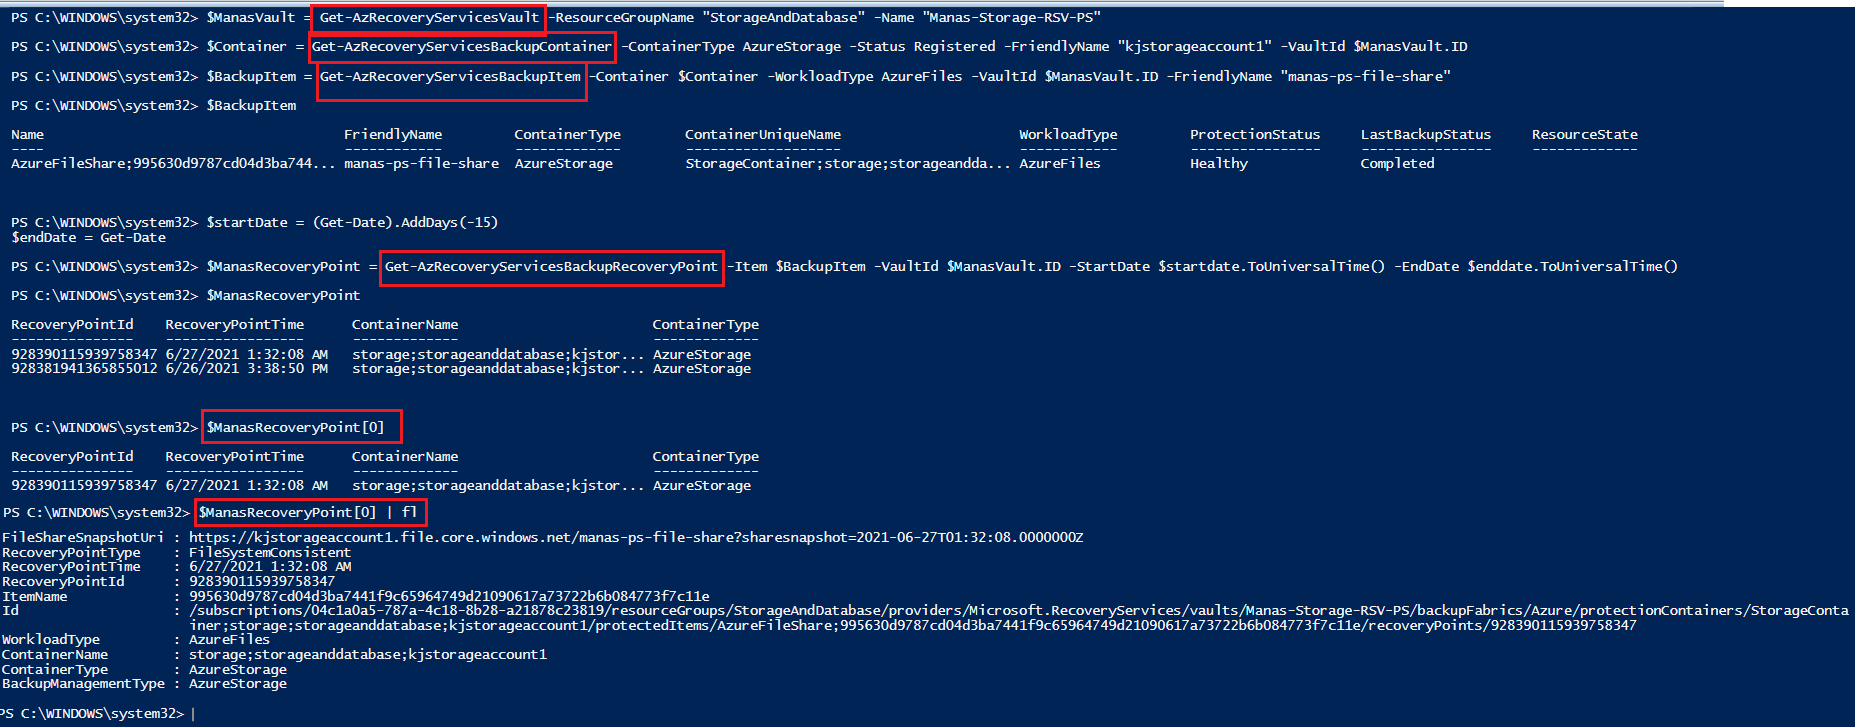
Step 1 – Using Get-AzRecoveryServicesVault cmdlet, we can gets a list of Recovery Services vaults in the current subscription. If we pass resource group name and vault name then we can get a specific Vault and then set its context as showing in the following figure.
Connect-AzAccount
$ManasVault = Get-AzRecoveryServicesVault -ResourceGroupName "StorageAndDatabase" -Name "Manas-Storage-RSV-PS"
Set-AzRecoveryServicesVaultContext -Vault $ManasVault
Step 2 – By Using the Get-AzRecoveryServicesBackupContainer cmdlet, we can get a backup container. A Backup container encapsulates data sources that are modelled as backup items as showig in the following example.
$Container = Get-AzRecoveryServicesBackupContainer -ContainerType AzureStorage -Status Registered -FriendlyName "kjstorageaccount1" -VaultId $ManasVault.ID
Step 3 – The Get-AzRecoveryServicesBackupItem cmdlet gets the list of protected items in a container and the protection status of the items. A container that is registered to an Azure Recovery Services vault can have one or more items that can be protected. Here in the following example, we are getting our BackUp Item.
$BackupItem = Get-AzRecoveryServicesBackupItem -Container $Container -WorkloadType AzureFiles -VaultId $ManasVault.ID -FriendlyName "manas-ps-file-share"
Step 4 – The Get-AzRecoveryServicesBackupRecoveryPoint cmdlet gets the recovery points for a backed up Azure Backup item. After an item has been backed up, an AzureRmRecoveryServicesBackupRecoveryPoint object has one or more recovery points. Here we are getting all recovery points from last 15 days.
$startDate = (Get-Date).AddDays(-15)
$endDate = Get-Date
$ManasRecoveryPoint = Get-AzRecoveryServicesBackupRecoveryPoint -Item $BackupItem -VaultId $ManasVault.ID -StartDate $startdate.ToUniversalTime() -EndDate $enddate.ToUniversalTime()$ManasRecoveryPoint[0] | fl
Restore File Share from BackUp
Following figure showing the details of files in the file share before taking backup.
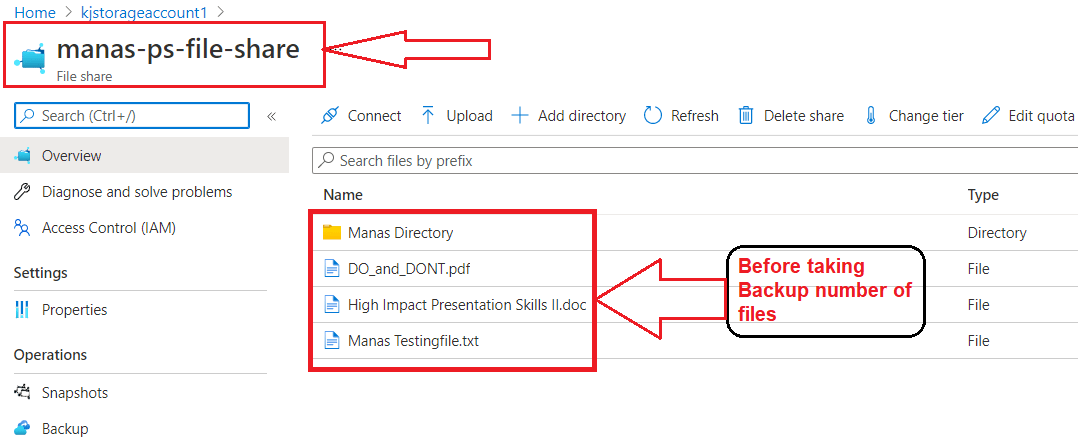
Flowing figure showing the file details after taking the backup. 3 files has been deleted since the last backup taken. We need to restore them in this section.

In the above section we, have collected all data we required to restore the backup. As we discussed above that, we can restore an entire file share or specific files on the share. We can restore to the original location, or to an alternate location. In this article we will restore the file share to it’s original location and will override if there is any conflict. So let’s go through the following use cases.
Case 1 – Using Restore-AzRecoveryServicesBackupItemcommand we can restore file share from the backup. As showing in the following example.
Restore-AzRecoveryServicesBackupItem -RecoveryPoint $ManasRecoveryPoint[0] -ResolveConflict Overwrite
When we execute the above command, we got one error in our powershell window. In our following article we have resolved that error and execute the above command again and as we can see in the following figure we completed successfully.
Error and Solution Link: Issue In Azure Restore – Restore-AzRecoveryServicesBackupItem : Set vault context first using cmdlet Set-AzRecoveryServicesVaultContext


As we can see in the above figure, we have successfully restored all our deleted files.
Case 2 – Using Restore-AzRecoveryServicesBackupItemcommand we can restore a specific file of file share from the backup as showing in the following example.
Restore-AzRecoveryServicesBackupItem -RecoveryPoint $ManasRecoveryPoint[0] -SourceFileType File -SourceFilePath "Manas Testingfile.txt" -ResolveConflict Overwrite
Case 3 – Using the Restore-AzRecoveryServicesBackupItem command and by passing the path of all files we want to restore as a value for the MultipleSourceFilePath parameter we can Restore Multiple Files original or alternate location as in following example.
$files = ("FileSharePage.png", "MyTestFile.txt")
Restore-AzRecoveryServicesBackupItem -RecoveryPoint $ManasRecoveryPoint[0] -MultipleSourceFilePath $files -SourceFileType File -ResolveConflict Overwrite -VaultId $ManasVault.ID -VaultLocation $ManasVault.Location
Case 4 – Using the Restore-AzRecoveryServicesBackupItem command and by passing the path of all folder we want to restore as a value for the MultipleSourceFilePath parameter we can Restore Multiple Folders original or alternate location as in following example.
$files = ("Manas Derectory","Manas_restore")
Restore-AzRecoveryServicesBackupItem -RecoveryPoint $ManasRecoveryPoint[0] -MultipleSourceFilePath $files -SourceFileType Directory -ResolveConflict Overwrite -VaultId $ManasVault.ID -VaultLocation $ManasVault.Location
To restore Azure file share to an alternate location, we need to pass few more parameters. As per Microsoft documentation following are the parameters need to set if we are restoring our backup to a different location instead of it’s original location.
- TargetStorageAccountName: The storage account to which the backed-up content is restored. The target storage account must be in the same location as the vault.
- TargetFileShareName: The file shares within the target storage account to which the backed-up content is restored.
- TargetFolder: The folder under the file share to which data is restored. If the backed-up content is to be restored to a root folder, give the target folder values as an empty string.
- SourceFilePath: The absolute path of the file, to be restored within the file share, as a string. This path is the same path used in the Get-AzStorageFile PowerShell cmdlet.
- SourceFileType: Whether a directory or a file is selected. Accepts Directory or File.
- ResolveConflict: Instruction if there’s a conflict with the restored data. Accepts Overwrite or Skip.
Case 5 – By using the Restore-AzRecoveryServicesBackupItem we can restore the selected recovery point by specifying these parameters to identify the alternate location
Restore-AzRecoveryServicesBackupItem -RecoveryPoint $ManasRecoveryPoint[0] -TargetStorageAccountName "2ndkjstorageaccount1" -TargetFileShareName "other-file-share" -TargetFolder "Manas Directory2" -ResolveConflict Overwrite
Case 6 – By using the Restore-AzRecoveryServicesBackupItem we can restore the selected recovery point by specifying these parameters to identify the alternate location, and to uniquely identify the file we want to restore as showing in the following example.
Restore-AzRecoveryServicesBackupItem -RecoveryPoint $ManasRecoveryPoint[0] -TargetStorageAccountName "2ndkjstorageaccount1" -TargetFileShareName "other-file-share" -TargetFolder "Manas Directory2" -SourceFileType File -SourceFilePath "Manas Testingfile.txt" -ResolveConflict Overwrite
Next Article : Part 24 – Azure File Service – Storage Sync Service
I hope this is informative to you. Please let me know if I missed anything important or if my understanding is not up to the mark. Keep reading, share your thoughts, experiences. Feel free to contact us to discuss more.
If you have any suggestion / feedback / doubt, you are most welcome. Stay tuned on Knowledge-Junction, will come up with more such articles.
Thanks for reading 🙂 .


6 Responses
[…] one of our previous articles we have discussed In our previous articles we have discussed How To Restore Azure File Share From BackUp Using PowerShell. Today in this article we will discuss How To Address One issue Raised During Register Recovery […]
[…] one of our previous articles we have discussed How To Restore Azure File Share From BackUp Using PowerShell. Today in this article we will discuss One Very Useful Azure Storage Sync […]
[…] Part 23 – Azure File Service – Restore Azure Files From Back Up Using PowerShell […]
[…] Part 23 – Azure File Service – Restore Azure Files From Back Up Using PowerShell […]
[…] Part 23 – Azure File Service – Restore Azure Files From Back Up Using PowerShell […]
[…] Part 23 – Azure File Service – Restore Azure Files From Back Up Using PowerShell […]